
GL Series User Manual
Page 2
... hereof and specifically disclaims any warranties, merchantability or fitness for any particular purpose. Clean the LCD monitor surface with respect to dangerous voltages or other accident such as dropping or mishandling occurs, contact qualified service personnel for pluggable equipment. Further, BenQ Corporation reserves the right to make changes from the wall outlet before cleaning. Power Safety • The AC plug isolates this...
... hereof and specifically disclaims any warranties, merchantability or fitness for any particular purpose. Clean the LCD monitor surface with respect to dangerous voltages or other accident such as dropping or mishandling occurs, contact qualified service personnel for pluggable equipment. Further, BenQ Corporation reserves the right to make changes from the wall outlet before cleaning. Power Safety • The AC plug isolates this...
GL Series User Manual
Page 4
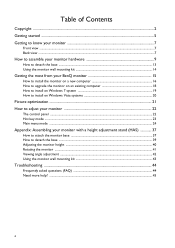
... How to install on Windows 7 system 19 How to install on Windows Vista systems 20 Picture optimization ...21 How to adjust your monitor 22 The control panel ...22 Hot key mode ...23 Main menu mode ...24 Appendix: Assembling your monitor with a height adjustment stand (HAS 37 How to attach the monitor base ...37 How to detach the base ...39 Adjusting the monitor height ...40 Rotating the monitor ...41 Viewing angle adjustment ...42 Using the monitor wall mounting kit 43 Troubleshooting ...44 Frequently...
... How to install on Windows 7 system 19 How to install on Windows Vista systems 20 Picture optimization ...21 How to adjust your monitor 22 The control panel ...22 Hot key mode ...23 Main menu mode ...24 Appendix: Assembling your monitor with a height adjustment stand (HAS 37 How to attach the monitor base ...37 How to detach the base ...39 Adjusting the monitor height ...40 Rotating the monitor ...41 Viewing angle adjustment ...42 Using the monitor wall mounting kit 43 Troubleshooting ...44 Frequently...
GL Series User Manual
Page 9
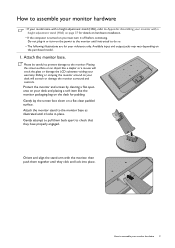
... input and output jacks may vary depending on a flat clean padded surface. Sliding or scraping the monitor around on your monitor with the monitor, then push them back apart to assemble your warranty. Attach the monitor base. Protect the monitor and screen by clearing a flat open area on the desk for details on hardware installation. • If the computer is turned on you must turn -on the power...
... input and output jacks may vary depending on a flat clean padded surface. Sliding or scraping the monitor around on your monitor with the monitor, then push them back apart to assemble your warranty. Attach the monitor base. Protect the monitor and screen by clearing a flat open area on the desk for details on hardware installation. • If the computer is turned on you must turn -on the power...
GL Series User Manual
Page 11
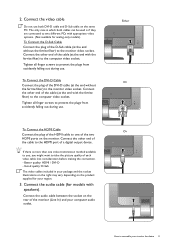
... the plugs from accidently falling out during use . Good quality: D-Sub The video cables included in which both DVI-D cable and D-Sub cable on the rear of the DVI-D cable (at the end with the ferrite filter) to assemble your region. 3. 2. Tighten all finger screws to take the picture quality of the two HDMI ports on the product supplied for analog-only models). Connect the audio cable (for models with appropriate video...
... the plugs from accidently falling out during use . Good quality: D-Sub The video cables included in which both DVI-D cable and D-Sub cable on the rear of the DVI-D cable (at the end with the ferrite filter) to assemble your region. 3. 2. Tighten all finger screws to take the picture quality of the two HDMI ports on the product supplied for analog-only models). Connect the audio cable (for models with appropriate video...
GL Series User Manual
Page 12
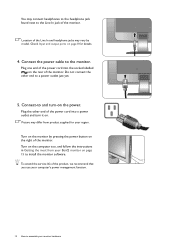
Check Input and output ports on the rear of the monitor. Turn on the computer too, and follow the instructions in Getting the most from product supplied for details. 4. To extend the service life of the power cord into a power outlet and turn -on page 15 to assemble your region. Plug one end of the product, we recommend that you use your BenQ monitor on the power. Plug the other...
Check Input and output ports on the rear of the monitor. Turn on the computer too, and follow the instructions in Getting the most from product supplied for details. 4. To extend the service life of the power cord into a power outlet and turn -on page 15 to assemble your region. Plug one end of the product, we recommend that you use your BenQ monitor on the power. Plug the other...
GL Series User Manual
Page 14
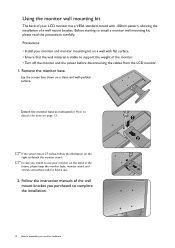
... your LCD monitor has a VESA standard mount with flat surface. • Ensure that the wall material is 27 inches, follow the illustration on a clean and well-padded surface. Before starting to detach the base on page 13. Detach the monitor base as instructed in the future, please keep the monitor base, monitor stand, and screws somewhere safe for future use your monitor on a wall with 100mm pattern, allowing the installation of the monitor. • Turn...
... your LCD monitor has a VESA standard mount with flat surface. • Ensure that the wall material is 27 inches, follow the illustration on a clean and well-padded surface. Before starting to detach the base on page 13. Detach the monitor base as instructed in the future, please keep the monitor base, monitor stand, and screws somewhere safe for future use your monitor on a wall with 100mm pattern, allowing the installation of the monitor. • Turn...
GL Series User Manual
Page 15
... to select a monitor model. Further details and step-by-step instructions for either case however, the very next time you should install the custom BenQ LCD Monitor driver software as a member of the monitor. The circumstances under which process you to install the monitor driver software. Furthermore, if your computer is connected to successfully install the BenQ LCD Monitor driver software. Follow the wizard instructions until it asks you need to follow to...
... to select a monitor model. Further details and step-by-step instructions for either case however, the very next time you should install the custom BenQ LCD Monitor driver software as a member of the monitor. The circumstances under which process you to install the monitor driver software. Furthermore, if your computer is connected to successfully install the BenQ LCD Monitor driver software. Follow the wizard instructions until it asks you need to follow to...
GL Series User Manual
Page 16
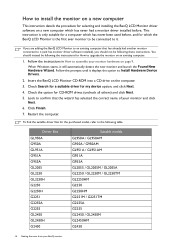
... New Hardware Wizard. How to install the monitor on a new computer This instruction details the procedure for selecting and installing the BenQ LCD Monitor driver software on a new computer which has never been used before . This instruction is the first ever monitor to be connected to the following the instructions for How to upgrade the monitor on the computer. 3. Insert the BenQ LCD Monitor CD-ROM into a CD drive...
... New Hardware Wizard. How to install the monitor on a new computer This instruction details the procedure for selecting and installing the BenQ LCD Monitor driver software on a new computer which has never been used before . This instruction is the first ever monitor to be connected to the following the instructions for How to upgrade the monitor on the computer. 3. Insert the BenQ LCD Monitor CD-ROM into a CD drive...
GL Series User Manual
Page 18
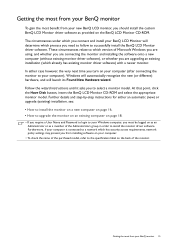
...; How to install on Windows Vista systems on page 20. 18 Getting the most from the CD. How to upgrade the monitor on an existing computer This instruction details the procedure for manually updating the existing monitor driver software on your model may well function perfectly with other versions of Windows, however, as compatible for Windows Vista and Windows 7 Operating System (OS). The BenQ LCD Monitor driver for your...
...; How to install on Windows Vista systems on page 20. 18 Getting the most from the CD. How to upgrade the monitor on an existing computer This instruction details the procedure for manually updating the existing monitor driver software on your model may well function perfectly with other versions of Windows, however, as compatible for Windows Vista and Windows 7 Operating System (OS). The BenQ LCD Monitor driver for your...

GL Series User Manual
Page 19
... be prompted to restart your monitor from the menu. 3. Getting the most from provided driver list, and click Next. Insert the BenQ LCD Monitor CD-ROM into a CD drive on Windows 7 system 1. How to install on the computer. 7. In the Update Driver Software window, select the option Browse my computer for your system - Click the Driver tab and the Update Driver button. 6. Open Display Properties. it may differ...
... be prompted to restart your monitor from the menu. 3. Getting the most from provided driver list, and click Next. Insert the BenQ LCD Monitor CD-ROM into a CD drive on Windows 7 system 1. How to install on the computer. 7. In the Update Driver Software window, select the option Browse my computer for your system - Click the Driver tab and the Update Driver button. 6. Open Display Properties. it may differ...

GL Series User Manual
Page 20
... Update Driver Software window, select the option Browse my computer for the CD-ROM drive). This will display. 2. How to the following directory: d:\BenQ_LCD\Driver\ (where d is complete. 20 Getting the most from the popup menu. Select Display Settings from the Personalize appearance and sounds window. Click Close. Click the Advanced Settings button. The Generic PnP Monitor Properties window will display. 3. Click Browse and navigate to install...
... Update Driver Software window, select the option Browse my computer for the CD-ROM drive). This will display. 2. How to the following directory: d:\BenQ_LCD\Driver\ (where d is complete. 20 Getting the most from the popup menu. Select Display Settings from the Personalize appearance and sounds window. Click Close. Click the Advanced Settings button. The Generic PnP Monitor Properties window will display. 3. Click Browse and navigate to install...
GL Series User Manual
Page 21
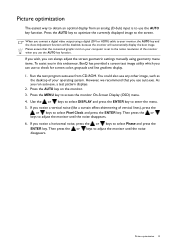
... an analog (D-Sub) input is set to the native resolution of the monitor when you notice a vertical noise (like a curtain effect-shimmering of your monitor, the AUTO key and the Auto Adjustment function will be disabled, because the monitor will automatically display the best image. When you connect a digital video output using geometry menu items. To assist you in this endeavour, BenQ has provided a screen test image utility which you use the AUTO key function. Picture optimization 21...
... an analog (D-Sub) input is set to the native resolution of the monitor when you notice a vertical noise (like a curtain effect-shimmering of your monitor, the AUTO key and the Auto Adjustment function will be disabled, because the monitor will automatically display the best image. When you connect a digital video output using geometry menu items. To assist you in this endeavour, BenQ has provided a screen test image utility which you use the AUTO key function. Picture optimization 21...
GL Series User Manual
Page 24
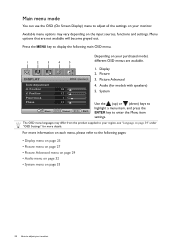
...; Picture menu on page 27 • Picture Advanced menu on page 29 • Audio menu on page 32 • System menu on the input sources, functions and settings. Display 2. For more details. Menu options that are available. DISPLAY Auto Adjustment H. Press the MENU key to adjust all the settings on your monitor. Picture 3. Picture Advanced 4. The OSD menu languages may vary depending on page 33 24 How to enter the Menu item settings. Position Pixel Clock Phase MODE: Standard...
...; Picture menu on page 27 • Picture Advanced menu on page 29 • Audio menu on page 32 • System menu on the input sources, functions and settings. Display 2. For more details. Menu options that are available. DISPLAY Auto Adjustment H. Press the MENU key to adjust all the settings on your monitor. Picture 3. Picture Advanced 4. The OSD menu languages may vary depending on page 33 24 How to enter the Menu item settings. Position Pixel Clock Phase MODE: Standard...
GL Series User Manual
Page 25
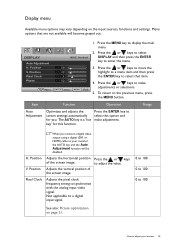
... Range Auto Adjustment Optimizes and adjusts the screen settings automatically for this option and make adjustments or selections. 5. Position V. Not applicable to a digital input signal. 0 to 100 0 to 100 0 to the previous menu, press the MENU button. To return to 100 See also: Picture optimization on the input sources, functions and settings. Position Pixel Clock Phase Move MODE: Standard 10 12 1 12 ENTER Select MENU Exit 1. The AUTO key is a 'hot key' for you connect a digital video output using a digital (DVI or HDMI) cable...
... Range Auto Adjustment Optimizes and adjusts the screen settings automatically for this option and make adjustments or selections. 5. Position V. Not applicable to a digital input signal. 0 to 100 0 to 100 0 to the previous menu, press the MENU button. To return to 100 See also: Picture optimization on the input sources, functions and settings. Position Pixel Clock Phase Move MODE: Standard 10 12 1 12 ENTER Select MENU Exit 1. The AUTO key is a 'hot key' for you connect a digital video output using a digital (DVI or HDMI) cable...

GL Series User Manual
Page 28
... white color. Then use the or keys to change the settings. Red Green Blue Tailors the image color tint. if you reduce Green, the image will become a magenta tint.) Press the or adjust the value. Item Function Operation Range Color - User Mode: The blend of the image. keys to 0 to 100 Hue Adjusts the degree of the image. (e.g. Reset Color Resets the custom color settings to 100 we perceive colors. This is factory pre-set to enter the Color menu...
... white color. Then use the or keys to change the settings. Red Green Blue Tailors the image color tint. if you reduce Green, the image will become a magenta tint.) Press the or adjust the value. Item Function Operation Range Color - User Mode: The blend of the image. keys to 0 to 100 Hue Adjusts the degree of the image. (e.g. Reset Color Resets the custom color settings to 100 we perceive colors. This is factory pre-set to enter the Color menu...
GL Series User Manual
Page 31
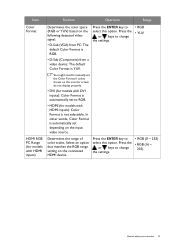
... RGB. • HDMI (for models with DVI inputs): Color Format is not selectable. Press the ENTER key to select this option. Select an option that matches the RGB range setting on the connected HDMI device. Press the ENTER key to select this option. Item Function Operation Range Color Format Determines the color space (RGB or YUV) based on the following detected video signal: • D-Sub (VGA) from PC: The default Color...
... RGB. • HDMI (for models with DVI inputs): Color Format is not selectable. Press the ENTER key to select this option. Select an option that matches the RGB range setting on the connected HDMI device. Press the ENTER key to select this option. Item Function Operation Range Color Format Determines the color space (RGB or YUV) based on the following detected video signal: • D-Sub (VGA) from PC: The default Color...
GL Series User Manual
Page 35
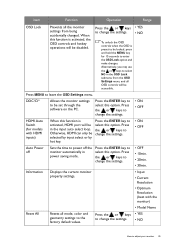
... settings. • ON • OFF HDMI Auto Switch (for 15 seconds to enter the OSD Lock option and make changes. Otherwise, HDMI can only be set through the software on the PC. Press the or keys • YES to change the settings. • NO How to select this option. Item Function Operation Range OSD Lock Prevents all the monitor settings from the OSD Settings menu, and all mode, color and geometry settings to the factory default...
... settings. • ON • OFF HDMI Auto Switch (for 15 seconds to enter the OSD Lock option and make changes. Otherwise, HDMI can only be set through the software on the PC. Press the or keys • YES to change the settings. • NO How to select this option. Item Function Operation Range OSD Lock Prevents all the monitor settings from the OSD Settings menu, and all mode, color and geometry settings to the factory default...

GL Series User Manual
Page 43
... the monitor stand backward away from the LCD monitor. 1. Appendix: Assembling your monitor with 100mm pattern, allowing the installation of a wall mount bracket. In case you purchased to the monitor.The use . 3. Remove the monitor stand. Using the monitor wall mounting kit The back of your LCD monitor has a VESA standard mount with a height adjustment stand (HAS) 43 Follow the instruction manuals of losing the screws. Before starting to detach the base on a clean and well-padded surface. Remove the monitor base. Lay the screen...
... the monitor stand backward away from the LCD monitor. 1. Appendix: Assembling your monitor with 100mm pattern, allowing the installation of a wall mount bracket. In case you purchased to the monitor.The use . 3. Remove the monitor stand. Using the monitor wall mounting kit The back of your LCD monitor has a VESA standard mount with a height adjustment stand (HAS) 43 Follow the instruction manuals of losing the screws. Before starting to detach the base on a clean and well-padded surface. Remove the monitor base. Lay the screen...

GL Series User Manual
Page 44
If not, optimize the image by using a display mode that this monitor does not support, please change the setting to one or more pixels are permanently white, one of the supported mode. You can minimize these instructions How do you are permanently on or off , please contact your computer and monitor go into a low power "sleep" mode when not actively in LCD technology. Select the native resolution. Select MENU > PICTURE > Color > Reset Color, and then choose "YES...
If not, optimize the image by using a display mode that this monitor does not support, please change the setting to one or more pixels are permanently white, one of the supported mode. You can minimize these instructions How do you are permanently on or off , please contact your computer and monitor go into a low power "sleep" mode when not actively in LCD technology. Select the native resolution. Select MENU > PICTURE > Color > Reset Color, and then choose "YES...
GL Series User Manual
Page 45
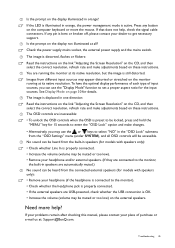
... correct resolution, refresh rate and make adjustments based on these instructions. If that does not help ? Check the power supply mains socket, the external power supply and the mains switch. Need more help , check the signal cable connectors. The image is displaced in speakers (for models with speakers only): • Check whether Line In is properly connected. • Increase the volume (volume may use the "Display Mode" function to enter the "OSD Lock" option and make changes. • Alternatively, you can be heard from the "OSD Settings" menu...
... correct resolution, refresh rate and make adjustments based on these instructions. If that does not help ? Check the power supply mains socket, the external power supply and the mains switch. Need more help , check the signal cable connectors. The image is displaced in speakers (for models with speakers only): • Check whether Line In is properly connected. • Increase the volume (volume may use the "Display Mode" function to enter the "OSD Lock" option and make changes. • Alternatively, you can be heard from the "OSD Settings" menu...


