
User Manual
Page 2
...objects or spill liquid of power available, consult your monitor from the type of such revision or changes. If any form or by BENQ Corporation. Further, BENQ Corporation reserves the right to the contents hereof and ...specifically disclaims any warranties, merchantability or fitness for ventilation. iv Care And Cleaning • Cleaning. They must not be operated from the wall outlet before cleaning. Always unplug your dealer or local power company. Clean the LCD monitor...
...objects or spill liquid of power available, consult your monitor from the type of such revision or changes. If any form or by BENQ Corporation. Further, BENQ Corporation reserves the right to the contents hereof and ...specifically disclaims any warranties, merchantability or fitness for ventilation. iv Care And Cleaning • Cleaning. They must not be operated from the wall outlet before cleaning. Always unplug your dealer or local power company. Clean the LCD monitor...

User Manual
Page 5
1 Getting started 5 BenQ LCD Monitor Quick Start Guide CD-ROM Disk Power cord Signal cable: D-Sub Adapter Signal cable: DVI-D Getting started When unpacking please check you have the following items. If they are missing or are damaged, please immediately contact the dealer at which you purchased the goods.
1 Getting started 5 BenQ LCD Monitor Quick Start Guide CD-ROM Disk Power cord Signal cable: D-Sub Adapter Signal cable: DVI-D Getting started When unpacking please check you have the following items. If they are missing or are damaged, please immediately contact the dealer at which you purchased the goods.

User Manual
Page 8
Adjust LCD monitor's angle to your monitor hardware Make sure that the computer and monitor's power are both turned off. 3 How to install your best comfort. 3. Tilt back and turn LCD monitor to install your monitor hardware Connect D-Sub cable to the LCD monitor. 8 How to install your LCD monitor. 1. Please follow these seven steps to the right. 2.
Adjust LCD monitor's angle to your monitor hardware Make sure that the computer and monitor's power are both turned off. 3 How to install your best comfort. 3. Tilt back and turn LCD monitor to install your monitor hardware Connect D-Sub cable to the LCD monitor. 8 How to install your LCD monitor. 1. Please follow these seven steps to the right. 2.

User Manual
Page 9
Connect audio cable to the signal connector of your computer. 7. Connect power cord to your LCD monitor. 5. Connect the other end of signal cable to your computer. How to your monitor hardware 9 Connect the power cord to install your LCD monitor. 6. Connect DVI-D cable to an AC power socket. 4.
Connect audio cable to the signal connector of your computer. 7. Connect power cord to your LCD monitor. 5. Connect the other end of signal cable to your computer. How to your monitor hardware 9 Connect the power cord to install your LCD monitor. 6. Connect DVI-D cable to an AC power socket. 4.

User Manual
Page 10
... you start on this page. Windows 2000, turn to page 33. Windows XP turn to page 20. Insert "BenQ LCD Monitor" CD-ROM into your monitor's software 4 How to install your monitor's software You need to set up the correct monitor driver to suit your operating system. To set up Windows 95, start Windows with a new... monitor, the system will detect it and automatically install the driver for plug and play displays. Windows 95. Click "Start" then "Settings". 10 How to install ...
... you start on this page. Windows 2000, turn to page 33. Windows XP turn to page 20. Insert "BenQ LCD Monitor" CD-ROM into your monitor's software 4 How to install your monitor's software You need to set up the correct monitor driver to suit your operating system. To set up Windows 95, start Windows with a new... monitor, the system will detect it and automatically install the driver for plug and play displays. Windows 95. Click "Start" then "Settings". 10 How to install ...

User Manual
Page 20
Insert "BenQ LCD Monitor" CD-ROM into your monitor's software Click "Start" then "Settings". 3. Windows 2000. Carry out the instructions beginning at step 4. 1. Open the Control Panel and double click on the "Display" icon. 20 How to install your CD-ROM Driver. 2. The first time you start Windows with a new monitor, the system will detect it and automatically start the "Add New Hardware Wizard".
Insert "BenQ LCD Monitor" CD-ROM into your monitor's software Click "Start" then "Settings". 3. Windows 2000. Carry out the instructions beginning at step 4. 1. Open the Control Panel and double click on the "Display" icon. 20 How to install your CD-ROM Driver. 2. The first time you start Windows with a new monitor, the system will detect it and automatically start the "Add New Hardware Wizard".
User Manual
Page 26
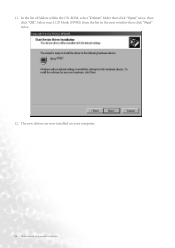
The new drivers are now installed on your computer. 26 How to install your LCD Mode (FP992) from the list in the next window then click "Next" twice. 12. 11. Select your monitor's software In the list of folders within the CD-ROM, select "Drivers" folder then click "Open" twice, then click "OK".
The new drivers are now installed on your computer. 26 How to install your LCD Mode (FP992) from the list in the next window then click "Next" twice. 12. 11. Select your monitor's software In the list of folders within the CD-ROM, select "Drivers" folder then click "Open" twice, then click "OK".

User Manual
Page 30
Click "Have disk" and then click "Browse...". 9. Enter "Drivers" folder to match your monitor's software 8. Click "OK". 30 How to install your CD-ROM driver if it is not drive D). Insert "BenQ LCD Monitor's CD" into your CD-ROM and type d:\ (change the driver letter to select the model from the list left.
Click "Have disk" and then click "Browse...". 9. Enter "Drivers" folder to match your monitor's software 8. Click "OK". 30 How to install your CD-ROM driver if it is not drive D). Insert "BenQ LCD Monitor's CD" into your CD-ROM and type d:\ (change the driver letter to select the model from the list left.
User Manual
Page 47
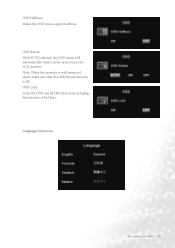
OSD Halftone: Makes the OSD menu appear halftone. OSD Rotate: With AUTO selected, the OSD menu will automatically rotates in the same way as the LCD monitor. Note: When the monitor is wall mounted, please make sure that the OSD Rotate function is off. OSD Lock: Locks the OSD and all OSD functions including deactivation of hot keys. Languages Sub menu How to adjust your Monitor 47
OSD Halftone: Makes the OSD menu appear halftone. OSD Rotate: With AUTO selected, the OSD menu will automatically rotates in the same way as the LCD monitor. Note: When the monitor is wall mounted, please make sure that the OSD Rotate function is off. OSD Lock: Locks the OSD and all OSD functions including deactivation of hot keys. Languages Sub menu How to adjust your Monitor 47


