

User Manual
Page 2
...easily accessible. • This product should be reproduced, transmitted, transcribed, stored in the contents hereof without the prior written permission of BenQ Corporation. They must not be operated from time to time in a retrieval system or translated into this publication and to dangerous voltages ...to notify any person of such revision or changes. All rights reserved. Further, BenQ Corporation reserves the right to revise this product. Always unplug your dealer or local power company. Avoid using any of the cabinet are not sure of the type of power available, consult...
...easily accessible. • This product should be reproduced, transmitted, transcribed, stored in the contents hereof without the prior written permission of BenQ Corporation. They must not be operated from time to time in a retrieval system or translated into this publication and to dangerous voltages ...to notify any person of such revision or changes. All rights reserved. Further, BenQ Corporation reserves the right to revise this product. Always unplug your dealer or local power company. Avoid using any of the cabinet are not sure of the type of power available, consult...
User Manual
Page 3
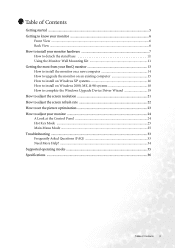
... your monitor 6 Front View ...6 Back View ...6 How to install your monitor hardware 7 How to detach the stand base 10 Using the Monitor Wall Mounting Kit 11 Getting the most from your BenQ monitor 13 How to install the monitor on a new computer 14 How to upgrade the monitor on an existing computer...
... your monitor 6 Front View ...6 Back View ...6 How to install your monitor hardware 7 How to detach the stand base 10 Using the Monitor Wall Mounting Kit 11 Getting the most from your BenQ monitor 13 How to install the monitor on a new computer 14 How to upgrade the monitor on an existing computer...
User Manual
Page 8
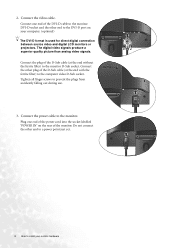
... not connect the other plug of the D-Sub cable (at the end with the ferrite filter) to prevent the plugs from accidently falling out during use. 3. Connect the plug of the D-Sub cable (at the end without the ferrite filter) to the DVI-D port on the rear of the DVI-D ... the other end to a power point just yet. 8 How to the monitor. 2. Connect the power cable to install your computer. (optional) The DVI-D format is used for direct digital connection between source video and digital LCD monitors or projectors. Connect one end of the power cord into the socket labelled 'POWER...
... not connect the other plug of the D-Sub cable (at the end with the ferrite filter) to prevent the plugs from accidently falling out during use. 3. Connect the plug of the D-Sub cable (at the end without the ferrite filter) to the DVI-D port on the rear of the DVI-D ... the other end to a power point just yet. 8 How to the monitor. 2. Connect the power cable to install your computer. (optional) The DVI-D format is used for direct digital connection between source video and digital LCD monitors or projectors. Connect one end of the power cord into the socket labelled 'POWER...

User Manual
Page 11
...LCD monitor. 1. Detach the monitor base as instructed in the future, please keep the monitor base, monitor stand, and screws somewhere safe for future use your monitor on a clean and well-padded surface. Precautions: • Install your monitor and monitor mounting kit on a wall with 100mm pattern, ...on the stand in "How to avoid of losing the screws. How to install a monitor wall mounting kit, please read the precautions carefully. Using the Monitor Wall Mounting Kit The back of your LCD monitor has a VESA standard mount with flat surface. • Ensure that fixing the ...
...LCD monitor. 1. Detach the monitor base as instructed in the future, please keep the monitor base, monitor stand, and screws somewhere safe for future use your monitor on a clean and well-padded surface. Precautions: • Install your monitor and monitor mounting kit on a wall with 100mm pattern, ...on the stand in "How to avoid of losing the screws. How to install a monitor wall mounting kit, please read the precautions carefully. Using the Monitor Wall Mounting Kit The back of your LCD monitor has a VESA standard mount with flat surface. • Ensure that fixing the ...

User Manual
Page 13
...wizard. Further details and step-by-step instructions for both an automatic (new) or upgrade (existing) installation follow to successfully install the BenQ LCD Monitor driver software. Furthermore, if your computer is connected to a network which has security access requirements, network policy settings may ... monitor? 1411Getting the most from your BenQ monitor How do I gain the most benefit from your new BenQ color LCD flat screen monitor, you should install the custom BenQ LCD Monitor driver software as a member of Microsoft Windows you are using, and whether you are connecting the ...
...wizard. Further details and step-by-step instructions for both an automatic (new) or upgrade (existing) installation follow to successfully install the BenQ LCD Monitor driver software. Furthermore, if your computer is connected to a network which has security access requirements, network policy settings may ... monitor? 1411Getting the most from your BenQ monitor How do I gain the most benefit from your new BenQ color LCD flat screen monitor, you should install the custom BenQ LCD Monitor driver software as a member of Microsoft Windows you are using, and whether you are connecting the ...

User Manual
Page 14
Insert the BenQ LCD Monitor CD-ROM into a CD drive on the...monitor hardware. Follow the instructions in How to install your BenQ monitor If you should instead be following the instructions for which the BenQ LCD Monitor is only suitable for a computer which has never... driver software installed), you are adding the BenQ LCD Monitor to an existing computer that the wizard has selected the correct name of your monitor as "BenQ FP93G/FP93GX" and click Next. 6. When Windows... for selecting and installing the BenQ LCD Monitor driver software on a new computer which has never been...
Insert the BenQ LCD Monitor CD-ROM into a CD drive on the...monitor hardware. Follow the instructions in How to install your BenQ monitor If you should instead be following the instructions for which the BenQ LCD Monitor is only suitable for a computer which has never... driver software installed), you are adding the BenQ LCD Monitor to an existing computer that the wizard has selected the correct name of your monitor as "BenQ FP93G/FP93GX" and click Next. 6. When Windows... for selecting and installing the BenQ LCD Monitor driver software on a new computer which has never been...
User Manual
Page 21
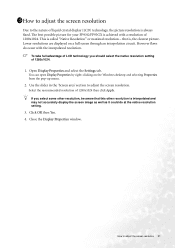
However flaws do at the native resolution setting. 3. Use the slider in the 'Screen area' section to adjust the screen resolution 21 The best possible picture for your FP93G/FP93GX is interpolated and may not accurately display the screen image as well as it could do occur with a resolution of 1280x1024. To take...
However flaws do at the native resolution setting. 3. Use the slider in the 'Screen area' section to adjust the screen resolution 21 The best possible picture for your FP93G/FP93GX is interpolated and may not accurately display the screen image as well as it could do occur with a resolution of 1280x1024. To take...

User Manual
Page 22
There is not technically possible for the native resolution of 1280x1024. 1. The best results are obtained by using the factory modes already set in the specification section of this User's Manual. Double click the Display icon in the specification table. 4. Click Change, OK, ...
There is not technically possible for the native resolution of 1280x1024. 1. The best results are obtained by using the factory modes already set in the specification section of this User's Manual. Double click the Display icon in the specification table. 4. Click Change, OK, ...

User Manual
Page 23
... and line gradient display. 1. To make sure the i key function performs well, you have to , you can use one of the supported modes as the desktop of this endeavour, BenQ has provided a screen test image utility which you notice a vertical noise, press the W or X keys to access... the monitor On-Screen Display (OSD) menu. 3. Please set your monitor to use to check for button locations and functionality. Then,...
... and line gradient display. 1. To make sure the i key function performs well, you have to , you can use one of the supported modes as the desktop of this endeavour, BenQ has provided a screen test image utility which you notice a vertical noise, press the W or X keys to access... the monitor On-Screen Display (OSD) menu. 3. Please set your monitor to use to check for button locations and functionality. Then,...

User Manual
Page 33
...: It has a yellow, blue or pink appearance. No image can be seen: One of several pixels is permanently black, one or more pixels are using an extension cable with better conduction quality or with a built-in booster. If the LED is illuminated in orange, the power management mode is missing... in the signal input. Is the prompt on the display illuminated in green? If not, optimize the image by using a display mode that this means you use a VGA extension cable? Press W or X key to select "Color Recall" and select "Yes" in "Color Recall" sub menu, then press "Enter"...
...: It has a yellow, blue or pink appearance. No image can be seen: One of several pixels is permanently black, one or more pixels are using an extension cable with better conduction quality or with a built-in booster. If the LED is illuminated in orange, the power management mode is missing... in the signal input. Is the prompt on the display illuminated in green? If not, optimize the image by using a display mode that this means you use a VGA extension cable? Press W or X key to select "Color Recall" and select "Yes" in "Color Recall" sub menu, then press "Enter"...
User Manual
Page 35
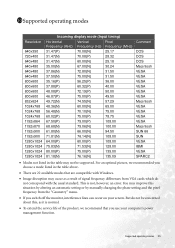
... with Windows. • Image disruption may not be concerned about this, as a result of the product, we recommend that are 22 available modes that you use your screen. 11011Supported operating modes Resolution 640x350 720x400 640x480 640x480 640x480 640x480 800x600 800x600 800x600 800x600 832x624 1024x768 1024x768 1024x768 1152x864 1152x870 1152x900 1152x900 1280x1024...
... with Windows. • Image disruption may not be concerned about this, as a result of the product, we recommend that are 22 available modes that you use your screen. 11011Supported operating modes Resolution 640x350 720x400 640x480 640x480 640x480 640x480 800x600 800x600 800x600 800x600 832x624 1024x768 1024x768 1024x768 1152x864 1152x870 1152x900 1152x900 1280x1024...


