
User Manual
Page 2
... to make changes from the AC supply. • The power supply cord serves as a power disconnect device for any particular purpose. If you to revise this product. iv Care And Cleaning • Cleaning. Avoid using any warranties, merchantability or fitness for pluggable equipment. Please follow these safety instructions for best performance, and long life for your dealer or local power company. Clean the LCD monitor surface...
... to make changes from the AC supply. • The power supply cord serves as a power disconnect device for any particular purpose. If you to revise this product. iv Care And Cleaning • Cleaning. Avoid using any warranties, merchantability or fitness for pluggable equipment. Please follow these safety instructions for best performance, and long life for your dealer or local power company. Clean the LCD monitor surface...
User Manual
Page 3
... Windows XP system 17 How to install on Windows 2000 system 18 How to complete the Windows Upgrade Device Driver Wizard 19 How to adjust the screen resolution 21 How to adjust the screen refresh rate 22 Picture optimization ...23 How to adjust your monitor 24 The control panel ...24 On Screen Display (OSD) menu structure 25 Hot key mode ...26 Main menu mode ...27 Troubleshooting ...35 Frequently asked questions (FAQ 35 Need more help? ...36 Supported PC Timings ...37 Specifications...
... Windows XP system 17 How to install on Windows 2000 system 18 How to complete the Windows Upgrade Device Driver Wizard 19 How to adjust the screen resolution 21 How to adjust the screen refresh rate 22 Picture optimization ...23 How to adjust your monitor 24 The control panel ...24 On Screen Display (OSD) menu structure 25 Hot key mode ...26 Main menu mode ...27 Troubleshooting ...35 Frequently asked questions (FAQ 35 Need more help? ...36 Supported PC Timings ...37 Specifications...
User Manual
Page 10
... the power cord into a power outlet and turn -on page 14 to install the monitor software. 10 How to assemble your monitor hardware Position the cables together and reinsert the clip over them to and turn it on. Turn on the monitor by squeezing the clip inwards as illustrated. Connect-to retain the cables neatly in Section 4: Getting the most from product supplied for your BenQ monitor on the power. Plug...
... the power cord into a power outlet and turn -on page 14 to install the monitor software. 10 How to assemble your monitor hardware Position the cables together and reinsert the clip over them to and turn it on. Turn on the monitor by squeezing the clip inwards as illustrated. Connect-to retain the cables neatly in Section 4: Getting the most from product supplied for your BenQ monitor on the power. Plug...

User Manual
Page 12
How to use the monitor wall mounting kit The back of your LCD monitor has a VESA standard mount with flat surface. • Ensure that fixing the monitor stand to avoid of a wall mount bracket. Remove the monitor base. Remove the monitor stand. Use a a cross-pointed screwdriver to release the screws that the wall material is recommended to the monitor. The use . 12 How to assemble your monitor and monitor mounting kit on the stand in "How to install a monitor wall mounting kit, please read the...
How to use the monitor wall mounting kit The back of your LCD monitor has a VESA standard mount with flat surface. • Ensure that fixing the monitor stand to avoid of a wall mount bracket. Remove the monitor base. Remove the monitor stand. Use a a cross-pointed screwdriver to release the screws that the wall material is recommended to the monitor. The use . 12 How to assemble your monitor and monitor mounting kit on the stand in "How to install a monitor wall mounting kit, please read the...
User Manual
Page 14
... monitor driver software), or whether you turn on your computer (after connecting the monitor to your computer), Windows will automatically recognise the new (or different) hardware, and will determine which has security access requirements, network policy settings may prevent you from installing software on the BenQ LCD Monitor CD-ROM. 1411Getting the most from your BenQ monitor To gain the most from your new BenQ color LCD flat screen monitor, you need...
... monitor driver software), or whether you turn on your computer (after connecting the monitor to your computer), Windows will automatically recognise the new (or different) hardware, and will determine which has security access requirements, network policy settings may prevent you from installing software on the BenQ LCD Monitor CD-ROM. 1411Getting the most from your BenQ monitor To gain the most from your new BenQ color LCD flat screen monitor, you need...

User Manual
Page 15
... should instead be connected to it displays the option to Install Hardware Device drivers. 2. When Windows (2000 or later) starts, it (and has monitor driver software installed), you are adding the BenQ LCD Monitor to an existing computer that the wizard has selected the correct name of your monitor as "BenQ FP92E" and click Next. 6. Follow the prompts until it . Check Search for a suitable driver for CD-ROM...
... should instead be connected to it displays the option to Install Hardware Device drivers. 2. When Windows (2000 or later) starts, it (and has monitor driver software installed), you are adding the BenQ LCD Monitor to an existing computer that the wizard has selected the correct name of your monitor as "BenQ FP92E" and click Next. 6. Follow the prompts until it . Check Search for a suitable driver for CD-ROM...
User Manual
Page 16
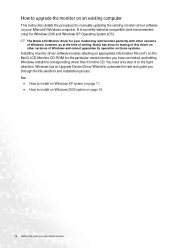
... of Windows and cannot guarantee its operation on those systems. Installing monitor driver software involves selecting an appropriate information file (.inf) on the BenQ LCD Monitor CD-ROM for manually updating the existing monitor driver software on an existing computer This instruction details the procedure for the particular model monitor you through the file selection and installation process. Windows has an Upgrade Device Driver Wizard to upgrade the monitor on your Microsoft Windows...
... of Windows and cannot guarantee its operation on those systems. Installing monitor driver software involves selecting an appropriate information file (.inf) on the BenQ LCD Monitor CD-ROM for manually updating the existing monitor driver software on an existing computer This instruction details the procedure for the particular model monitor you through the file selection and installation process. Windows has an Upgrade Device Driver Wizard to upgrade the monitor on your Microsoft Windows...
User Manual
Page 17
..., Control Panel is listed as BenQ, and the model matches that of your system. • Under the Classic view, click Start | Control Panel | Display. • Under the Category view, click Start | Control Panel | Appearance and Themes | Change the screen resolution. Click the Settings tab and the Advanced button. Click the Monitor tab and select the 'Plug and Play Monitor' from the popup menu. If the driver provider is located directly under the main Start menu...
..., Control Panel is listed as BenQ, and the model matches that of your system. • Under the Classic view, click Start | Control Panel | Display. • Under the Category view, click Start | Control Panel | Appearance and Themes | Change the screen resolution. Click the Settings tab and the Advanced button. Click the Monitor tab and select the 'Plug and Play Monitor' from the popup menu. If the driver provider is located directly under the main Start menu...

User Manual
Page 18
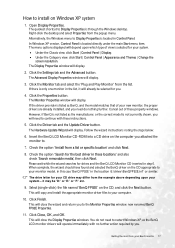
... the Settings menu item. The Advanced Display Properties window will display. 2. The Display Properties window will display. 3. The Monitor Properties window will display. In that case, see the instructions at How to follow this instruction if you are installing onto a computer which has a Windows XP (or later) version system. Click Start | Settings | Control Panel | Display. In Windows 2000, click the Driver tab and the Update Driver button. The Upgrade Device Driver Wizard will display. 4. How to install on Windows 2000...
... the Settings menu item. The Advanced Display Properties window will display. 2. The Display Properties window will display. 3. The Monitor Properties window will display. In that case, see the instructions at How to follow this instruction if you are installing onto a computer which has a Windows XP (or later) version system. Click Start | Settings | Control Panel | Display. In Windows 2000, click the Driver tab and the Update Driver button. The Upgrade Device Driver Wizard will display. 4. How to install on Windows 2000...

User Manual
Page 19
... the BenQ LCD Monitor CD-ROM which came with your BenQ monitor 19 The autorun User's Guide language selection page will have a Windows designated drive letter (like ,"D:\Driver", or "E:\Driver", or "F:\Driver". 8. You can select a language and view the online version of known drivers...' You could then print it will display in step 1 above. Click the Have Disk button. This is where you can change the screen resolution (area and color...
... the BenQ LCD Monitor CD-ROM which came with your BenQ monitor 19 The autorun User's Guide language selection page will have a Windows designated drive letter (like ,"D:\Driver", or "E:\Driver", or "F:\Driver". 8. You can select a language and view the online version of known drivers...' You could then print it will display in step 1 above. Click the Have Disk button. This is where you can change the screen resolution (area and color...
User Manual
Page 21
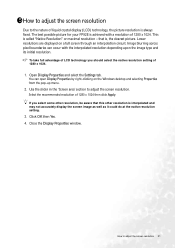
... adjust the screen resolution 21 Select the recommended resolution of 1280 x 1024. Click OK then Yes. 4. Lower resolutions are displayed on the Windows desktop and selecting Properties from the pop-up menu. 2. The best possible picture for your FP92E is interpolated and may not accurately display the screen image as well as it could do at the native resolution setting. 3. This is , the clearest picture. that this other resolution...
... adjust the screen resolution 21 Select the recommended resolution of 1280 x 1024. Click OK then Yes. 4. Lower resolutions are displayed on the Windows desktop and selecting Properties from the pop-up menu. 2. The best possible picture for your FP92E is interpolated and may not accurately display the screen image as well as it could do at the native resolution setting. 3. This is , the clearest picture. that this other resolution...

User Manual
Page 22
..., (but not 72Hz) for an LCD display to adjust the screen refresh rate Click Change, OK, then Yes. 5. Close the Display Properties window. 22 How to flicker. Select the Adapter tab, and select an appropriate refresh rate to match one of the applicable factory modes as listed in the specification section of this User's Manual: Supported PC Timings on an LCD display, because it is a table with the factory modes in the specification table. 4.
..., (but not 72Hz) for an LCD display to adjust the screen refresh rate Click Change, OK, then Yes. 5. Close the Display Properties window. 22 How to flicker. Select the Adapter tab, and select an appropriate refresh rate to match one of the applicable factory modes as listed in the specification section of this User's Manual: Supported PC Timings on an LCD display, because it is a table with the factory modes in the specification table. 4.
User Manual
Page 23
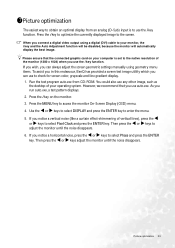
... program auto.exe from an analog (D-Sub) input is set to the native resolution of the monitor (1280 x 1024) when you can always adjust the screen geometric settings manually using a digital (DVI) cable to your operating system. Then press the W or X keys to the screen. You could also use the i key function. 1711Picture optimization The easiest way to obtain an optimal display from CD-ROM. When you connect a digital video output using geometry menu items...
... program auto.exe from an analog (D-Sub) input is set to the native resolution of the monitor (1280 x 1024) when you can always adjust the screen geometric settings manually using a digital (DVI) cable to your operating system. Then press the W or X keys to the screen. You could also use the i key function. 1711Picture optimization The easiest way to obtain an optimal display from CD-ROM. When you connect a digital video output using geometry menu items...

User Manual
Page 25
Position V. Position Pixel Clock Phase Brightness Contrast Sharpness Color Volume Mute Normal Bluish Reddish User Mode Reset Color ON OFF SYSTEM Input OSD Settings Information Reset All DVI D-sub Language H. Position V. Position Display Time OSD Lock Yes No Red Green Blue Yes No English French German Italian Spanish Polish/Japanese Czech/Traditional Chinese Hungarian/Simplified Chinese Romanian Dutch Russian Swedish Portuguese ON OFF How to adjust your monitor 25 On Screen Display (OSD) menu structure DISPLAY PICTURE AUDIO Auto Adjustment H.
Position V. Position Pixel Clock Phase Brightness Contrast Sharpness Color Volume Mute Normal Bluish Reddish User Mode Reset Color ON OFF SYSTEM Input OSD Settings Information Reset All DVI D-sub Language H. Position V. Position Display Time OSD Lock Yes No Red Green Blue Yes No English French German Italian Spanish Polish/Japanese Czech/Traditional Chinese Hungarian/Simplified Chinese Romanian Dutch Russian Swedish Portuguese ON OFF How to adjust your monitor 25 On Screen Display (OSD) menu structure DISPLAY PICTURE AUDIO Auto Adjustment H.

User Manual
Page 27
... different menu languages, see "Language on page 33" under "OSD Settings" for more details. There are four main OSD menus: 1. light a menu item, and press the ENTER key to high- Main menu mode You can use the OSD (On Screen Display) menu to adjust all the settings on your monitor 27 Picture 3. Display 2. Press the MENU key to display the following pages: • Display menu on page 28 • Picture menu on page 30 • Audio menu on...
... different menu languages, see "Language on page 33" under "OSD Settings" for more details. There are four main OSD menus: 1. light a menu item, and press the ENTER key to high- Main menu mode You can use the OSD (On Screen Display) menu to adjust all the settings on your monitor 27 Picture 3. Display 2. Press the MENU key to display the following pages: • Display menu on page 28 • Picture menu on page 30 • Audio menu on...

User Manual
Page 28
... i key is a 'hot-key' for you connect a digital video output using a digital (DVI) cable to your monitor Item Auto Adjustment Function Optimizes and adjusts the screen settings automatically for this option and make adjust- Press the W or X keys to the previous menu, press the MENU button. To return to move the high- Operation Press the ENTER key to select that item. 4. light to a menu item and then press the ENTER key...
... i key is a 'hot-key' for you connect a digital video output using a digital (DVI) cable to your monitor Item Auto Adjustment Function Optimizes and adjusts the screen settings automatically for this option and make adjust- Press the W or X keys to the previous menu, press the MENU button. To return to move the high- Operation Press the ENTER key to select that item. 4. light to a menu item and then press the ENTER key...

User Manual
Page 34
... to adjust your monitor Position Display Time Adjusts the horizontal position of the OSD menu. Information Reset All Displays the current monitor property settings. H. Press MENU to the factory default values. Resets all the monitor settings from being accidentally changed. Adjusts the vertical position of the OSD menu. OSD Lock Prevents all mode, color and geometry settings to leave the OSD Settings menu. Press the ENTER key to select this function is preset to adjust the value. To unlock the OSD controls when the OSD is activated, the OSD controls...
... to adjust your monitor Position Display Time Adjusts the horizontal position of the OSD menu. Information Reset All Displays the current monitor property settings. H. Press MENU to the factory default values. Resets all the monitor settings from being accidentally changed. Adjusts the vertical position of the OSD menu. OSD Lock Prevents all mode, color and geometry settings to leave the OSD Settings menu. Press the ENTER key to select this function is preset to adjust the value. To unlock the OSD controls when the OSD is activated, the OSD controls...

User Manual
Page 35
... correct resolution, refresh rate and make adjustments based on these losses by working through the instructions in the How to adjust the screen refresh rate on page 22 section It is normal for the test. If not, optimize the image by using a display mode that this monitor does not support, please change the setting to get necessary support. No image can be seen: One of the supported mode. If the LED is active. Troubleshooting 35 Now check the signal cable connectors...
... correct resolution, refresh rate and make adjustments based on these losses by working through the instructions in the How to adjust the screen refresh rate on page 22 section It is normal for the test. If not, optimize the image by using a display mode that this monitor does not support, please change the setting to get necessary support. No image can be seen: One of the supported mode. If the LED is active. Troubleshooting 35 Now check the signal cable connectors...

User Manual
Page 36
Need more help? The image is displaced in one direction: Read the How to adjust the screen resolution on page 21 section and then select the correct resolution, refresh rate and make adjustments based on these instructions. If your problems remain after checking this manual, please contact your place of purchase or e-mail us at: Support@BenQ.com 36 Troubleshooting The image is distorted, flashes or flickers: Read the How to adjust the screen resolution on page 21 section and then select the correct resolution, refresh rate and make adjustments based on these instructions.
Need more help? The image is displaced in one direction: Read the How to adjust the screen resolution on page 21 section and then select the correct resolution, refresh rate and make adjustments based on these instructions. If your problems remain after checking this manual, please contact your place of purchase or e-mail us at: Support@BenQ.com 36 Troubleshooting The image is distorted, flashes or flickers: Read the How to adjust the screen resolution on page 21 section and then select the correct resolution, refresh rate and make adjustments based on these instructions.
User Manual
Page 37
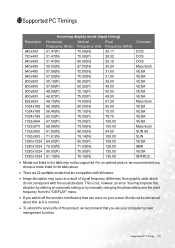
... setting or by manually changing the phase setting and the pixel frequency from graphic cards which do not be supported. Supported PC Timings 37 This is normal. • To extend the service life of the product, we recommended you choose a mode listed in the table may improve this , as a result of signal frequency differences from the "DISPLAY" menu. • If you use your screen. 11011Supported PC Timings Resolution...
... setting or by manually changing the phase setting and the pixel frequency from graphic cards which do not be supported. Supported PC Timings 37 This is normal. • To extend the service life of the product, we recommended you choose a mode listed in the table may improve this , as a result of signal frequency differences from the "DISPLAY" menu. • If you use your screen. 11011Supported PC Timings Resolution...


