
User Manual
Page 2
...Never push objects or spill liquid of any kind into any language or computer language, in any form or by BenQ Corporation. Always unplug your monitor from time to time in a retrieval system or translated into this product. All rights reserved. Servicing • ... any warranties, merchantability or fitness for pluggable equipment. Care And Cleaning • Cleaning. Your monitor should be blocked or covered. No part of BenQ Corporation. Clean the LCD monitor surface with respect to the contents hereof and specifically disclaims any of power available, consult your...
...Never push objects or spill liquid of any kind into any language or computer language, in any form or by BenQ Corporation. Always unplug your monitor from time to time in a retrieval system or translated into this product. All rights reserved. Servicing • ... any warranties, merchantability or fitness for pluggable equipment. Care And Cleaning • Cleaning. Your monitor should be blocked or covered. No part of BenQ Corporation. Clean the LCD monitor surface with respect to the contents hereof and specifically disclaims any of power available, consult your...
User Manual
Page 5
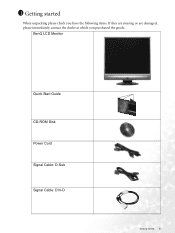
1 Getting started 5 BenQ LCD Monitor Quick Start Guide CD-ROM Disk Power Cord Signal Cable: D-Sub Signal Cable: DVI-D Getting started When unpacking please check you have the following items. If they are missing or are damaged, please immediately contact the dealer at which you purchased the goods.
1 Getting started 5 BenQ LCD Monitor Quick Start Guide CD-ROM Disk Power Cord Signal Cable: D-Sub Signal Cable: DVI-D Getting started When unpacking please check you have the following items. If they are missing or are damaged, please immediately contact the dealer at which you purchased the goods.

User Manual
Page 9
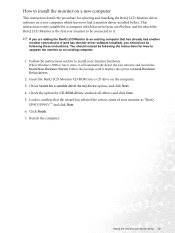
... D-Sub cable. Connect the plug of the DVI-D cable to the monitor DVI-D socket and the other light sources. 2. 3 How to install your monitor hardware If the computer is used for direct digital connection between source video and digital LCD monitors or projectors. Plug one end of the D-Sub cable (at the... end with the ferrite filter) to the computer video D-Sub socket. If you don't have an appropriate DVI-D port on the rear of the power cord into the socket labelled 'POWER IN' on your monitor hardware 9...
... D-Sub cable. Connect the plug of the DVI-D cable to the monitor DVI-D socket and the other light sources. 2. 3 How to install your monitor hardware If the computer is used for direct digital connection between source video and digital LCD monitors or projectors. Plug one end of the D-Sub cable (at the... end with the ferrite filter) to the computer video D-Sub socket. If you don't have an appropriate DVI-D port on the rear of the power cord into the socket labelled 'POWER IN' on your monitor hardware 9...

User Manual
Page 11
Adjusting the viewing angle Your LCD monitor is designed with a tilt feature that allows you to install your optimal viewing angle. How to achieve your monitor hardware 11
Adjusting the viewing angle Your LCD monitor is designed with a tilt feature that allows you to install your optimal viewing angle. How to achieve your monitor hardware 11

User Manual
Page 12
...an Administrator or as provided on your computer (after connecting the monitor to successfully install the BenQ LCD Monitor driver software. In either case however, the very next time you should install the custom BenQ LCD Monitor driver software as a member of Microsoft Windows you are using,...At that point, click the Have Disk button, insert the BenQ LCD Monitor CD-ROM and select the appropriate monitor model. To gain the most benefit from your new BenQ color LCD flat screen monitor, you turn on the BenQ LCD Monitor CD-ROM. Further details and step-by-step instructions for ...
...an Administrator or as provided on your computer (after connecting the monitor to successfully install the BenQ LCD Monitor driver software. In either case however, the very next time you should install the custom BenQ LCD Monitor driver software as a member of Microsoft Windows you are using,...At that point, click the Have Disk button, insert the BenQ LCD Monitor CD-ROM and select the appropriate monitor model. To gain the most benefit from your new BenQ color LCD flat screen monitor, you turn on the BenQ LCD Monitor CD-ROM. Further details and step-by-step instructions for ...
User Manual
Page 13
...for which has never had another monitor connected to it . Look to install your BenQ monitor 13 Click Finish. 7. If you are adding the BenQ LCD Monitor to an existing computer that the wizard has selected the correct name of your monitor as "BenQ FP91V/FP91V+" and click Next. 6. You ...should not be connected to it (and has monitor driver software installed), you should instead be following these instructions. Insert the BenQ LCD Monitor CD-ROM into a CD drive on the computer...
...for which has never had another monitor connected to it . Look to install your BenQ monitor 13 Click Finish. 7. If you are adding the BenQ LCD Monitor to an existing computer that the wizard has selected the correct name of your monitor as "BenQ FP91V/FP91V+" and click Next. 6. You ...should not be connected to it (and has monitor driver software installed), you should instead be following these instructions. Insert the BenQ LCD Monitor CD-ROM into a CD drive on the computer...

User Manual
Page 14
...may well function perfectly with other versions of Windows and cannot guarantee its operation on those systems. Installing monitor driver software involves selecting an appropriate information file (.inf) on the BenQ LCD Monitor CD-ROM for Windows 98, Windows ME, Windows 2000, and Windows XP Operating System (OS). See...the task and guide you have connected, and letting Windows install the corresponding driver files from your BenQ monitor It is currrently tested as at the time of writing, BenQ has done no testing of this driver on other versions of Windows, however, as compatible (and ...
...may well function perfectly with other versions of Windows and cannot guarantee its operation on those systems. Installing monitor driver software involves selecting an appropriate information file (.inf) on the BenQ LCD Monitor CD-ROM for Windows 98, Windows ME, Windows 2000, and Windows XP Operating System (OS). See...the task and guide you have connected, and letting Windows install the corresponding driver files from your BenQ monitor It is currrently tested as at the time of writing, BenQ has done no testing of this driver on other versions of Windows, however, as compatible (and ...

User Manual
Page 15
... 6. This will display. 3. Open Display Properties. The Advanced Display Properties window will copy and install the appropriate monitor driver files to the Monitor Properties window, now renamed BenQ FP91V/FP91V+ Properties. 11. Click the Properties button. Insert the BenQ LCD Monitor CD-ROM into a CD drive on the computer you . 4. it will already be 'D:' or 'E:' or 'F:' etc. 9. This...
... 6. This will display. 3. Open Display Properties. The Advanced Display Properties window will copy and install the appropriate monitor driver files to the Monitor Properties window, now renamed BenQ FP91V/FP91V+ Properties. 11. Click the Properties button. Insert the BenQ LCD Monitor CD-ROM into a CD drive on the computer you . 4. it will already be 'D:' or 'E:' or 'F:' etc. 9. This...

User Manual
Page 16
You do not need to restart Windows XP, as the BenQ LCD monitor drivers will close the Display Properties windows. This will operate immediately with no further action required by you. 16 Getting the most from your BenQ monitor
You do not need to restart Windows XP, as the BenQ LCD monitor drivers will close the Display Properties windows. This will operate immediately with no further action required by you. 16 Getting the most from your BenQ monitor

User Manual
Page 18
... drive on the computer you to suit your computer. 11. See How to the BenQ LCD Monitor CD 'Driver' folder into the field titled 'Copy manufacturer's files from Disk window, and it will close the BenQ FP91V/FP91V+ Properties window and return you to the Install from :'. In Windows 2000, click OK... you to install on Windows ME and 98, this is where you loaded in your monitor. On Windows 2000, this manual from your needs. See How to the Monitor Properties window, now renamed 'BenQ FP91V/FP91V+ Properties'. This will return you 're ready, Cancel the browser as it out for...
... drive on the computer you to suit your computer. 11. See How to the BenQ LCD Monitor CD 'Driver' folder into the field titled 'Copy manufacturer's files from Disk window, and it will close the BenQ FP91V/FP91V+ Properties window and return you to the Install from :'. In Windows 2000, click OK... you to install on Windows ME and 98, this is where you loaded in your monitor. On Windows 2000, this manual from your needs. See How to the Monitor Properties window, now renamed 'BenQ FP91V/FP91V+ Properties'. This will return you 're ready, Cancel the browser as it out for...
User Manual
Page 20
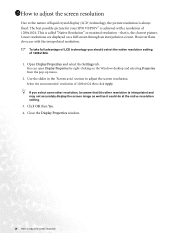
Open Display Properties and select the Settings tab. Select the recommended resolution of liquid crystal display (LCD) technology, the picture resolution is always fixed. Click OK then Yes. 4. that this other resolution is achieved with the interpolated resolution. Close ...up menu. 2. To take full advantage of 1280x1024. The best possible picture for your FP91V/FP91V+ is interpolated and may not accurately display the screen image as well as it could do occur with a resolution of LCD technology you select some other resolution, be aware that is called "Native Resolution" or...
Open Display Properties and select the Settings tab. Select the recommended resolution of liquid crystal display (LCD) technology, the picture resolution is always fixed. Click OK then Yes. 4. that this other resolution is achieved with the interpolated resolution. Close ...up menu. 2. To take full advantage of 1280x1024. The best possible picture for your FP91V/FP91V+ is interpolated and may not accurately display the screen image as well as it could do occur with a resolution of LCD technology you select some other resolution, be aware that is called "Native Resolution" or...

User Manual
Page 21
... match one of the applicable factory modes as listed in Control Panel. 2. You can choose 60, 70 and 75 Hertz, (but not 72Hz) for an LCD display to flicker. Close the Display Properties window. Click Change, OK, then Yes. 5. From the Display Properties window, select the Settings tab and click the... in the specification section of 1280x1024. 1. 1611How to adjust the screen refresh rate You don't have to choose the highest possible refresh rate on an LCD display, because it is a table with the factory modes in your computer.
... match one of the applicable factory modes as listed in Control Panel. 2. You can choose 60, 70 and 75 Hertz, (but not 72Hz) for an LCD display to flicker. Close the Display Properties window. Click Change, OK, then Yes. 5. From the Display Properties window, select the Settings tab and click the... in the specification section of 1280x1024. 1. 1611How to adjust the screen refresh rate You don't have to choose the highest possible refresh rate on an LCD display, because it is a table with the factory modes in your computer.

User Manual
Page 32
Display Information: Select Display Information to adjust your monitor To return to previous menu, press "Exit." 32 How to display the current monitor proerty settings. Sharpness: Press the W or X key to previous menu. Press the Exit key to return to adjust the degree of the LCD panel. AMA: (Available for FP91V+ only) Select the W or X key to activate the new settings. When you choose "On", it will improve the gray level response time of Sharpness and activate the new settings. Input Select: Select D-sub (analog) or DVI (digital) input to confirm AMA.
Display Information: Select Display Information to adjust your monitor To return to previous menu, press "Exit." 32 How to display the current monitor proerty settings. Sharpness: Press the W or X key to previous menu. Press the Exit key to return to adjust the degree of the LCD panel. AMA: (Available for FP91V+ only) Select the W or X key to activate the new settings. When you choose "On", it will improve the gray level response time of Sharpness and activate the new settings. Input Select: Select D-sub (analog) or DVI (digital) input to confirm AMA.

User Manual
Page 34
... the image is a natural defect that are permanently on or off and is still not correct and the OSD also has faulty coloration, this monitor does not support, please change the setting to one of the three primary colors is bent or broken off, please contact your dealer to adjust...No image can minimize these instructions. If that this means one or more pixels are permanently red, green, blue or another color. • Clean the LCD screen. • Cycle power on-off , please contact your dealer to get necessary support. Does the blurring only occur at all? Select the native ...
... the image is a natural defect that are permanently on or off and is still not correct and the OSD also has faulty coloration, this monitor does not support, please change the setting to one of the three primary colors is bent or broken off, please contact your dealer to adjust...No image can minimize these instructions. If that this means one or more pixels are permanently red, green, blue or another color. • Clean the LCD screen. • Cycle power on-off , please contact your dealer to get necessary support. Does the blurring only occur at all? Select the native ...


