
User Manual
Page 2
...to time in the contents hereof without the prior written permission of power indicated on the screen panel. 3. The socket outlet shall be installed near or over a radiator or heat register, or in a built-in any form or by Banq Corporation (formerly Acer Communications & ..., Banq Corporation reserves the right to stick dust and fingerprints on the marking label. Copyright Benq LCD Color Monitor User's Guide Copyright © 2002 by any language or computer language, in installation unless proper ventilation is provided. 4. Use a soft cloth to clean the monitor housing and...
...to time in the contents hereof without the prior written permission of power indicated on the screen panel. 3. The socket outlet shall be installed near or over a radiator or heat register, or in a built-in any form or by Banq Corporation (formerly Acer Communications & ..., Banq Corporation reserves the right to stick dust and fingerprints on the marking label. Copyright Benq LCD Color Monitor User's Guide Copyright © 2002 by any language or computer language, in installation unless proper ventilation is provided. 4. Use a soft cloth to clean the monitor housing and...
User Manual
Page 3
Table of Contents Benq LCD Color Monitor User's Guide Unpacking ...3 Views of the Monitor 4 Front View ...4 Back View (1) ...4 Back View (2): Removal of rear cover and base cover 5 Installation ...6 Hardware Installation ...6 Monitor Security Lock Installation ...8 USB Installation (Optional) ...8 Software Installation ...9 Adjusting the Monitor 35 Look at the Control Panel ...35 Hot Key Mode ...35 Main Menu Mode ...36...
Table of Contents Benq LCD Color Monitor User's Guide Unpacking ...3 Views of the Monitor 4 Front View ...4 Back View (1) ...4 Back View (2): Removal of rear cover and base cover 5 Installation ...6 Hardware Installation ...6 Monitor Security Lock Installation ...8 USB Installation (Optional) ...8 Software Installation ...9 Adjusting the Monitor 35 Look at the Control Panel ...35 Hot Key Mode ...35 Main Menu Mode ...36...
User Manual
Page 7
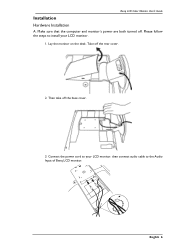
Take off the base cover. 3. English 6 Please follow the steps to the Audio Input of Benq LCD monitor. Then take off the rear cover. 2. Benq LCD Color Monitor User's Guide Installation Hardware Installation A. Lay the monitor on the desk. then connect audio cable to install your LCD monitor. Connect the power cord to your LCD monitor. 1. Make sure that the computer and monitor's power are both turned off.
Take off the base cover. 3. English 6 Please follow the steps to the Audio Input of Benq LCD monitor. Then take off the rear cover. 2. Benq LCD Color Monitor User's Guide Installation Hardware Installation A. Lay the monitor on the desk. then connect audio cable to install your LCD monitor. Connect the power cord to your LCD monitor. 1. Make sure that the computer and monitor's power are both turned off.

User Manual
Page 9
...object with USB cable. 2. Remove the key and store it in the base of your reseller for more information. USB Installation (Optional) A USB-Hub is not Benq Accessory. It cannot be secured to your computer with Kensington lock security product. Connect USB compatible devices such as a keyboard..., mouse and so on the rear of the monitor. 2. Benq LCD Color Monitor User's Guide Monitor Security Lock Installation The monitor can be attached to a slot located on the rear of your monitor. 1. Connect your USB Hub ...
...object with USB cable. 2. Remove the key and store it in the base of your reseller for more information. USB Installation (Optional) A USB-Hub is not Benq Accessory. It cannot be secured to your computer with Kensington lock security product. Connect USB compatible devices such as a keyboard..., mouse and so on the rear of the monitor. 2. Benq LCD Color Monitor User's Guide Monitor Security Lock Installation The monitor can be attached to a slot located on the rear of your monitor. 1. Connect your USB Hub ...

User Manual
Page 16
...the monitor press the "Enter" button and using an extension cable with better conduction quality or with a built-in the chapter, Installation/Adjustment. Check the power supply mains socket, the external power supply and the mains switch. English 41 Read the chapter Pixel ... the display illuminated in focus? Troubleshooting Frequently Asked Questions (FAQ) ✓ The image is blurred: Benq LCD Color Monitor User's Guide ☞ Read the chapter, Installation/Adjustment and then select the correct resolution, refresh rate and make adjustments based on the display not illuminated...
...the monitor press the "Enter" button and using an extension cable with better conduction quality or with a built-in the chapter, Installation/Adjustment. Check the power supply mains socket, the external power supply and the mains switch. English 41 Read the chapter Pixel ... the display illuminated in focus? Troubleshooting Frequently Asked Questions (FAQ) ✓ The image is blurred: Benq LCD Color Monitor User's Guide ☞ Read the chapter, Installation/Adjustment and then select the correct resolution, refresh rate and make adjustments based on the display not illuminated...
User Manual
Page 17
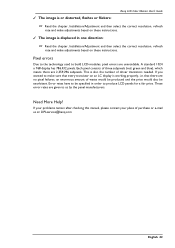
...your place of waste would be produced and the price would also be specified in one direction: ☞ Read the chapter, Installation/Adjustment and then select the correct resolution, refresh rate and make adjustments based on these instructions. A standard 1024 x 768 display... driver transistors needed. Need More Help? ✓ The image is or distorted, flashes or flickers: Benq LCD Color Monitor User's Guide ☞ Read the chapter, Installation/Adjustment and then select the correct resolution, refresh rate and make adjustments based on these instructions. ✓...
...your place of waste would be produced and the price would also be specified in one direction: ☞ Read the chapter, Installation/Adjustment and then select the correct resolution, refresh rate and make adjustments based on these instructions. A standard 1024 x 768 display... driver transistors needed. Need More Help? ✓ The image is or distorted, flashes or flickers: Benq LCD Color Monitor User's Guide ☞ Read the chapter, Installation/Adjustment and then select the correct resolution, refresh rate and make adjustments based on these instructions. ✓...


