
User Manual
Page 2
...• Cleaning. Clean the LCD monitor surface with respect to make changes from the type of power indicated on the back or top of the cabinet are not sure of the type of power available, consult your dealer or local power company. Further, BenQ Corporation reserves the right to ... into this publication and to the contents hereof and specifically disclaims any warranties, merchantability or fitness for any of the above mentioned misuse or other risks. Avoid using any person of such revision or changes. Always unplug your monitor Power Safety • The AC plug isolates this ...
...• Cleaning. Clean the LCD monitor surface with respect to make changes from the type of power indicated on the back or top of the cabinet are not sure of the type of power available, consult your dealer or local power company. Further, BenQ Corporation reserves the right to ... into this publication and to the contents hereof and specifically disclaims any warranties, merchantability or fitness for any of the above mentioned misuse or other risks. Avoid using any person of such revision or changes. Always unplug your monitor Power Safety • The AC plug isolates this ...
User Manual
Page 3
... View ...7 Back View (1) ...7 Back View (2): Locations of plugs & sockets 8 How to install your monitor hardware 9 Detach the base 11 Adjusting the viewing angle 11 How to install your monitor's software 12 Choosing the best picture resolution 16 How to choose the right Refresh Rate 18 How to set the ...Picture Optimization 21 How to adjust your Monitor 22 A Look at the Control Panel 22 Hot Key Mode ...22 Main Menu Mode ...23 Troubleshooting ...32 Frequently Asked Questions (FAQ 32 Need...
... View ...7 Back View (1) ...7 Back View (2): Locations of plugs & sockets 8 How to install your monitor hardware 9 Detach the base 11 Adjusting the viewing angle 11 How to install your monitor's software 12 Choosing the best picture resolution 16 How to choose the right Refresh Rate 18 How to set the ...Picture Optimization 21 How to adjust your Monitor 22 A Look at the Control Panel 22 Hot Key Mode ...22 Main Menu Mode ...23 Troubleshooting ...32 Frequently Asked Questions (FAQ 32 Need...

User Manual
Page 12
Windows XP turn to install your monitor's software button in a specific location, so you can select the driver you will be given a list of all drivers in the bottom...Settings" tab. The "Update Device Driver Wizard" opens. Select the CD-drive from the list and press "Next" again. 9. Select the "Monitor" tab. By pressing "OK" again in the top right corner. 4. Windows ME turn to suit your computer. Click "OK", and then... the "Advanced..." Confirm by clicking "Finish" to complete the installation. 12 How to page 14. Select "FP71E" from the drop-down menu. 8.
Windows XP turn to install your monitor's software button in a specific location, so you can select the driver you will be given a list of all drivers in the bottom...Settings" tab. The "Update Device Driver Wizard" opens. Select the CD-drive from the list and press "Next" again. 9. Select the "Monitor" tab. By pressing "OK" again in the top right corner. 4. Windows ME turn to suit your computer. Click "OK", and then... the "Advanced..." Confirm by clicking "Finish" to complete the installation. 12 How to page 14. Select "FP71E" from the drop-down menu. 8.

User Manual
Page 13
Insert "BenQ LCD Monitor" CD-ROM into your CD ROM Driver, then click "Next" . 11. The "Upgrade Device ... Properties" window, select the "Settings" tab. Select "Monitor" then click "Properties". 6. Select "Driver" tab then click "Update Driver". 7. In the list of the known drivers for this device so that I can choose a specific driver" then click "Next". 9. Windows 2000. Click... Disk" window will detect it and automatically start the "Add New Hardware Wizard". Select your monitor's software 13 How to install your LCD Model (FP71E) from the list in the bottom right corner. 5.
Insert "BenQ LCD Monitor" CD-ROM into your CD ROM Driver, then click "Next" . 11. The "Upgrade Device ... Properties" window, select the "Settings" tab. Select "Monitor" then click "Properties". 6. Select "Driver" tab then click "Update Driver". 7. In the list of the known drivers for this device so that I can choose a specific driver" then click "Next". 9. Windows 2000. Click... Disk" window will detect it and automatically start the "Add New Hardware Wizard". Select your monitor's software 13 How to install your LCD Model (FP71E) from the list in the bottom right corner. 5.

User Manual
Page 14
...the driver you want .". 8. Click "Have disk" and then click "Browse...". 9. Choose "Specify the location of all the drivers in a specific location, so you can select the driver you want " and click "Next". 6. Click "OK" on the "Install From Disk" window. ... driver, perform the following steps: 1. Choose "Monitor" from the list, then click "Next". 11. Enter "Drivers" folder to match your monitor's software Click "OK". 10. Click "Start", "Settings", "Control Panel" and then double-click "Display". 2. Insert "BenQ LCD Monitor's CD" into your CD-ROM and type d:\...
...the driver you want .". 8. Click "Have disk" and then click "Browse...". 9. Choose "Specify the location of all the drivers in a specific location, so you can select the driver you want " and click "Next". 6. Click "OK" on the "Install From Disk" window. ... driver, perform the following steps: 1. Choose "Monitor" from the list, then click "Next". 11. Enter "Drivers" folder to match your monitor's software Click "OK". 10. Click "Start", "Settings", "Control Panel" and then double-click "Display". 2. Insert "BenQ LCD Monitor's CD" into your CD-ROM and type d:\...
User Manual
Page 23
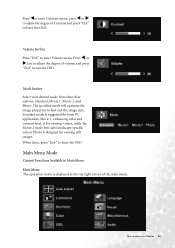
... key Select your Monitor 23 How to best suit the image type. Press W or X key to adjust the degree of volume and press "Exit" to leave the OSD. Standard mode is designed for viewing still images. Photo is suggested for viewing videos, while the Movie 2 mode best suits landscape-specific videos; Press...
... key Select your Monitor 23 How to best suit the image type. Press W or X key to adjust the degree of volume and press "Exit" to leave the OSD. Standard mode is designed for viewing still images. Photo is suggested for viewing videos, while the Movie 2 mode best suits landscape-specific videos; Press...
User Manual
Page 29
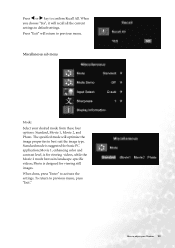
... "Exit" will return to activate the settings. Standard mode is designed for viewing videos, while the Movie 2 mode best suits landscape-specific videos; Miscellaneous sub menu Mode: Select your Monitor 29 To return to best suit the image type. How to adjust your desired mode from these four options: Standard, Movie 1, Movie...
... "Exit" will return to activate the settings. Standard mode is designed for viewing videos, while the Movie 2 mode best suits landscape-specific videos; Miscellaneous sub menu Mode: Select your Monitor 29 To return to best suit the image type. How to adjust your desired mode from these four options: Standard, Movie 1, Movie...
User Manual
Page 36
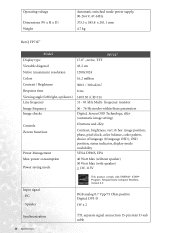
... Input signal PC Speaker Synchronization 36 Specifications RGB analog 0.7 Vpp/75 Ohm positive Digital: DVI-D 1W x 2 TTL separate signal connection 15-pin mini D-sub cable Operating voltage Dimensions (W x H x D) Weight Automatic switched mode power supply, 90-264 V, 47-63Hz 375.3 x 385.8 x 201.1 mm 4.7 kg BenQ FP71E+ Model Display type FP71E+ 17.0" , active, TFT Viewable diagonal 43...
... Input signal PC Speaker Synchronization 36 Specifications RGB analog 0.7 Vpp/75 Ohm positive Digital: DVI-D 1W x 2 TTL separate signal connection 15-pin mini D-sub cable Operating voltage Dimensions (W x H x D) Weight Automatic switched mode power supply, 90-264 V, 47-63Hz 375.3 x 385.8 x 201.1 mm 4.7 kg BenQ FP71E+ Model Display type FP71E+ 17.0" , active, TFT Viewable diagonal 43...