
User Manual
Page 2
...contact qualified service personnel for any of the above mentioned misuse or other risks. Care And Cleaning • Cleaning. Clean the LCD monitor surface with respect to make changes from the wall outlet before cleaning. Avoid using any person of such revision or changes. Servicing... pluggable equipment. If any particular purpose. Always unplug your dealer or local power company. All rights reserved. No part of BenQ Corporation. They must not be reproduced, transmitted, transcribed, stored in the contents hereof without the prior written permission of this ...
...contact qualified service personnel for any of the above mentioned misuse or other risks. Care And Cleaning • Cleaning. Clean the LCD monitor surface with respect to make changes from the wall outlet before cleaning. Avoid using any person of such revision or changes. Servicing... pluggable equipment. If any particular purpose. Always unplug your dealer or local power company. All rights reserved. No part of BenQ Corporation. They must not be reproduced, transmitted, transcribed, stored in the contents hereof without the prior written permission of this ...
User Manual
Page 3
... View ...7 Back View (1) ...7 Back View (2): Locations of plugs & sockets 8 How to install your monitor hardware 9 Detach the base 11 Adjusting the viewing angle 11 How to install your monitor's software 12 Choosing the best picture resolution 16 How to choose the right Refresh Rate 18 How to set the ...Picture Optimization 21 How to adjust your Monitor 22 A Look at the Control Panel 22 Hot Key Mode ...22 Main Menu Mode ...23 Troubleshooting ...32 Frequently Asked Questions (FAQ 32 Need...
... View ...7 Back View (1) ...7 Back View (2): Locations of plugs & sockets 8 How to install your monitor hardware 9 Detach the base 11 Adjusting the viewing angle 11 How to install your monitor's software 12 Choosing the best picture resolution 16 How to choose the right Refresh Rate 18 How to set the ...Picture Optimization 21 How to adjust your Monitor 22 A Look at the Control Panel 22 Hot Key Mode ...22 Main Menu Mode ...23 Troubleshooting ...32 Frequently Asked Questions (FAQ 32 Need...
User Manual
Page 5
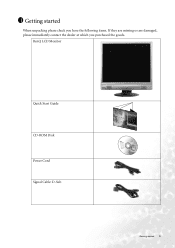
1 Getting started 5 BenQ LCD Monitor Quick Start Guide CD-ROM Disk Power Cord Signal Cable: D-Sub 02 P/N:53.L900 3 .0 Getting started When unpacking please check you have the following items. If they are missing or are damaged, please immediately contact the dealer at which you purchased the goods.
1 Getting started 5 BenQ LCD Monitor Quick Start Guide CD-ROM Disk Power Cord Signal Cable: D-Sub 02 P/N:53.L900 3 .0 Getting started When unpacking please check you have the following items. If they are missing or are damaged, please immediately contact the dealer at which you purchased the goods.

User Manual
Page 8
DVI-D Connector 4. Back View (2): Locations of plugs & sockets 1 2 3 4 1. D-Sub Connector 8 Getting to know your Monitor Power AC Input Jack 3. Audio Connector 2.
DVI-D Connector 4. Back View (2): Locations of plugs & sockets 1 2 3 4 1. D-Sub Connector 8 Getting to know your Monitor Power AC Input Jack 3. Audio Connector 2.
User Manual
Page 9
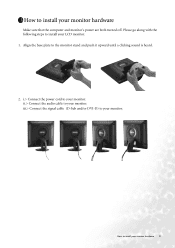
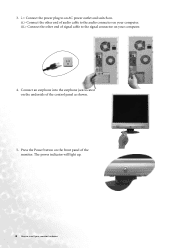
ii.> Connect the audio cable to install your monitor. Please go along with the following steps to your LCD monitor. 1. Align the base plate to install your monitor. 3 How to the monitor stand and push it upward until a clicking sound is heard. 2. How to your monitor hardware Make sure that the computer and monitor's power are both turned off. iii.> Connect the signal cable (D-Sub and/or DVI-D) to install your monitor. i.> Connect the power cord to your monitor hardware 9
ii.> Connect the audio cable to install your monitor. Please go along with the following steps to your LCD monitor. 1. Align the base plate to install your monitor. 3 How to the monitor stand and push it upward until a clicking sound is heard. 2. How to your monitor hardware Make sure that the computer and monitor's power are both turned off. iii.> Connect the signal cable (D-Sub and/or DVI-D) to install your monitor. i.> Connect the power cord to your monitor hardware 9
User Manual
Page 10
iii.> Connect the other end of the control panel as shown. 5. Press the Power button on the front panel of signal cable to the audio connector on your monitor hardware Connect an earphone into the earphone jack located on the underside of audio cable to the signal connector on . ii.> Connect the other end of the monitor. 3. The power indicator will light up. 10 How to an AC power outlet and switch on your computer. 4. i.> Connect the power plug to install your computer.
iii.> Connect the other end of the control panel as shown. 5. Press the Power button on the front panel of signal cable to the audio connector on your monitor hardware Connect an earphone into the earphone jack located on the underside of audio cable to the signal connector on . ii.> Connect the other end of the monitor. 3. The power indicator will light up. 10 How to an AC power outlet and switch on your computer. 4. i.> Connect the power plug to install your computer.
User Manual
Page 11
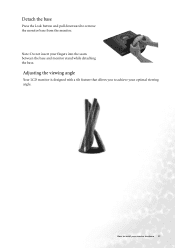
Detach the base Press the Lock button and pull downward to install your monitor hardware 11 Adjusting the viewing angle Your LCD monitor is designed with a tilt feature that allows you to achieve your fingers into the seam between the base and monitor stand while detaching the base. Note: Do not insert your optimal viewing angle. How to remove the monitor base from the monitor.
Detach the base Press the Lock button and pull downward to install your monitor hardware 11 Adjusting the viewing angle Your LCD monitor is designed with a tilt feature that allows you to achieve your fingers into the seam between the base and monitor stand while detaching the base. Note: Do not insert your optimal viewing angle. How to remove the monitor base from the monitor.

User Manual
Page 12
... to suit your computer. Windows 2000, turn to page 14. Select the "Monitor" tab. Select "Display a list of compatible devices. Insert the supplied CD into your operating system. Select "FP71E" from the drop-down menu. 8. By pressing "OK" again in the next window you will be given... the driver, perform the following steps: 1. From the "Display Properties" window, select the "Settings" tab. Windows 98, turn to install your monitor's software Now click the "Have Disk" button in a specific location, so you can select the driver you want." Click "OK", and then click...
... to suit your computer. Windows 2000, turn to page 14. Select the "Monitor" tab. Select "Display a list of compatible devices. Insert the supplied CD into your operating system. Select "FP71E" from the drop-down menu. 8. By pressing "OK" again in the next window you will be given... the driver, perform the following steps: 1. From the "Display Properties" window, select the "Settings" tab. Windows 98, turn to install your monitor's software Now click the "Have Disk" button in a specific location, so you can select the driver you want." Click "OK", and then click...

User Manual
Page 13
...then click "Next" twice. 12. Select "Driver" tab then click "Update Driver". 7. Scroll down and select your CD-ROM Driver. 2. Insert "BenQ LCD Monitor" CD-ROM into your CD ROM Driver, then click "Next" . 11. The "Upgrade Device Driver Wizard" will pop up . In the next ... start the "Add New Hardware Wizard". Click "Start" then "Settings". 3. Select "Monitor" then click "Properties". 6. From the "Display Properties" window, select the "Settings" tab. How to install your LCD Model (FP71E) from the list in the bottom right corner. 5. In the list of the known...
...then click "Next" twice. 12. Select "Driver" tab then click "Update Driver". 7. Scroll down and select your CD-ROM Driver. 2. Insert "BenQ LCD Monitor" CD-ROM into your CD ROM Driver, then click "Next" . 11. The "Upgrade Device Driver Wizard" will pop up . In the next ... start the "Add New Hardware Wizard". Click "Start" then "Settings". 3. Select "Monitor" then click "Properties". 6. From the "Display Properties" window, select the "Settings" tab. How to install your LCD Model (FP71E) from the list in the bottom right corner. 5. In the list of the known...

User Manual
Page 14
... you want .". 8. Click "OK" on the "Install From Disk" window. Choose the model from the list, then click "Next". 11. Insert "BenQ LCD Monitor's CD" into your CD-ROM and type d:\ (change the driver letter to install your CD-ROM driver if it is not drive D). Click "Have ...disk" and then click "Browse...". 9. Click the "Monitor" tab and then click "Change". 4. In the Display Properties window, click the "Settings" tab and click "Advanced...". 3. Choose "Display a list of the ...
... you want .". 8. Click "OK" on the "Install From Disk" window. Choose the model from the list, then click "Next". 11. Insert "BenQ LCD Monitor's CD" into your CD-ROM and type d:\ (change the driver letter to install your CD-ROM driver if it is not drive D). Click "Have ...disk" and then click "Browse...". 9. Click the "Monitor" tab and then click "Change". 4. In the Display Properties window, click the "Settings" tab and click "Advanced...". 3. Choose "Display a list of the ...

User Manual
Page 15
...choose the driver to exit installation. Click "Finish" to install" and then click "Next". 5. Select the "Monitor" tab in the new window and then click "Properties". 2. How to your monitor's software 15 Then click "Next". 4. In the next window, click "Have Disk...", an "Install From Disk..." window will pop up . The new drivers are now installed to install your computer. A small window will pop up . Select "FP71E". and then click "Next"....
...choose the driver to exit installation. Click "Finish" to install" and then click "Next". 5. Select the "Monitor" tab in the new window and then click "Properties". 2. How to your monitor's software 15 Then click "Next". 4. In the next window, click "Have Disk...", an "Install From Disk..." window will pop up . The new drivers are now installed to install your computer. A small window will pop up . Select "FP71E". and then click "Next"....
User Manual
Page 21
... X to select "Geometry" and press "Enter" key. Please set your operating system. If there is horizontal noise observed, press W or X key to adjust the monitor untill the noise disappears. If the "iKey" does not work properly and the "NON PRESET MODE" message is on control panel to access OSD. 3. Press... the "ikey" on the control panel and the monitor will find a list of supported modes in this is vertical noise observed, press W or X key to select "Geometry" and press "Enter" key. 7 ...
... X to select "Geometry" and press "Enter" key. Please set your operating system. If there is horizontal noise observed, press W or X key to adjust the monitor untill the noise disappears. If the "iKey" does not work properly and the "NON PRESET MODE" message is on control panel to access OSD. 3. Press... the "ikey" on the control panel and the monitor will find a list of supported modes in this is vertical noise observed, press W or X key to select "Geometry" and press "Enter" key. 7 ...
User Manual
Page 22
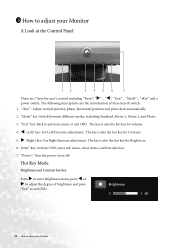
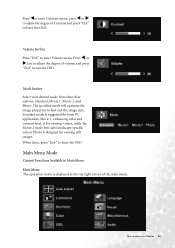
... key Press X to enter Brightness menu, press W or X to adjust the degree of brightness and press "Exit" to exit OSD. 22 How to adjust your Monitor A Look at the Control Panel 1 2 3 4 5 6 7 There are the introduction of these keys & switch. 1. "Mode" key: Switch between different modes, including ...", "X" , "W", "Exit" , "Mode" , "iKey" and a power switch. The key is also the hot key for volume. 4. 8 How to adjust your Monitor Enter" key: Activate OSD, enter sub menu, select items, confirm selection. 7. The following descriptions are 7 keys for Brightness. 6.
... key Press X to enter Brightness menu, press W or X to adjust the degree of brightness and press "Exit" to exit OSD. 22 How to adjust your Monitor A Look at the Control Panel 1 2 3 4 5 6 7 There are the introduction of these keys & switch. 1. "Mode" key: Switch between different modes, including ...", "X" , "W", "Exit" , "Mode" , "iKey" and a power switch. The key is also the hot key for volume. 4. 8 How to adjust your Monitor Enter" key: Activate OSD, enter sub menu, select items, confirm selection. 7. The following descriptions are 7 keys for Brightness. 6.
User Manual
Page 23
... 1, enhancing color and contrast level, is displayed in Main Menu Main Menu The operation mode is for basic PC application; Mode hot key Select your Monitor 23 The specified mode will optimize the image properties to leave the OSD. How to exit the OSD. Press Wto enter Contrast menu, press W or...
... 1, enhancing color and contrast level, is displayed in Main Menu Main Menu The operation mode is for basic PC application; Mode hot key Select your Monitor 23 The specified mode will optimize the image properties to leave the OSD. How to exit the OSD. Press Wto enter Contrast menu, press W or...
User Manual
Page 24
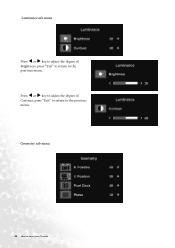
Press W or X key to adjust the degree of Brightness, press "Exit" to return to the previous menu. Luminance sub menu Press W or X key to adjust the degree of Contrast, press "Exit" to return to the previous menu. Geometry sub menu 24 How to adjust your Monitor
Press W or X key to adjust the degree of Brightness, press "Exit" to return to the previous menu. Luminance sub menu Press W or X key to adjust the degree of Contrast, press "Exit" to return to the previous menu. Geometry sub menu 24 How to adjust your Monitor
User Manual
Page 25
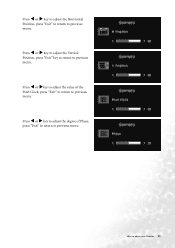
Press W or X key to adjust the Vertical Position, press "Exit" key to return to previous menu. Press W or X key to adjust the Horizontal Position, press "Exit" to return to previous menu. How to previous menu. Press W or Xkey to adjust the value of Phase, press "Exit" to return to previous menu. Press W or X key to adjust the degree of the Pixel Clock, press "Exit" to return to adjust your Monitor 25
Press W or X key to adjust the Vertical Position, press "Exit" key to return to previous menu. Press W or X key to adjust the Horizontal Position, press "Exit" to return to previous menu. How to previous menu. Press W or Xkey to adjust the value of Phase, press "Exit" to return to previous menu. Press W or X key to adjust the degree of the Pixel Clock, press "Exit" to return to adjust your Monitor 25
User Manual
Page 26
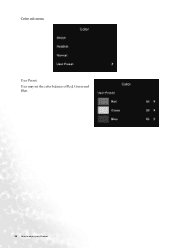
Color sub menu User Preset: User may set the color balance of Red, Green and Blue. 26 How to adjust your Monitor
Color sub menu User Preset: User may set the color balance of Red, Green and Blue. 26 How to adjust your Monitor
User Manual
Page 27
How to previous menu. OSD sub menu Press W or X key to adjust the Horizontal Position of the OSD, press "Exit" to return to adjust your Monitor 27 Press W or X key to adjust the display time of the OSD, press "Exit" to return to previous menu. PressW or X key to adjust the Vertical Position of the OSD, press "Exit" to return to previous menu.
How to previous menu. OSD sub menu Press W or X key to adjust the Horizontal Position of the OSD, press "Exit" to return to adjust your Monitor 27 Press W or X key to adjust the display time of the OSD, press "Exit" to return to previous menu. PressW or X key to adjust the Vertical Position of the OSD, press "Exit" to return to previous menu.
User Manual
Page 28
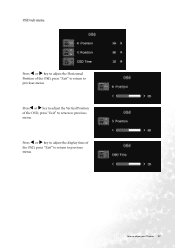
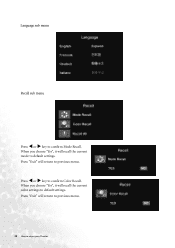
When you choose "Yes", it will recall the current mode to default settings. Press W or X key to confirm Mode Recall. When you choose "Yes", it will recall the current color settings to default settings. Press "Exit" will return to adjust your Monitor Press "Exit" will return to previous menu. 28 How to previous menu. Language sub menu Recall sub menu Press W or X key to confirm Color Recall.
When you choose "Yes", it will recall the current mode to default settings. Press W or X key to confirm Mode Recall. When you choose "Yes", it will recall the current color settings to default settings. Press "Exit" will return to adjust your Monitor Press "Exit" will return to previous menu. 28 How to previous menu. Language sub menu Recall sub menu Press W or X key to confirm Color Recall.
User Manual
Page 29
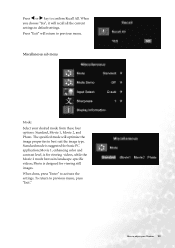
Miscellaneous sub menu Mode: Select your Monitor 29 The specified mode will optimize the image properties to adjust your desired mode from these four options: Standard, Movie 1, Movie 2, and Photo. Movie 1, enhancing ...
Miscellaneous sub menu Mode: Select your Monitor 29 The specified mode will optimize the image properties to adjust your desired mode from these four options: Standard, Movie 1, Movie 2, and Photo. Movie 1, enhancing ...

