
User Manual
Page 2
ii Disclaimer BenQ Corporation makes no representations or warranties, either expressed or implied, with a lint-free, non-abrasive cloth. Clean the LCD monitor surface with respect to notify any person of such revision or changes. Care And Cleaning •..., magnetic, optical, chemical, manual or otherwise, without obligation of BenQ Corporation to the contents hereof and specifically disclaims any warranties, merchantability or fitness for any particular purpose. All rights reserved. Your monitor should be reproduced, transmitted, transcribed, stored in a retrieval system ...
ii Disclaimer BenQ Corporation makes no representations or warranties, either expressed or implied, with a lint-free, non-abrasive cloth. Clean the LCD monitor surface with respect to notify any person of such revision or changes. Care And Cleaning •..., magnetic, optical, chemical, manual or otherwise, without obligation of BenQ Corporation to the contents hereof and specifically disclaims any warranties, merchantability or fitness for any particular purpose. All rights reserved. Your monitor should be reproduced, transmitted, transcribed, stored in a retrieval system ...
User Manual
Page 5
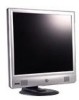
BenQ LCD Monitor Quick Start Guide CD-ROM Disk Power Cord Signal Cable: D-Sub 02 P/N:53.L900 3 .0 Getting started When unpacking please check you have the following items. If they are missing or are damaged, please immediately contact the dealer at which you purchased the goods. 1 Getting started 5
BenQ LCD Monitor Quick Start Guide CD-ROM Disk Power Cord Signal Cable: D-Sub 02 P/N:53.L900 3 .0 Getting started When unpacking please check you have the following items. If they are missing or are damaged, please immediately contact the dealer at which you purchased the goods. 1 Getting started 5
User Manual
Page 9
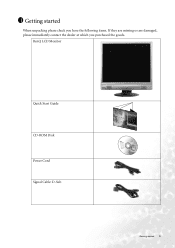
ii.> Connect the audio cable to your monitor. iii.> Connect the signal cable (D-Sub and/or DVI-D) to your monitor. 3 How to install your monitor. Align the base plate to install your LCD monitor. 1. i.> Connect the power cord to install your monitor hardware 9 Please go along with the following steps to your monitor hardware Make sure that the computer and monitor's power are both turned off. How to the monitor stand and push it upward until a clicking sound is heard. 2.
ii.> Connect the audio cable to your monitor. iii.> Connect the signal cable (D-Sub and/or DVI-D) to your monitor. 3 How to install your monitor. Align the base plate to install your LCD monitor. 1. i.> Connect the power cord to install your monitor hardware 9 Please go along with the following steps to your monitor hardware Make sure that the computer and monitor's power are both turned off. How to the monitor stand and push it upward until a clicking sound is heard. 2.
User Manual
Page 11
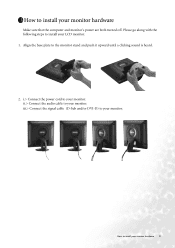
Adjusting the viewing angle Your LCD monitor is designed with a tilt feature that allows you to install your monitor hardware 11 How to achieve your fingers into the seam between the base and monitor stand while detaching the base. Detach the base Press the Lock button and pull downward to remove the monitor base from the monitor. Note: Do not insert your optimal viewing angle.
Adjusting the viewing angle Your LCD monitor is designed with a tilt feature that allows you to install your monitor hardware 11 How to achieve your fingers into the seam between the base and monitor stand while detaching the base. Detach the base Press the Lock button and pull downward to remove the monitor base from the monitor. Note: Do not insert your optimal viewing angle.

User Manual
Page 13
... for this device so that I can choose a specific driver" then click "Next". 9. Select your LCD Model (FP71E) from the list in the bottom right corner. 5. How to install your CD-ROM Driver. 2. Insert "BenQ LCD Monitor" CD-ROM into your monitor's software 13 Select "Display a list of folders within the CD-ROM, select "Drivers" folder then...
... for this device so that I can choose a specific driver" then click "Next". 9. Select your LCD Model (FP71E) from the list in the bottom right corner. 5. How to install your CD-ROM Driver. 2. Insert "BenQ LCD Monitor" CD-ROM into your monitor's software 13 Select "Display a list of folders within the CD-ROM, select "Drivers" folder then...

User Manual
Page 14
... and then click "Change". 4. Click "OK" on the "Install From Disk" window. Click "Finish" to complete the installation. 14 How to match your monitor's software Insert "BenQ LCD Monitor's CD" into your CD-ROM and type d:\ (change the driver letter to install your CD-ROM driver if it is not drive D). Choose "Display a list...
... and then click "Change". 4. Click "OK" on the "Install From Disk" window. Click "Finish" to complete the installation. 14 How to match your monitor's software Insert "BenQ LCD Monitor's CD" into your CD-ROM and type d:\ (change the driver letter to install your CD-ROM driver if it is not drive D). Choose "Display a list...

User Manual
Page 16
... by using Windows 98/2000/ME or XP you can change the picture resolution as follows: 1. However flaws do occur with a resolution of LCD display technology, the picture resolution is achieved with the interpolated resolution. that is called "Native Resolution" or maximal resolution - If you must use... the native resolution. This is , the clearest picture. 5 Choosing the best picture resolution Due to have all the advantages of LCD technology you are displayed on the right-hand side. 16 Choosing the best picture resolution The best picture possible for your...
... by using Windows 98/2000/ME or XP you can change the picture resolution as follows: 1. However flaws do occur with a resolution of LCD display technology, the picture resolution is achieved with the interpolated resolution. that is called "Native Resolution" or maximal resolution - If you must use... the native resolution. This is , the clearest picture. 5 Choosing the best picture resolution Due to have all the advantages of LCD technology you are displayed on the right-hand side. 16 Choosing the best picture resolution The best picture possible for your...

User Manual
Page 18
... to choose the right Refresh Rate 6 How to choose the right Refresh Rate You don't have to choose the highest possible refresh rate on an LCD display, because it is a table with the factory modes in the Control Panel. 18 How to flicker. You can change the refresh rate as follows...
... to choose the right Refresh Rate 6 How to choose the right Refresh Rate You don't have to choose the highest possible refresh rate on an LCD display, because it is a table with the factory modes in the Control Panel. 18 How to flicker. You can change the refresh rate as follows...

User Manual
Page 32
... active. If the image is still not correct and the OSD also has faulty coloration, this monitor does not support, please change the setting to one of the supported mode. If not, optimize... the image by using a display mode that occurs in LCD technology. Select the native resolution. You can minimize these instructions. Press W or X key to select ... white, one or more pixels are permanently red, green, blue or another color. • Clean the LCD screen. • Cycle power on-off and is a natural defect that this means one of Range"...
... active. If the image is still not correct and the OSD also has faulty coloration, this monitor does not support, please change the setting to one of the supported mode. If not, optimize... the image by using a display mode that occurs in LCD technology. Select the native resolution. You can minimize these instructions. Press W or X key to select ... white, one or more pixels are permanently red, green, blue or another color. • Clean the LCD screen. • Cycle power on-off and is a natural defect that this means one of Range"...


