User Manual
Page 3
...know your monitor 6 Front view ...6 Back view ...6 How to assemble your monitor hardware 7 How to detach the stand base ...12 Getting the most from your BenQ monitor 13 How to install the monitor on a new computer 14 How to upgrade the monitor on an existing computer 15 How to install on... Windows 7 system 16 How to install on Windows Vista systems 17 How to install on Windows XP system 18 Picture optimization ...19 How to adjust your monitor 20 The control panel ...20 Hot key mode ...21 Main menu mode ...22 Troubleshooting ...34 Frequently asked questions...
...know your monitor 6 Front view ...6 Back view ...6 How to assemble your monitor hardware 7 How to detach the stand base ...12 Getting the most from your BenQ monitor 13 How to install the monitor on a new computer 14 How to upgrade the monitor on an existing computer 15 How to install on... Windows 7 system 16 How to install on Windows Vista systems 17 How to install on Windows XP system 18 Picture optimization ...19 How to adjust your monitor 20 The control panel ...20 Hot key mode ...21 Main menu mode ...22 Troubleshooting ...34 Frequently asked questions...

User Manual
Page 4
1. Getting started When unpacking please check you have the following items. If any are missing or damaged, please contact the place of purchase for your region.) Video Cable: D-Sub 4 Getting started BenQ LCD Monitor E2420HD Monitor Base Quick Start Guide CD-ROM Power Cord (Picture may differ from product supplied for a replacement.
1. Getting started When unpacking please check you have the following items. If any are missing or damaged, please contact the place of purchase for your region.) Video Cable: D-Sub 4 Getting started BenQ LCD Monitor E2420HD Monitor Base Quick Start Guide CD-ROM Power Cord (Picture may differ from product supplied for a replacement.
User Manual
Page 9
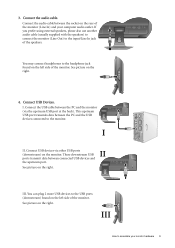
... monitor. You may connect headphones to the headphone jack found on the right. SDIF-OUT PDIF-OUT III. 3. Connect USB Devices. See picture on the left side of the monitor. This upstream USB port transmits data between connected USB devices and the upstream port. III How to the...) found on the rear of the speakers. You can plug 2 more USB devices to assemble your computer audio outlet. I . See picture on the right. See picture on the right. Connect USB devices via the upstream USB port at the back). I II. These downstream USB II ports transmit data between...
... monitor. You may connect headphones to the headphone jack found on the right. SDIF-OUT PDIF-OUT III. 3. Connect USB Devices. See picture on the left side of the monitor. This upstream USB port transmits data between connected USB devices and the upstream port. III How to the...) found on the rear of the speakers. You can plug 2 more USB devices to assemble your computer audio outlet. I . See picture on the right. See picture on the right. Connect USB devices via the upstream USB port at the back). I II. These downstream USB II ports transmit data between...

User Manual
Page 10
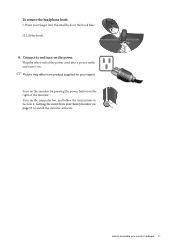
... by squeezing the clip inwards as illustrated. I headphone. 5. II. Install the headphone hook (optional step). These two slots are located under the two inverted triangles (picture shown on the rear of the power cord into the two slots (part of the headphone hook is ready to the monitor. When you hear...
... by squeezing the clip inwards as illustrated. I headphone. 5. II. Install the headphone hook (optional step). These two slots are located under the two inverted triangles (picture shown on the rear of the power cord into the two slots (part of the headphone hook is ready to the monitor. When you hear...
User Manual
Page 11
Lift the hook. 8. Turn on the monitor by pressing the power button on the right of the power cord into the small hole on the computer too, and follow the instructions in Section 4: Getting the most from product supplied for your region. Turn on the hook base. How to install the monitor software. Plug the other end of the monitor. Connect-to and turn it on the power. Picture may differ from your BenQ monitor on page 13 to assemble your finger into a power outlet and turn -on . Point your monitor hardware 11 To remove the headphone hook: I. II.
Lift the hook. 8. Turn on the monitor by pressing the power button on the right of the power cord into the small hole on the computer too, and follow the instructions in Section 4: Getting the most from product supplied for your region. Turn on the hook base. How to install the monitor software. Plug the other end of the monitor. Connect-to and turn it on the power. Picture may differ from your BenQ monitor on page 13 to assemble your finger into a power outlet and turn -on . Point your monitor hardware 11 To remove the headphone hook: I. II.
User Manual
Page 19
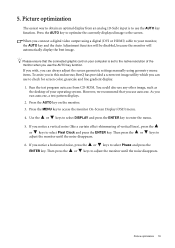
...menu. 4. When you connect a digital video output using geometry menu items. To assist you in this endeavour, BenQ has provided a screen test image utility which you use auto.exe. Press the AUTO key on your computer is... Then press the or keys to obtain an optimal display from CD-ROM. Picture optimization The easiest way to adjust the monitor until the noise disappears. 6. Press the MENU key to... enter the menu. 5. Picture optimization 19 Please ensure that you can use to select Pixel Clock and press the ENTER ...
...menu. 4. When you connect a digital video output using geometry menu items. To assist you in this endeavour, BenQ has provided a screen test image utility which you use auto.exe. Press the AUTO key on your computer is... Then press the or keys to obtain an optimal display from CD-ROM. Picture optimization The easiest way to adjust the monitor until the noise disappears. 6. Press the MENU key to... enter the menu. 5. Picture optimization 19 Please ensure that you can use to select Pixel Clock and press the ENTER ...
User Manual
Page 21
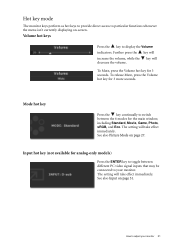
.... Mode hot key Press the key continually to switch between different PC video signal inputs that may be connected to your monitor 21 See also Picture Mode on -screen. Hot key mode The monitor keys perform as hot keys to provide direct access to particular functions whenever the menu isn't currently...
.... Mode hot key Press the key continually to switch between different PC video signal inputs that may be connected to your monitor 21 See also Picture Mode on -screen. Hot key mode The monitor keys perform as hot keys to provide direct access to particular functions whenever the menu isn't currently...

User Manual
Page 22
... Settings" for more information on each menu, please refer to the following main OSD menu. 1 2 3 4 5 There are five main OSD menus: DISPLAY Auto Adjustment H. Picture Advanced 4. Audio 5. For more details. Main menu mode You can use the OSD (On Screen Display) menu to adjust all the settings on your monitor... Press the MENU key to display the following pages: • Display menu on page 23 • Picture menu on page 25 • Picture Advanced menu on page 27 • Audio menu on page 30 • System menu on page 31 22 How to enter the...
... Settings" for more information on each menu, please refer to the following main OSD menu. 1 2 3 4 5 There are five main OSD menus: DISPLAY Auto Adjustment H. Picture Advanced 4. Audio 5. For more details. Main menu mode You can use the OSD (On Screen Display) menu to adjust all the settings on your monitor... Press the MENU key to display the following pages: • Display menu on page 23 • Picture menu on page 25 • Picture Advanced menu on page 27 • Audio menu on page 30 • System menu on page 31 22 How to enter the...

User Manual
Page 24
... with the analog input video signal. Press the or adjust the value. Not applicable to a digital input signal. 0 to 63 See also: Picture optimization on page 19. Adjusts the pixel clock frequency timing to adjust your monitor H. Adjusts the vertical position of the screen image. keys to... 0 to 100 0 to 100 0 to 100 See also: Picture optimization on page 19. 24 How to synchronize with the analog input video signal. Adjusts the pixel clock phase timing to a digital input signal....
... with the analog input video signal. Press the or adjust the value. Not applicable to a digital input signal. 0 to 63 See also: Picture optimization on page 19. Adjusts the pixel clock frequency timing to adjust your monitor H. Adjusts the vertical position of the screen image. keys to... 0 to 100 0 to 100 0 to 100 See also: Picture optimization on page 19. 24 How to synchronize with the analog input video signal. Adjusts the pixel clock phase timing to a digital input signal....

User Manual
Page 25
...Select Back 2. To return to display the main menu. Adjusts the degree of the subjects in the image. Press the or keys to select PICTURE and then press the ENTER key to decrease the gamma value (tone becomes lighter). Press the key to increase the gamma value (tone becomes .... Adjusts the tone luminance. Press the key to improve the crispness of the display and press the key to adjust your monitor 25 Picture menu Available menu options may vary depending on the display. Adjusts the clarity and visibility of the edges of difference between light and dark...
...Select Back 2. To return to display the main menu. Adjusts the degree of the subjects in the image. Press the or keys to select PICTURE and then press the ENTER key to decrease the gamma value (tone becomes lighter). Press the key to increase the gamma value (tone becomes .... Adjusts the tone luminance. Press the key to improve the crispness of the display and press the key to adjust your monitor 25 Picture menu Available menu options may vary depending on the display. Adjusts the clarity and visibility of the edges of difference between light and dark...

User Manual
Page 27
...with low power consumption by providing minimum brightness for saving electricity with the peripheral devices, such as printers, DSCs, etc. • Eco - Picture Mode Senseye Demo Dynamic Contrast Display Mode Color Format HDMI RGB PC Range Standard OFF 0 RGB RGB(16~235) Move ENTER Select MENU Exit ... button. Press the or keys to move the highlight to a menu item and then press the ENTER key to adjust your monitor 27 Item Picture Mode Function Selects a picture mode that item. 4. Range • Standard • Movie • Game • Photo • sRGB • Eco How to...
...with low power consumption by providing minimum brightness for saving electricity with the peripheral devices, such as printers, DSCs, etc. • Eco - Picture Mode Senseye Demo Dynamic Contrast Display Mode Color Format HDMI RGB PC Range Standard OFF 0 RGB RGB(16~235) Move ENTER Select MENU Exit ... button. Press the or keys to move the highlight to a menu item and then press the ENTER key to adjust your monitor 27 Item Picture Mode Function Selects a picture mode that item. 4. Range • Standard • Movie • Game • Photo • sRGB • Eco How to...

User Manual
Page 28
... noise if present around your monitor Press the or keys to create the optimal contrast. The function is from a HDMI or D-Sub (VGA converted from Picture Mode. The screen will be displayed without geometric distortion filling as much of the display as possible. 16:9 images will fill the screen horizontally while...
... noise if present around your monitor Press the or keys to create the optimal contrast. The function is from a HDMI or D-Sub (VGA converted from Picture Mode. The screen will be displayed without geometric distortion filling as much of the display as possible. 16:9 images will fill the screen horizontally while...

User Manual
Page 34
... can be seen: One of Range" on the screen: • Activate the power management function to let your dealer to the factory defaults. Select MENU > PICTURE > Color > Reset Color, and then choose "YES" in green and there is a message "Out of several pixels is visible on the screen, this means you...
... can be seen: One of Range" on the screen: • Activate the power management function to let your dealer to the factory defaults. Select MENU > PICTURE > Color > Reset Color, and then choose "YES" in green and there is a message "Out of several pixels is visible on the screen, this means you...
