
User Manual
Page 5
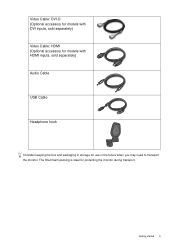
Getting started 5 The fitted foam packing is ideal for use in storage for protecting the monitor during transport. Video Cable: DVI-D (Optional accessory for models with DVI inputs, sold separately) Video Cable: HDMI (Optional accessory for models with HDMI inputs, sold separately) Audio Cable USB Cable Headphone hook Consider keeping the box and packaging in the future when you may need to transport the monitor.
Getting started 5 The fitted foam packing is ideal for use in storage for protecting the monitor during transport. Video Cable: DVI-D (Optional accessory for models with DVI inputs, sold separately) Video Cable: HDMI (Optional accessory for models with HDMI inputs, sold separately) Audio Cable USB Cable Headphone hook Consider keeping the box and packaging in the future when you may need to transport the monitor.

User Manual
Page 6
... 2. connecting to the 12 PC) 12 9. connecting to 10 USB devices) 11. 2. USB port x 1 (upstream; Getting to know your monitor connecting to USB devices) 13.Headphone hook indicators (two inverted triangles) 14.Control buttons 15.Power button Above diagram may vary depending on the model. 6 Getting to know your monitor Front view...
... 2. connecting to the 12 PC) 12 9. connecting to 10 USB devices) 11. 2. USB port x 1 (upstream; Getting to know your monitor connecting to USB devices) 13.Headphone hook indicators (two inverted triangles) 14.Control buttons 15.Power button Above diagram may vary depending on the model. 6 Getting to know your monitor Front view...

User Manual
Page 10
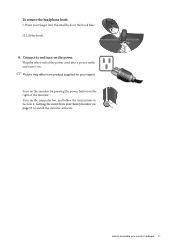
...the monitor stand. 7. II. Plug one end of the power cord into the two slots (part of the vents). You can install the headphone hook to place your headphone is 500g. 10 How to retain the cables neatly in use . It is ready to the vents and is useful when your I . When... you hear the click, the hook is attached to use . Install the headphone hook (optional step). 5. II The maximum load capacity of the monitor. Connect the power cable to a power outlet just yet. 6. Release ...
...the monitor stand. 7. II. Plug one end of the power cord into the two slots (part of the vents). You can install the headphone hook to place your headphone is 500g. 10 How to retain the cables neatly in use . It is ready to the vents and is useful when your I . When... you hear the click, the hook is attached to use . Install the headphone hook (optional step). 5. II The maximum load capacity of the monitor. Connect the power cable to a power outlet just yet. 6. Release ...
User Manual
Page 11
Lift the hook. 8. Point your BenQ monitor on page 13 to install the monitor software. II. Plug the other end of the monitor. Turn on the monitor by pressing the power button on the right of the power cord into the small hole on the power. Picture may differ from your finger into a power outlet and turn -on the hook base. How to and turn it on the computer too, and follow the instructions in Section 4: Getting the most from product supplied for your monitor hardware 11 Connect-to assemble your region. To remove the headphone hook: I. Turn on .
Lift the hook. 8. Point your BenQ monitor on page 13 to install the monitor software. II. Plug the other end of the monitor. Turn on the monitor by pressing the power button on the right of the power cord into the small hole on the power. Picture may differ from your finger into a power outlet and turn -on the hook base. How to and turn it on the computer too, and follow the instructions in Section 4: Getting the most from product supplied for your monitor hardware 11 Connect-to assemble your region. To remove the headphone hook: I. Turn on .

