User Manual
Page 7
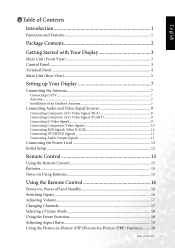
... Connecting DVI/HDCP Signals 11 Connecting Audio Output Signals 11 Connecting the Power Cord 12 Initial Setup...12 Remote Control 13 Using the Remote Control 15 Batteries...15 Notes on Using Batteries 15 Using the Remote Control 16 Power on, Power off and Standby 16 Switching Inputs 16 Adjusting Volume 17 Changing Channels...
... Connecting DVI/HDCP Signals 11 Connecting Audio Output Signals 11 Connecting the Power Cord 12 Initial Setup...12 Remote Control 13 Using the Remote Control 15 Batteries...15 Notes on Using Batteries 15 Using the Remote Control 16 Power on, Power off and Standby 16 Switching Inputs 16 Adjusting Volume 17 Changing Channels...

User Manual
Page 10
English Package Contents Please ensure that the following items are included with the location of cables may vary with your DV3250 LCD Display. DV3250 LCD Display (x1) User's manual (x1) Power cord (x1) Antenna cable (x1) Remote control (x1) AAA batteries (x2) Actual number and type of purchase. 2 Package Contents If any item is missing or damaged, contact an authorized dealer immediately.
English Package Contents Please ensure that the following items are included with the location of cables may vary with your DV3250 LCD Display. DV3250 LCD Display (x1) User's manual (x1) Power cord (x1) Antenna cable (x1) Remote control (x1) AAA batteries (x2) Actual number and type of purchase. 2 Package Contents If any item is missing or damaged, contact an authorized dealer immediately.
User Manual
Page 11
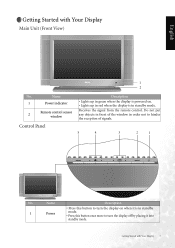
... Description • Press this button to turn the display off by placing it into standby mode. English Getting Started with Your Display 3 Name 1 Power indicator 2 Remote control sensor window Control Panel Description • Lights up in green when the display is powered on when it is in standby 1 Power mode. •...; Press this button once more to hinder the reception of signals. 5 4 3 2 1 No. Receives the signal from the remote control. Getting Started with Your Display Main Unit (Front View) 1 2 No.
... Description • Press this button to turn the display off by placing it into standby mode. English Getting Started with Your Display 3 Name 1 Power indicator 2 Remote control sensor window Control Panel Description • Lights up in green when the display is powered on when it is in standby 1 Power mode. •...; Press this button once more to hinder the reception of signals. 5 4 3 2 1 No. Receives the signal from the remote control. Getting Started with Your Display Main Unit (Front View) 1 2 No.
User Manual
Page 21
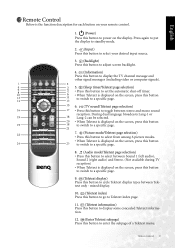
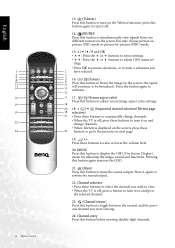
...this button to display some concealed Teletext information. 12. (Enter Teletext subpage) Press this button to cycle Teletext display types between Teletext only - Remote Control 13 Press again to put the display to standby mode. 2. (Input) Press this button to select your desired input source. 3. (Backlight... the automatic shut-off timer. • When Teletext is the function description for each button on your remote control. 1. (Power) Press this button to power on the display. English Remote Control Below is displayed on the screen, press this button to switch to a specific page. 6. (...
...this button to display some concealed Teletext information. 12. (Enter Teletext subpage) Press this button to cycle Teletext display types between Teletext only - Remote Control 13 Press again to put the display to standby mode. 2. (Input) Press this button to select your desired input source. 3. (Backlight... the automatic shut-off timer. • When Teletext is the function description for each button on your remote control. 1. (Power) Press this button to power on the display. English Remote Control Below is displayed on the screen, press this button to switch to a specific page. 6. (...
User Manual
Page 22
... to restore the sound output. 22. Pressing this button again removes the OSD. 21. (Mute) Press this button to mute the sound output. English 14 Remote Control 13. (Teletext) Press this button to turn on and go to the previous or next page. 19. +/Press these buttons to raise or lower...
... to restore the sound output. 22. Pressing this button again removes the OSD. 21. (Mute) Press this button to mute the sound output. English 14 Remote Control 13. (Teletext) Press this button to turn on and go to the previous or next page. 19. +/Press these buttons to raise or lower...
User Manual
Page 23
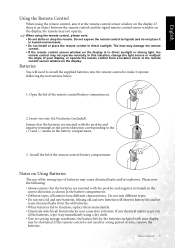
...the correct direction as shown in the battery compartment. 3. Please note the following the instructions below. 1. The heat may damage the remote control. • If the remote control sensor window on the display is not used for the batteries included with your display, or operate the...chemical matter seeps out of time, remove the batteries. Install the lid of batteries may not operate. Notes on the display. Do not expose the remote control to liquids and do not place it up immediately using a dry cloth. • Due to the (+) and (-) marks in the battery ...
...the correct direction as shown in the battery compartment. 3. Please note the following the instructions below. 1. The heat may damage the remote control. • If the remote control sensor window on the display is not used for the batteries included with your display, or operate the...chemical matter seeps out of time, remove the batteries. Install the lid of batteries may not operate. Notes on the display. Do not expose the remote control to liquids and do not place it up immediately using a dry cloth. • Due to the (+) and (-) marks in the battery ...
User Manual
Page 24
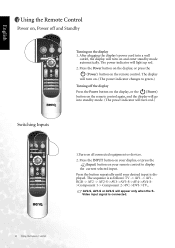
...DVI->TV... The power indicator will appear only when the SVideo input signal is connected. 16 Using the Remote Control AV2-S, AV3-S or AV4-S will light up red. 2. Press the button repeatedly until your remote control to green.) Turning off and Standby Turning on the display 1. The display will turn on. (... displayed. After plugging the display's power cord into standby mode. (The power indicator will turn on and enter standby mode automatically. English Using the Remote Control Power on, Power off the display Press the Power button on the display, or the (Power) button on the...
...DVI->TV... The power indicator will appear only when the SVideo input signal is connected. 16 Using the Remote Control AV2-S, AV3-S or AV4-S will light up red. 2. Press the button repeatedly until your remote control to green.) Turning off and Standby Turning on the display 1. The display will turn on. (... displayed. After plugging the display's power cord into standby mode. (The power indicator will turn on and enter standby mode automatically. English Using the Remote Control Power on, Power off the display Press the Power button on the display, or the (Power) button on the...

User Manual
Page 25
...channels Press the Channel or Channel buttons on your display to select channel 8, press the channel selection button on the remote control. • To select a double-digit channel, press the Channel entry button on the display to decrease volume. button on the... to sequentially select the TV channels available in length as volume falls. The volume indicator will depend on the remote control. Press the Volume button on the Remote Control to temporarily cut off the sound. 2. Using the Channel selection buttons on your area. For example, to select "Sound 1", "Sound ...
...channels Press the Channel or Channel buttons on your display to select channel 8, press the channel selection button on the remote control. • To select a double-digit channel, press the Channel entry button on the display to decrease volume. button on the... to sequentially select the TV channels available in length as volume falls. The volume indicator will depend on the remote control. Press the Volume button on the Remote Control to temporarily cut off the sound. 2. Using the Channel selection buttons on your area. For example, to select "Sound 1", "Sound ...
User Manual
Page 26
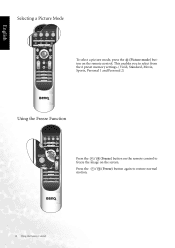
English Selecting a Picture Mode To select a picture mode, press the (Picture mode) button on the remote control to restore normal motion. 18 Using the Remote Control Press the / (Freeze) button again to freeze the image on the screen. This enables you to select from the 6 preset memory settings. (Vivid, Standard, Movie, Sports, Personal 1 and Personal 2) Using the Freeze Function Press the / (Freeze) button on the remote control.
English Selecting a Picture Mode To select a picture mode, press the (Picture mode) button on the remote control to restore normal motion. 18 Using the Remote Control Press the / (Freeze) button again to freeze the image on the screen. This enables you to select from the 6 preset memory settings. (Vivid, Standard, Movie, Sports, Personal 1 and Personal 2) Using the Freeze Function Press the / (Freeze) button on the remote control.
User Manual
Page 27
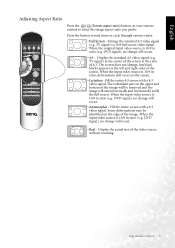
...video source without zooming. Fill the entire screen with a 4:3 video signal. The redundant part on the upper and bottom of the screen. Using the Remote Control 19 When the input video source is 16:9 in ratio, deformation will extend vertically and horizontally to cycle through various ratios. • Full ...video source is 16:9 in ratio (e.g. Enlarge the standard 4:3 video signal (e.g. English Adjusting Aspect Ratio Press the / (Screen aspect ratio) button on your remote control to 16:9 full screen video signal. Press the button several times to fill the full screen.
...video source without zooming. Fill the entire screen with a 4:3 video signal. The redundant part on the upper and bottom of the screen. Using the Remote Control 19 When the input video source is 16:9 in ratio, deformation will extend vertically and horizontally to cycle through various ratios. • Full ...video source is 16:9 in ratio (e.g. Enlarge the standard 4:3 video signal (e.g. English Adjusting Aspect Ratio Press the / (Screen aspect ratio) button on your remote control to 16:9 full screen video signal. Press the button several times to fill the full screen.

User Manual
Page 28
English Using the Picture-in-Picture (PIP)/Picture-by-Picture (PBP) Function If your remote control to display both images on the screen at once in PIP (Picture In Picture) or PBP (Picture By Picture) modes: • Full Screen: Normal ... timer) button on your display is set the automatic sleep timer. 2. Using the Sleep Timer 1. Press the button again to 180 minutes. 20 Using the Remote Control Time is connected to an additional Video or PC source, pressing the PIP/PBP button allows you to set in graphics. • PBP G by...
English Using the Picture-in-Picture (PIP)/Picture-by-Picture (PBP) Function If your remote control to display both images on the screen at once in PIP (Picture In Picture) or PBP (Picture By Picture) modes: • Full Screen: Normal ... timer) button on your display is set the automatic sleep timer. 2. Using the Sleep Timer 1. Press the button again to 180 minutes. 20 Using the Remote Control Time is connected to an additional Video or PC source, pressing the PIP/PBP button allows you to set in graphics. • PBP G by...

User Manual
Page 29
Display Information Press the (Information) button on your remote control to display the signal information, including input video signal source, Video format, TV sound and current selected channel. When viewing the display in dimly ..." will reduce the image brightness and make the dark areas of your display's backlight, press the (Backlight) button on your remote control to select "Dark", Normal" or "Bright". Using the Remote Control 21 Setting the backlight to "Dark". English Adjusting Backlight To adjust the intensity of the image darker thus maintaining a high...
Display Information Press the (Information) button on your remote control to display the signal information, including input video signal source, Video format, TV sound and current selected channel. When viewing the display in dimly ..." will reduce the image brightness and make the dark areas of your display's backlight, press the (Backlight) button on your remote control to select "Dark", Normal" or "Bright". Using the Remote Control 21 Setting the backlight to "Dark". English Adjusting Backlight To adjust the intensity of the image darker thus maintaining a high...
User Manual
Page 30
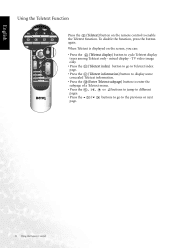
... to jump to different pages. • Press the / buttons to go to cycle Teletext display types among Teletext only - When Teletext is displayed on the remote control to enable the Teletext function. mixed display - To disable the function, press the button again. English Using the Teletext Function Press the (Teletext) button...
... to jump to different pages. • Press the / buttons to go to cycle Teletext display types among Teletext only - When Teletext is displayed on the remote control to enable the Teletext function. mixed display - To disable the function, press the button again. English Using the Teletext Function Press the (Teletext) button...
User Manual
Page 32
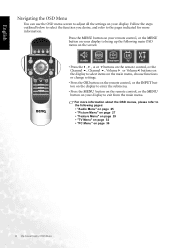
Press the MENU button on your remote control, or the MENU button on your display to bring up the following pages: • "Audio Menu...on page 32 • "PC Menu" on your display to enter the submenu. • Press the MENU button on the remote control, or the MENU button on page 36 24 On-Screen Display (OSD) Menu Follow the steps outlined below to select ...OSD menus, please refer to the following main OSD menu on the screen: • Press the , , or buttons on the remote control, or the Channel , Channel , Volume or Volume buttons on the display to select items on the main menu, choose ...
Press the MENU button on your remote control, or the MENU button on your display to bring up the following pages: • "Audio Menu...on page 32 • "PC Menu" on your display to enter the submenu. • Press the MENU button on the remote control, or the MENU button on page 36 24 On-Screen Display (OSD) Menu Follow the steps outlined below to select ...OSD menus, please refer to the following main OSD menu on the screen: • Press the , , or buttons on the remote control, or the Channel , Channel , Volume or Volume buttons on the display to select items on the main menu, choose ...
User Manual
Page 33
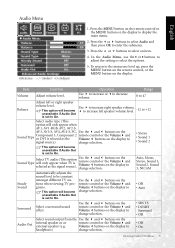
... the submenu. 3. To return to select an item. 4. Item Function Operation Range Volume Adjust volume level. Use the and buttons on the remote control or the Volume and Volume buttons on the Audio Out internal speaker or or external speaker (e.g. Use to increase right speaker volume, to... when TV is set to display the main menu. 2. On-Screen Display (OSD) Menu 25 English Audio Menu 1. Press the MENU button on the remote control or the MENU button on the display to change selection. • Stereo • Sound 1 • Sound 2 This option will become unavailable...
... the submenu. 3. To return to select an item. 4. Item Function Operation Range Volume Adjust volume level. Use the and buttons on the remote control or the Volume and Volume buttons on the Audio Out internal speaker or or external speaker (e.g. Use to increase right speaker volume, to... when TV is set to display the main menu. 2. On-Screen Display (OSD) Menu 25 English Audio Menu 1. Press the MENU button on the remote control or the MENU button on the display to change selection. • Stereo • Sound 1 • Sound 2 This option will become unavailable...

User Manual
Page 35
... the options. 5. Press the or buttons to select Picture and then press OK to display the main menu. 2. Use the and buttons on the remote control or the Volume and Volume buttons on the display to change selec- • Panel Default: Backlight color • Warm: Biased toward red •...; Normal: Standard video/ TV color temperature tion. • Cool: Biased toward blue - Use the and buttons on the remote control or • Auto the Volume and • High Volume buttons on the display to enter the submenu. 3. Press the MENU button on the...
... the options. 5. Press the or buttons to select Picture and then press OK to display the main menu. 2. Use the and buttons on the remote control or the Volume and Volume buttons on the display to change selec- • Panel Default: Backlight color • Warm: Biased toward red •...; Normal: Standard video/ TV color temperature tion. • Cool: Biased toward blue - Use the and buttons on the remote control or • Auto the Volume and • High Volume buttons on the display to enter the submenu. 3. Press the MENU button on the...
User Manual
Page 36
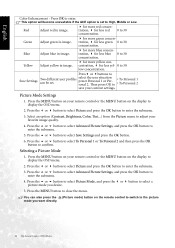
Green Adjust green in image. tration, for less red 0 to adjust your remote control or the MENU button on your current settings. Picture Mode Settings 1. Press the MENU button on your favorite image quality. 4. Press the or button ... . Red Adjust red in image. for more yellow concentration, for more blue concen- Then press OK to • To Personal 1 • To Personal 2 save your remote control or the MENU button on the remote control to switch to 30 low concentration. English Color Enhancement -
Green Adjust green in image. tration, for less red 0 to adjust your remote control or the MENU button on your current settings. Picture Mode Settings 1. Press the MENU button on your favorite image quality. 4. Press the or button ... . Red Adjust red in image. for more yellow concentration, for more blue concen- Then press OK to • To Personal 1 • To Personal 2 save your remote control or the MENU button on the remote control to switch to 30 low concentration. English Color Enhancement -

User Manual
Page 37
...Sleep Timer automatically turn off the display. change selection. Set the Sleep timer to the menu one level up, press the MENU button on the remote control, or the MENU button on the display to enter. Press OK to change selection. English Feature Menu 1. buttons on the display. Advanced ...the display to change selection. Display video and Use the and buttons on Freeze motion of screen the remote control or the image (however, broad- Use the and buttons on the remote control or the Volume and Volume buttons on source you want to hear. Press the MENU button on...
...Sleep Timer automatically turn off the display. change selection. Set the Sleep timer to the menu one level up, press the MENU button on the remote control, or the MENU button on the display to enter. Press OK to change selection. English Feature Menu 1. buttons on the display. Advanced ...the display to change selection. Display video and Use the and buttons on Freeze motion of screen the remote control or the image (however, broad- Use the and buttons on the remote control or the Volume and Volume buttons on source you want to hear. Press the MENU button on...
User Manual
Page 38
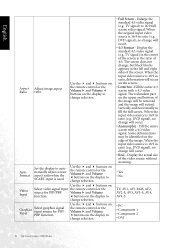
.... Fill the entire screen with a 4:3 video signal. Auto Format Set the display to fill the full screen. Use the and buttons on the remote control or the Volume and Volume buttons on the screen. • Letterbox -Fill the entire 4:3 screen with a 4:3 video signal. When the ...used. When the input video source is 16:9 in ratio (e.g. Display the standard 4:3 video signal (e.g. Use the and buttons on the remote control or the Volume and Volume buttons on the display to change will extend vertically and horizontally to automatically adjust screen aspect ratio when ...
.... Fill the entire screen with a 4:3 video signal. Auto Format Set the display to fill the full screen. Use the and buttons on the remote control or the Volume and Volume buttons on the screen. • Letterbox -Fill the entire 4:3 screen with a 4:3 video signal. When the ...used. When the input video source is 16:9 in ratio (e.g. Display the standard 4:3 video signal (e.g. Use the and buttons on the remote control or the Volume and Volume buttons on the display to change will extend vertically and horizontally to automatically adjust screen aspect ratio when ...

User Manual
Page 39
PIP/PBP Functions are available with 480p, 576p, 720p, 1080i HDTV formats. Press the OK button on the remote control or the INPUT button on the display to Settings default values. On-Screen Display (OSD) Menu 31 English Reset All Restore all settings to reset.
PIP/PBP Functions are available with 480p, 576p, 720p, 1080i HDTV formats. Press the OK button on the remote control or the INPUT button on the display to Settings default values. On-Screen Display (OSD) Menu 31 English Reset All Restore all settings to reset.
