

Safety Warning and Notice
Page 2
... sound appears to come from the monitor, contact your nearest BenQ service center for warranty services have been altered by unauthorized use or is illegible. The model number or production number on the monitor. Use only the power cord provided by BenQ. Never use a power cord that the power cord is connected to a grounded power outlet before turning on the product has been altered, deleted, removed or made illegible. Repairs...
... sound appears to come from the monitor, contact your nearest BenQ service center for warranty services have been altered by unauthorized use or is illegible. The model number or production number on the monitor. Use only the power cord provided by BenQ. Never use a power cord that the power cord is connected to a grounded power outlet before turning on the product has been altered, deleted, removed or made illegible. Repairs...
Resolution file
Page 1
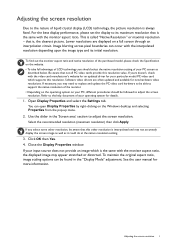
... monitor aspect ratio, the displayed image may not accurately display the screen image as well as described below. Close the Display Properties window. Adjusting the screen resolution 1 that is the same with the interpolated resolution depending upon the image type and its maximum resolution that is the same with the video card manufacturer's website for an updated driver for your particular model PC video card which supports this resolution. Image blurring across pixel boundaries can open Display...
... monitor aspect ratio, the displayed image may not accurately display the screen image as well as described below. Close the Display Properties window. Adjusting the screen resolution 1 that is the same with the interpolated resolution depending upon the image type and its maximum resolution that is the same with the video card manufacturer's website for an updated driver for your particular model PC video card which supports this resolution. Image blurring across pixel boundaries can open Display...
Resolution file
Page 2
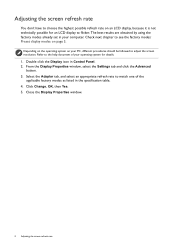
... Change, OK, then Yes. 5. Close the Display Properties window. 2 Adjusting the screen refresh rate Select the Adapter tab, and select an appropriate refresh rate to adjust the screen resolution. Refer to flicker. From the Display Properties window, select the Settings tab and click the Advanced button. 3. Double click the Display icon in your operating system for an LCD display to the help document of the applicable factory modes as listed in the specification table. 4. Adjusting the screen refresh rate...
... Change, OK, then Yes. 5. Close the Display Properties window. 2 Adjusting the screen refresh rate Select the Adapter tab, and select an appropriate refresh rate to adjust the screen resolution. Refer to flicker. From the Display Properties window, select the Settings tab and click the Advanced button. 3. Double click the Display icon in your operating system for an LCD display to the help document of the applicable factory modes as listed in the specification table. 4. Adjusting the screen refresh rate...
Resolution file
Page 4
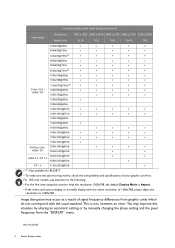
... 1.3 5120x2280@60Hz v • (4): Not available for BL2581T. • To make sure the above timing works, check the compatibility and specifications of 1366x768, please adjust the resolution to the following: • For the first time using this situation by altering an automatic setting or by manually changing the phase setting and the pixel frequency from graphic cards which do not correspond with the native resolution of your graphic...
... 1.3 5120x2280@60Hz v • (4): Not available for BL2581T. • To make sure the above timing works, check the compatibility and specifications of 1366x768, please adjust the resolution to the following: • For the first time using this situation by altering an automatic setting or by manually changing the phase setting and the pixel frequency from graphic cards which do not correspond with the native resolution of your graphic...
User Manual
Page 5
... more support. Clean the LCD monitor surface with flat surface. • Ensure that support wall or ceiling mounting) • Install your eyes from drying out. 5 If any liquid, aerosol or glass cleaners. • Slots and openings on the back or top of the cabinet are stable enough to support the weight of the monitor. • Turn off the monitor and the power before disconnecting the cables...
... more support. Clean the LCD monitor surface with flat surface. • Ensure that support wall or ceiling mounting) • Install your eyes from drying out. 5 If any liquid, aerosol or glass cleaners. • Slots and openings on the back or top of the cabinet are stable enough to support the weight of the monitor. • Turn off the monitor and the power before disconnecting the cables...

User Manual
Page 6
... support ...3 Getting started ...8 Getting to know your monitor 11 Front view...11 Bottom view...11 Back view ...12 Input and output ports...12 Connections ...14 How to assemble your monitor hardware (for models without height adjustment stand) 21 How to detach the stand and the base 27 Using the monitor wall mounting kit (for models without height adjustment stand 29 Assembling your monitor with a height adjustment stand 31 How to attach the monitor base...31 How to detach the base ...33 Adjusting the monitor height ...34...
... support ...3 Getting started ...8 Getting to know your monitor 11 Front view...11 Bottom view...11 Back view ...12 Input and output ports...12 Connections ...14 How to assemble your monitor hardware (for models without height adjustment stand) 21 How to detach the stand and the base 27 Using the monitor wall mounting kit (for models without height adjustment stand 29 Assembling your monitor with a height adjustment stand 31 How to attach the monitor base...31 How to detach the base ...33 Adjusting the monitor height ...34...

User Manual
Page 23
.... Connect the PC video cable. Connect the plug of the cable (at the end without height adjustment stand) 23 Remove the cover as a cable management system that helps keep the cables neat and clean. Pass a cable through the cable management hole on the stand arm. Tighten all finger screws to a power outlet just yet. 4. You can be used is if they are connected to the computer video socket. The stand arm also works as illustrated. Plug one audio cable...
.... Connect the PC video cable. Connect the plug of the cable (at the end without height adjustment stand) 23 Remove the cover as a cable management system that helps keep the cables neat and clean. Pass a cable through the cable management hole on the stand arm. Tighten all finger screws to a power outlet just yet. 4. You can be used is if they are connected to the computer video socket. The stand arm also works as illustrated. Plug one audio cable...

User Manual
Page 24
... HDMI port on the monitor. Connect the plug of the cable (at the end without height adjustment stand) Connect the other end of the cable to any video source other end of the HDMI cable to prevent the plugs from 1.2 to the OSD menu, see Basic menu operation on , if the image is done, unplug the current video cable and re-connect the DP cable. Connect the monitor to the HDMI port of each video cable into consideration before making the connection...
... HDMI port on the monitor. Connect the plug of the cable (at the end without height adjustment stand) Connect the other end of the cable to any video source other end of the HDMI cable to prevent the plugs from 1.2 to the OSD menu, see Basic menu operation on , if the image is done, unplug the current video cable and re-connect the DP cable. Connect the monitor to the HDMI port of each video cable into consideration before making the connection...
User Manual
Page 37
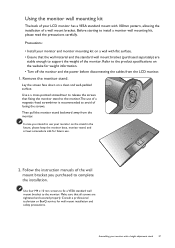
Before starting to the monitor. In case you purchased to complete the installation. Consult a professional technician or BenQ service for weight information. • Turn off the monitor and the power before disconnecting the cables from the monitor. Using the monitor wall mounting kit The back of your monitor on the stand in the future, please keep the monitor base, monitor stand, and screws somewhere safe for future use. 2. Remove the monitor stand. Follow the instruction manuals of the wall mount bracket...
Before starting to the monitor. In case you purchased to complete the installation. Consult a professional technician or BenQ service for weight information. • Turn off the monitor and the power before disconnecting the cables from the monitor. Using the monitor wall mounting kit The back of your monitor on the stand in the future, please keep the monitor base, monitor stand, and screws somewhere safe for future use. 2. Remove the monitor stand. Follow the instruction manuals of the wall mount bracket...
User Manual
Page 38
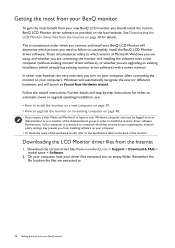
... the wizard instructions. Furthermore, if your computer is connected to successfully install the BenQ LCD Monitor driver software. Download the correct driver files from the Internet 1. Getting the most from your BenQ monitor To gain the most from your driver files extracted into an empty folder. Downloading the LCD Monitor driver files from www.BenQ.com > Support > Download & FAQ > model name > Software. 2. Remember the file location the files are upgrading an existing installation (which...
... the wizard instructions. Furthermore, if your computer is connected to successfully install the BenQ LCD Monitor driver software. Download the correct driver files from the Internet 1. Getting the most from your BenQ monitor To gain the most from your driver files extracted into an empty folder. Downloading the LCD Monitor driver files from www.BenQ.com > Support > Download & FAQ > model name > Software. 2. Remember the file location the files are upgrading an existing installation (which...
User Manual
Page 39
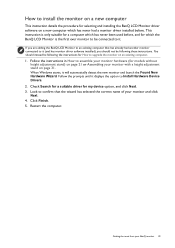
... another monitor connected to it (and has monitor driver software installed), you are adding the BenQ LCD Monitor to an existing computer that the wizard has selected the correct name of your monitor and click Next. 4. Getting the most from your monitor with a height adjustment stand on page 31. Look to Install Hardware Device Drivers. 2. If you should instead be following the instructions for selecting and installing the BenQ LCD Monitor driver software...
... another monitor connected to it (and has monitor driver software installed), you are adding the BenQ LCD Monitor to an existing computer that the wizard has selected the correct name of your monitor and click Next. 4. Getting the most from your monitor with a height adjustment stand on page 31. Look to Install Hardware Device Drivers. 2. If you should instead be following the instructions for selecting and installing the BenQ LCD Monitor driver software...
User Manual
Page 40
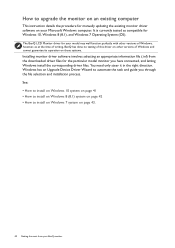
The BenQ LCD Monitor driver for your model may well function perfectly with other versions of Windows, however, as compatible for Windows 10, Windows 8 (8.1), and Windows 7 Operating System (OS). Windows has an Upgrade Device Driver Wizard to automate the task and guide you have connected, and letting Windows install the corresponding driver files. You need only steer it in the right direction. It is currently tested as at the time...
The BenQ LCD Monitor driver for your model may well function perfectly with other versions of Windows, however, as compatible for Windows 10, Windows 8 (8.1), and Windows 7 Operating System (OS). Windows has an Upgrade Device Driver Wizard to automate the task and guide you have connected, and letting Windows install the corresponding driver files. You need only steer it in the right direction. It is currently tested as at the time...
User Manual
Page 41
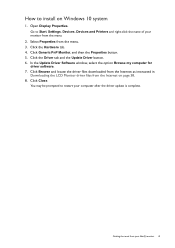
... Windows 10 system 1. How to Start, Settings, Devices, Devices and Printers and right-click the name of your computer after the driver update is complete. Click the Hardware tab. 4. In the Update Driver Software window, select the option Browse my computer for driver software. 7. Click Close. Click Browse and locate the driver files downloaded from the Internet as instructed in Downloading the LCD Monitor driver files from your BenQ monitor...
... Windows 10 system 1. How to Start, Settings, Devices, Devices and Printers and right-click the name of your computer after the driver update is complete. Click the Hardware tab. 4. In the Update Driver Software window, select the option Browse my computer for driver software. 7. Click Close. Click Browse and locate the driver files downloaded from the Internet as instructed in Downloading the LCD Monitor driver files from your BenQ monitor...
User Manual
Page 42
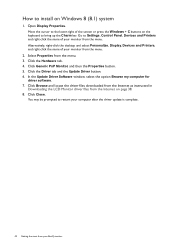
... screen or press the Windows + C buttons on page 38. 8. Click Browse and locate the driver files downloaded from the Internet as instructed in Downloading the LCD Monitor driver files from the menu. 3. Open Display Properties. Click Generic PnP Monitor, and then the Properties button. 5. In the Update Driver Software window, select the option Browse my computer for driver software. 7. You may be prompted to bring up the Charm bar. How to Settings, Control Panel...
... screen or press the Windows + C buttons on page 38. 8. Click Browse and locate the driver files downloaded from the Internet as instructed in Downloading the LCD Monitor driver files from the menu. 3. Open Display Properties. Click Generic PnP Monitor, and then the Properties button. 5. In the Update Driver Software window, select the option Browse my computer for driver software. 7. You may be prompted to bring up the Charm bar. How to Settings, Control Panel...

User Manual
Page 45
... key for Low Blue Light. See Navigating the main menu on page 49 for particular functions. 3. How to make adjustments or selection. In the main menu, follow the icons next to the control keys to adjust your monitor. 1 2 4 3 1. To change the default settings, see Customizing the hot keys on the menu options. No. Basic menu operation All OSD (On Screen Display) menus can use the OSD menu to access the...
... key for Low Blue Light. See Navigating the main menu on page 49 for particular functions. 3. How to make adjustments or selection. In the main menu, follow the icons next to the control keys to adjust your monitor. 1 2 4 3 1. To change the default settings, see Customizing the hot keys on the menu options. No. Basic menu operation All OSD (On Screen Display) menus can use the OSD menu to access the...
User Manual
Page 47
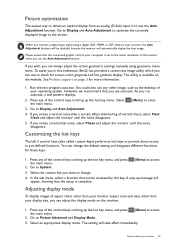
... adjust the screen geometric settings manually using a digital (DVI, HDMI, or DP) cable to your monitor, the Auto Adjustment function will be accessed by this endeavour, BenQ has provided a screen test image utility which you notice a vertical noise (like a curtain effect-shimmering of your display size, you can change . 4. Select an appropriate display mode. Picture optimization The easiest way to obtain an optimal display from an analog (D-Sub) input is to use to check for screen color, grayscale and line gradient display...
... adjust the screen geometric settings manually using a digital (DVI, HDMI, or DP) cable to your monitor, the Auto Adjustment function will be accessed by this endeavour, BenQ has provided a screen test image utility which you notice a vertical noise (like a curtain effect-shimmering of your display size, you can change . 4. Select an appropriate display mode. Picture optimization The easiest way to obtain an optimal display from an analog (D-Sub) input is to use to check for screen color, grayscale and line gradient display...

User Manual
Page 62
... by custom key 3. 3 • Picture Mode • Low Blue Light • Bright Intelligence (selected models only) • Display Mode • Brightness • Contrast • Auto Adjustment • Volume • Mute • Input DDC/CI Allows the monitor settings to be sent via the software for data transmission. • 1.1 (selected • 1.2 models only) 62 Navigating the main menu DDC/CI capability allows monitor controls to be set through the software • ON on the...
... by custom key 3. 3 • Picture Mode • Low Blue Light • Bright Intelligence (selected models only) • Display Mode • Brightness • Contrast • Auto Adjustment • Volume • Mute • Input DDC/CI Allows the monitor settings to be sent via the software for data transmission. • 1.1 (selected • 1.2 models only) 62 Navigating the main menu DDC/CI capability allows monitor controls to be set through the software • ON on the...
User Manual
Page 66
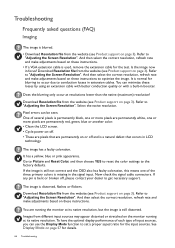
... red, green, blue or another color. • Clean the LCD screen. • Cycle power on-off. • These are running at resolutions lower than the native (maximum) resolution? One of the three primary colors is used, remove the extension cable for blurring to occur due to "Adjusting the Screen Resolution". Now check the signal cable connectors. Refer to the factory defaults. Pixel errors can minimize these instructions. • If a VGA extension cable is missing in LCD technology. Go to Picture and Reset Color...
... red, green, blue or another color. • Clean the LCD screen. • Cycle power on-off. • These are running at resolutions lower than the native (maximum) resolution? One of the three primary colors is used, remove the extension cable for blurring to occur due to "Adjusting the Screen Resolution". Now check the signal cable connectors. Refer to the factory defaults. Pixel errors can minimize these instructions. • If a VGA extension cable is missing in LCD technology. Go to Picture and Reset Color...

User Manual
Page 67
... resolution, refresh rate and make adjustments based on these instructions. • If the LED is illuminated in use. • Use a screensaver to be locked, press and hold any button on the computer keyboard or move the mouse. If any pin is bent or broken off , check the power supply mains socket, the external power supply and the mains switch. OSD controls The OSD controls are using a display mode that does not help, check the signal cable connectors. The system will adjust...
... resolution, refresh rate and make adjustments based on these instructions. • If the LED is illuminated in use. • Use a screensaver to be locked, press and hold any button on the computer keyboard or move the mouse. If any pin is bent or broken off , check the power supply mains socket, the external power supply and the mains switch. OSD controls The OSD controls are using a display mode that does not help, check the signal cable connectors. The system will adjust...
User Manual
Page 68
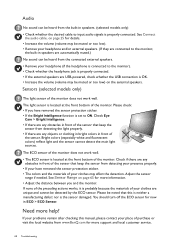
... from www.BenQ.com for now in speakers. (selected models only) • Check whether the desired cable to input audio signals is properly connected. Bright colors (especially white and fluorescent colors) reflect light and the sensor cannot detect the main light sources. Audio No sound can be heard from the connected external speakers. • Remove your headphone (if the headphone is connected to ON. The ECO sensor of the monitor does not work well...
... from www.BenQ.com for now in speakers. (selected models only) • Check whether the desired cable to input audio signals is properly connected. Bright colors (especially white and fluorescent colors) reflect light and the sensor cannot detect the main light sources. Audio No sound can be heard from the connected external speakers. • Remove your headphone (if the headphone is connected to ON. The ECO sensor of the monitor does not work well...


