US One Year LCD Monitor Warranty
Page 1
...States, Hawaii, and Alaska. An RMA number must be reported within thirty (30) days of the original warranty period specified above. BenQ LCD Monitor Standard Limited Warranty: Subject to the exclusions set forth below : • One (1) year from the purchase date by the original ... warranty period. • DOA (Dead On Arrival): Must be free from a BenQ authorized reseller/retailer to the terms and conditions set forth below , BenQ America Corp. ("BenQ") warrants the BenQ LCD Monitor ("Product"), you are entitled to depot repair service during the warranty period subject to...
...States, Hawaii, and Alaska. An RMA number must be reported within thirty (30) days of the original warranty period specified above. BenQ LCD Monitor Standard Limited Warranty: Subject to the exclusions set forth below : • One (1) year from the purchase date by the original ... warranty period. • DOA (Dead On Arrival): Must be free from a BenQ authorized reseller/retailer to the terms and conditions set forth below , BenQ America Corp. ("BenQ") warrants the BenQ LCD Monitor ("Product"), you are entitled to depot repair service during the warranty period subject to...

User Manual
Page 2
...means, electronic, mechanical, magnetic, optical, chemical, manual or otherwise, without obligation of BenQ Corporation to service this equipment from the wall outlet before cleaning. No part of power available, consult your monitor from the AC supply. • The power supply cord serves as opening or ...removing covers may be used. Avoid using any of BenQ Corporation. If any liquid, aerosol or glass cleaners. • Slots...
...means, electronic, mechanical, magnetic, optical, chemical, manual or otherwise, without obligation of BenQ Corporation to service this equipment from the wall outlet before cleaning. No part of power available, consult your monitor from the AC supply. • The power supply cord serves as opening or ...removing covers may be used. Avoid using any of BenQ Corporation. If any liquid, aerosol or glass cleaners. • Slots...
User Manual
Page 3
...view ...6 How to assemble your monitor hardware 7 Adjusting the monitor stand height 11 Rotating the monitor ...12 Viewing angle adjustment ...13 How to detach the stand base ...14 Using the monitor wall mounting kit 15 Getting the most from your BenQ monitor 16 How to install the monitor on a new computer 17 How... to upgrade the monitor on an existing computer 18 How to install on Windows 7 system ...
...view ...6 How to assemble your monitor hardware 7 Adjusting the monitor stand height 11 Rotating the monitor ...12 Viewing angle adjustment ...13 How to detach the stand base ...14 Using the monitor wall mounting kit 15 Getting the most from your BenQ monitor 16 How to install the monitor on a new computer 17 How... to upgrade the monitor on an existing computer 18 How to install on Windows 7 system ...
User Manual
Page 4
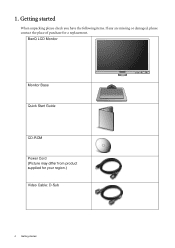
Getting started When unpacking please check you have the following items. If any are missing or damaged, please contact the place of purchase for your region.) Video Cable: D-Sub 4 Getting started 1. BenQ LCD Monitor Monitor Base Quick Start Guide CD-ROM Power Cord (Picture may differ from product supplied for a replacement.
Getting started When unpacking please check you have the following items. If any are missing or damaged, please contact the place of purchase for your region.) Video Cable: D-Sub 4 Getting started 1. BenQ LCD Monitor Monitor Base Quick Start Guide CD-ROM Power Cord (Picture may differ from product supplied for a replacement.
User Manual
Page 5
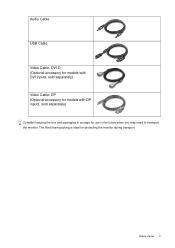
Getting started 5 Audio Cable USB Cable Video Cable: DVI-D (Optional accessory for models with DVI inputs, sold separately) Video Cable: DP (Optional accessory for models with DP inputs, sold separately) Consider keeping the box and packaging in the future when you may need to transport the monitor. The fitted foam packing is ideal for use in storage for protecting the monitor during transport.
Getting started 5 Audio Cable USB Cable Video Cable: DVI-D (Optional accessory for models with DVI inputs, sold separately) Video Cable: DP (Optional accessory for models with DP inputs, sold separately) Consider keeping the box and packaging in the future when you may need to transport the monitor. The fitted foam packing is ideal for use in storage for protecting the monitor during transport.
User Manual
Page 6
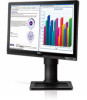
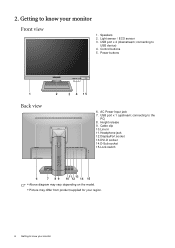
... / ECO sensor 3. Power buttons 1 Back view 2 3 4 15 6. AC Power Input jack 7. connecting to USB device) 4. Cable clip 10.Line In 11. Getting to know your monitor USB port x 1 (upstream; Control buttons 5. USB port x 4 (downstream; Headphone jack 12.DisplayPort socket 13.DVI-D socket 14.D-Sub socket 15.Lock switch 11 13 6 7 8 9 10... 14 15 • Above diagram may vary depending on the model. • Picture may differ from product supplied for your region. 6 Getting to know your monitor Front view 1.
... / ECO sensor 3. Power buttons 1 Back view 2 3 4 15 6. AC Power Input jack 7. connecting to USB device) 4. Cable clip 10.Line In 11. Getting to know your monitor USB port x 1 (upstream; Control buttons 5. USB port x 4 (downstream; Headphone jack 12.DisplayPort socket 13.DVI-D socket 14.D-Sub socket 15.Lock switch 11 13 6 7 8 9 10... 14 15 • Above diagram may vary depending on the model. • Picture may differ from product supplied for your region. 6 Getting to know your monitor Front view 1.
User Manual
Page 7
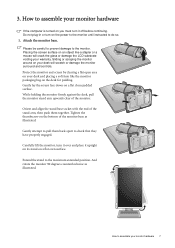
...it upright on its stand on the desk for padding. And rotate the monitor 90 degrees counterclockwise as illustrated. Attach the monitor base. Orient and align the stand base socket with the end of the monitor. Protect the monitor and screen by clearing a flat open area on your desk and placing a... How to check that they have properly engaged. Sliding or scraping the monitor around on you must turn it over and place it off before continuing. While holding the monitor firmly against the desk, pull the monitor stand arm upwards clear of the stand arm, then push them back apart...
...it upright on its stand on the desk for padding. And rotate the monitor 90 degrees counterclockwise as illustrated. Attach the monitor base. Orient and align the stand base socket with the end of the monitor. Protect the monitor and screen by clearing a flat open area on your desk and placing a... How to check that they have properly engaged. Sliding or scraping the monitor around on you must turn it over and place it off before continuing. While holding the monitor firmly against the desk, pull the monitor stand arm upwards clear of the stand arm, then push them back apart...
User Manual
Page 8
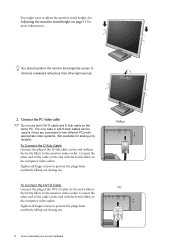
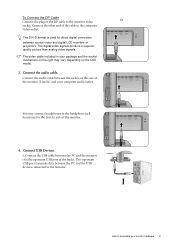
... cables can be used is if they are connected to two different PCs with appropriate video systems. (Not available for more information. See Adjusting the monitor stand height on the same PC. To Connect the D-Sub Cable Connect the plug of the cable (at the end with the ferrite filter) to... the monitor video socket. Connect the other end of the D-Sub cable (at the end without the ferrite filter) to the computer video socket. Connect the other...
... cables can be used is if they are connected to two different PCs with appropriate video systems. (Not available for more information. See Adjusting the monitor stand height on the same PC. To Connect the D-Sub Cable Connect the plug of the cable (at the end with the ferrite filter) to... the monitor video socket. Connect the other end of the D-Sub cable (at the end without the ferrite filter) to the computer video socket. Connect the other...
User Manual
Page 9
...). Connect the USB cable between the socket on the LCD model. 3. Connect the audio cable. Connect the other end of the DP cable to the monitor video Or socket. To Connect the DP Cable Connect the plug of the cable to the computer video socket. I . Connect USB Devices. This upstream USB... port transmits data between source video and digital LCD monitors or projectors. The DVI-D format is used for direct digital connection between the PC and the USB devices connected to the...
...). Connect the USB cable between the socket on the LCD model. 3. Connect the audio cable. Connect the other end of the DP cable to the monitor video Or socket. To Connect the DP Cable Connect the plug of the cable to the computer video socket. I . Connect USB Devices. This upstream USB... port transmits data between source video and digital LCD monitors or projectors. The DVI-D format is used for direct digital connection between the PC and the USB devices connected to the...
User Manual
Page 10
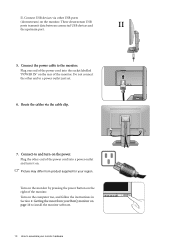
... the computer too, and follow the instructions in Section 4: Getting the most from product supplied for your BenQ monitor on the monitor. Connect-to the monitor. Plug the other USB ports (downstream) on page 16 to install the monitor software. 10 How to a power outlet just yet. 6. Connect USB devices via the cable clip. 7. Plug... it on the power. Route the cables via other end of the power cord into the socket labelled 'POWER IN' on the right of the monitor. Turn on the monitor by pressing the power button on the rear of the...
... the computer too, and follow the instructions in Section 4: Getting the most from product supplied for your BenQ monitor on the monitor. Connect-to the monitor. Plug the other USB ports (downstream) on page 16 to install the monitor software. 10 How to a power outlet just yet. 6. Connect USB devices via the cable clip. 7. Plug... it on the power. Route the cables via other end of the power cord into the socket labelled 'POWER IN' on the right of the monitor. Turn on the monitor by pressing the power button on the rear of the...
User Manual
Page 11
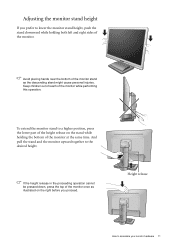
...height, push the stand downward while holding the bottom of the monitor at the same time. And pull the stand and the monitor upward together to assemble your monitor hardware 11 Avoid placing hands near the bottom of the monitor stand as illustrated on the stand while holding both left and ...right sides of the monitor. If the height release in the proceeding operation cannot be pressed down, press the top of the monitor once as the descending stand might cause personal injuries. Height release How to the desired height....
...height, push the stand downward while holding the bottom of the monitor at the same time. And pull the stand and the monitor upward together to assemble your monitor hardware 11 Avoid placing hands near the bottom of the monitor stand as illustrated on the stand while holding both left and ...right sides of the monitor. If the height release in the proceeding operation cannot be pressed down, press the top of the monitor once as the descending stand might cause personal injuries. Height release How to the desired height....

User Manual
Page 12
Pivot the display. Select to find the GPU name. Fully extend the monitor and tilt it is enough room for cables. Rotate the monitor 90 degrees clockwise as illustrated. Rotating the monitor 1. Before rotating the monitor with a portrait viewing orientation, the display has to the maximum extended position. Gently ...rotate from landscape to route the cables again via the cable clip after the rotation. 4. Then tilt the monitor. To avoid the edge of the GPU. 2. Adjust the monitor to the desired viewing angle. 12 How to assemble your computer to rotate the display 90 degrees, and ...
Pivot the display. Select to find the GPU name. Fully extend the monitor and tilt it is enough room for cables. Rotate the monitor 90 degrees clockwise as illustrated. Rotating the monitor 1. Before rotating the monitor with a portrait viewing orientation, the display has to the maximum extended position. Gently ...rotate from landscape to route the cables again via the cable clip after the rotation. 4. Then tilt the monitor. To avoid the edge of the GPU. 2. Adjust the monitor to the desired viewing angle. 12 How to assemble your computer to rotate the display 90 degrees, and ...
User Manual
Page 13
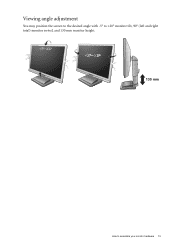
Viewing angle adjustment You may position the screen to the desired angle with -5° to +20° monitor tilt, 90° (left and right total) monitor swivel, and 130 mm monitor height. -5O ~ +20O -45O ~ +45O 130 mm How to assemble your monitor hardware 13
Viewing angle adjustment You may position the screen to the desired angle with -5° to +20° monitor tilt, 90° (left and right total) monitor swivel, and 130 mm monitor height. -5O ~ +20O -45O ~ +45O 130 mm How to assemble your monitor hardware 13

User Manual
Page 14
... and controls. 2. Turn off the computer before unplugging the power cable. Sliding or scraping the monitor around on the bottom of the monitor base and detach the monitor base as illustrated. 14 How to assemble your desk will crack the glass or damage the LCD substrate voiding your desk ...item like a towel on the desk for padding, before laying the screen face down on your warranty. How to the monitor. Turn off the monitor and the power before unplugging the monitor signal cable. Please be careful to prevent damage to detach the stand base 1. Release the thumbscrew on your...
... and controls. 2. Turn off the computer before unplugging the power cable. Sliding or scraping the monitor around on the bottom of the monitor base and detach the monitor base as illustrated. 14 How to assemble your desk will crack the glass or damage the LCD substrate voiding your desk ...item like a towel on the desk for padding, before laying the screen face down on your warranty. How to the monitor. Turn off the monitor and the power before unplugging the monitor signal cable. Please be careful to prevent damage to detach the stand base 1. Release the thumbscrew on your...
User Manual
Page 15
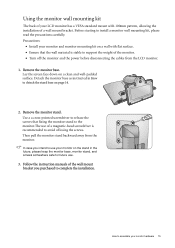
..., and screws somewhere safe for future use. 3. How to detach the stand base on the stand in How to assemble your monitor on page 14. 2. Remove the monitor stand. Use a a cross-pointed screwdriver to release the screws that the wall material is stable to use of a magnetic-head ... to avoid of the wall mount bracket you intend to support the weight of a wall mount bracket. In case you purchased to install a monitor wall mounting kit, please read the precautions carefully. Before starting to complete the installation. Lay the screen face down on a wall with 100mm pattern...
..., and screws somewhere safe for future use. 3. How to detach the stand base on the stand in How to assemble your monitor on page 14. 2. Remove the monitor stand. Use a a cross-pointed screwdriver to release the screws that the wall material is stable to use of a magnetic-head ... to avoid of the wall mount bracket you intend to support the weight of a wall mount bracket. In case you purchased to install a monitor wall mounting kit, please read the precautions carefully. Before starting to complete the installation. Lay the screen face down on a wall with 100mm pattern...

User Manual
Page 16
... computer on the back of the Administrators group in order to your BenQ monitor Getting the most from your BenQ monitor To gain the most from your computer (after connecting the monitor to install the monitor driver software. Further details and step-by-step instructions for either case...; If you require a User Name and Password to login to your Windows computer, you should install the custom BenQ LCD Monitor driver software as a member of the monitor. 16 Getting the most benefit from your computer), Windows will automatically recognize the new (or different) hardware, and...
... computer on the back of the Administrators group in order to your BenQ monitor Getting the most from your BenQ monitor To gain the most from your computer (after connecting the monitor to install the monitor driver software. Further details and step-by-step instructions for either case...; If you require a User Name and Password to login to your Windows computer, you should install the custom BenQ LCD Monitor driver software as a member of the monitor. 16 Getting the most benefit from your computer), Windows will automatically recognize the new (or different) hardware, and...
User Manual
Page 17
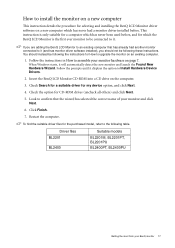
... existing computer. 1. Click Finish. 7. Driver files BL2201 BL2400 Suitable models BL2201M, BL2201PT, BL2201PU BL2400PT, BL2400PU Getting the most from your monitor and click Next. 6. Follow the prompts until it displays the option to it. Restart the computer. Insert the BenQ LCD Monitor CD-ROM into a CD drive on the computer. 3. This instruction is the...
... existing computer. 1. Click Finish. 7. Driver files BL2201 BL2400 Suitable models BL2201M, BL2201PT, BL2201PU BL2400PT, BL2400PU Getting the most from your monitor and click Next. 6. Follow the prompts until it displays the option to it. Restart the computer. Insert the BenQ LCD Monitor CD-ROM into a CD drive on the computer. 3. This instruction is the...

User Manual
Page 18
...testing of this driver on other versions of Windows and cannot guarantee its operation on those systems. Installing monitor driver software involves selecting an appropriate information file (.inf) on the BenQ LCD Monitor CD-ROM for Windows XP, Windows Vista, and Windows 7 Operating System (OS). See: •... to automate the task and guide you have connected, and letting Windows install the corresponding driver files from your BenQ monitor The BenQ LCD Monitor driver for your model may well function perfectly with other versions of Windows, however, as compatible for the particular model...
...testing of this driver on other versions of Windows and cannot guarantee its operation on those systems. Installing monitor driver software involves selecting an appropriate information file (.inf) on the BenQ LCD Monitor CD-ROM for Windows XP, Windows Vista, and Windows 7 Operating System (OS). See: •... to automate the task and guide you have connected, and letting Windows install the corresponding driver files from your BenQ monitor The BenQ LCD Monitor driver for your model may well function perfectly with other versions of Windows, however, as compatible for the particular model...
User Manual
Page 19
... Update Driver button. 6. Alternatively, right-click the desktop and select Personalize, Display, Devices and Printers, and right-click the name of your monitor from your BenQ monitor 19 Insert the BenQ LCD Monitor CD-ROM into a CD drive on Windows 7 system 1. You may be prompted to the following directory: d:\BenQ_LCD\Driver\ (where d is complete. This...
... Update Driver button. 6. Alternatively, right-click the desktop and select Personalize, Display, Devices and Printers, and right-click the name of your monitor from your BenQ monitor 19 Insert the BenQ LCD Monitor CD-ROM into a CD drive on Windows 7 system 1. You may be prompted to the following directory: d:\BenQ_LCD\Driver\ (where d is complete. This...

User Manual
Page 20
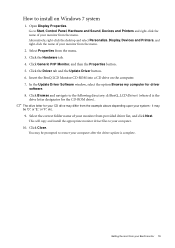
... Browse my computer for your CD drive may be prompted to install on the computer. 7. Click the Monitor tab and the Properties button. 4. Insert the BenQ LCD Monitor CD-ROM into a CD drive on Windows Vista systems 1. Open Display Settings. This will copy and ...install the appropriate monitor driver files to the following directory: d:\BenQ_LCD\Driver\ (where d is complete. 20 Getting the most from your BenQ monitor Click the Advanced Settings button. Click the Driver tab and the Update Driver button...
... Browse my computer for your CD drive may be prompted to install on the computer. 7. Click the Monitor tab and the Properties button. 4. Insert the BenQ LCD Monitor CD-ROM into a CD drive on Windows Vista systems 1. Open Display Settings. This will copy and ...install the appropriate monitor driver files to the following directory: d:\BenQ_LCD\Driver\ (where d is complete. 20 Getting the most from your BenQ monitor Click the Advanced Settings button. Click the Driver tab and the Update Driver button...

