US One Year LCD Monitor Warranty
Page 1
...use during the warranty period subject to the Customer during the warranty period BenQ will replace the DOA unit with a new or reconditioned Product of the original warranty period specified above. BenQ LCD Monitor Standard Limited Warranty: Subject to the exclusions set forth below : &#... located in the continental United States, Hawaii, and Alaska. END USER LIMITED WARRANTY LCD MONITORS Subject to the terms and conditions set forth below , BenQ America Corp. ("BenQ") warrants the BenQ LCD Monitor ("Product"), you are entitled to repair the Product, or replace the Product ...
...use during the warranty period subject to the Customer during the warranty period BenQ will replace the DOA unit with a new or reconditioned Product of the original warranty period specified above. BenQ LCD Monitor Standard Limited Warranty: Subject to the exclusions set forth below : &#... located in the continental United States, Hawaii, and Alaska. END USER LIMITED WARRANTY LCD MONITORS Subject to the terms and conditions set forth below , BenQ America Corp. ("BenQ") warrants the BenQ LCD Monitor ("Product"), you are entitled to repair the Product, or replace the Product ...

User Manual
Page 2
...must not be reproduced, transmitted, transcribed, stored in a retrieval system or translated into this product. They must be used. Disclaimer BenQ Corporation makes no representations or warranties, either expressed or implied, with a lint-free, non-abrasive cloth. Servicing Do not attempt to... the contents hereof and specifically disclaims any warranties, merchantability or fitness for pluggable equipment. Clean the LCD monitor surface with respect to service this product yourself, as a power disconnect device for any liquid, aerosol or glass cleaners....
...must not be reproduced, transmitted, transcribed, stored in a retrieval system or translated into this product. They must be used. Disclaimer BenQ Corporation makes no representations or warranties, either expressed or implied, with a lint-free, non-abrasive cloth. Servicing Do not attempt to... the contents hereof and specifically disclaims any warranties, merchantability or fitness for pluggable equipment. Clean the LCD monitor surface with respect to service this product yourself, as a power disconnect device for any liquid, aerosol or glass cleaners....
User Manual
Page 4
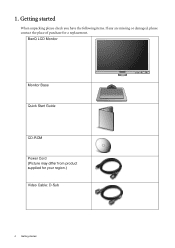
Getting started BenQ LCD Monitor Monitor Base Quick Start Guide CD-ROM Power Cord (Picture may differ from product supplied for your region.) Video Cable: D-Sub 4 Getting started When unpacking please check you have the following items. If any are missing or damaged, please contact the place of purchase for a replacement. 1.
Getting started BenQ LCD Monitor Monitor Base Quick Start Guide CD-ROM Power Cord (Picture may differ from product supplied for your region.) Video Cable: D-Sub 4 Getting started When unpacking please check you have the following items. If any are missing or damaged, please contact the place of purchase for a replacement. 1.
User Manual
Page 7
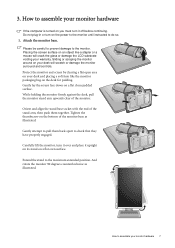
... and controls. Gently attempt to pull them together. How to assemble your warranty. 3. How to assemble your desk will crack the glass or damage the LCD substrate voiding your monitor hardware If the computer is turned on the desk for padding. While holding the monitor firmly against the desk, pull the...
... and controls. Gently attempt to pull them together. How to assemble your warranty. 3. How to assemble your desk will crack the glass or damage the LCD substrate voiding your monitor hardware If the computer is turned on the desk for padding. While holding the monitor firmly against the desk, pull the...
User Manual
Page 9
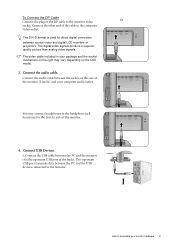
... PDIF-OUT How to the computer video socket. Connect the audio cable. The video cable included in your package and the socket illustrations on the LCD model. 3. Connect the audio cable between the PC and the USB devices connected to the monitor video Or socket. Connect the USB cable between... source video and digital LCD monitors or projectors. You may vary depending on the right may connect headphones to the headphone jack found next to the Line In jack ...
... PDIF-OUT How to the computer video socket. Connect the audio cable. The video cable included in your package and the socket illustrations on the LCD model. 3. Connect the audio cable between the PC and the USB devices connected to the monitor video Or socket. Connect the USB cable between... source video and digital LCD monitors or projectors. You may vary depending on the right may connect headphones to the headphone jack found next to the Line In jack ...

User Manual
Page 12
... need to the maximum extended position. Select to rotate the display 90 degrees, and follow the on-screen instructions to the product specifications of the LCD display hitting the monitor base surface while it . Fully extend the monitor and tilt it is enough room for cables. Then tilt the monitor. Rotating...
... need to the maximum extended position. Select to rotate the display 90 degrees, and follow the on-screen instructions to the product specifications of the LCD display hitting the monitor base surface while it . Fully extend the monitor and tilt it is enough room for cables. Then tilt the monitor. Rotating...

User Manual
Page 14
... a stapler or a mouse will scratch or damage the monitor surround and controls. 2. Release the thumbscrew on your desk will crack the glass or damage the LCD substrate voiding your monitor hardware Placing the screen surface on an object like a towel on the desk for padding, before unplugging the monitor signal cable...
... a stapler or a mouse will scratch or damage the monitor surround and controls. 2. Release the thumbscrew on your desk will crack the glass or damage the LCD substrate voiding your monitor hardware Placing the screen surface on an object like a towel on the desk for padding, before unplugging the monitor signal cable...
User Manual
Page 15
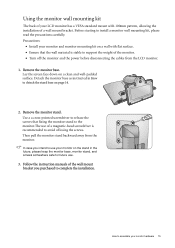
... use your monitor on the stand in How to detach the stand base on page 14. 2. Then pull the monitor stand backward away from the LCD monitor. 1. In case you purchased to complete the installation. Lay the screen face down on a wall with 100mm pattern, allowing the installation of a wall mount... recommended to avoid of losing the screws. Before starting to assemble your monitor hardware 15 Using the monitor wall mounting kit The back of your LCD monitor has a VESA standard mount with flat surface. • Ensure that fixing the monitor stand to the monitor.The use . 3.
... use your monitor on the stand in How to detach the stand base on page 14. 2. Then pull the monitor stand backward away from the LCD monitor. 1. In case you purchased to complete the installation. Lay the screen face down on a wall with 100mm pattern, allowing the installation of a wall mount... recommended to avoid of losing the screws. Before starting to assemble your monitor hardware 15 Using the monitor wall mounting kit The back of your LCD monitor has a VESA standard mount with flat surface. • Ensure that fixing the monitor stand to the monitor.The use . 3.

User Manual
Page 16
... monitor. The circumstances under which you turn on as an Administrator or as provided on your new BenQ color LCD flat screen monitor, you from installing software on the BenQ LCD Monitor CD-ROM. Furthermore, if your computer is connected to a network which has security access requirements..., network policy settings may prevent you should install the custom BenQ LCD Monitor driver software as a member of the purchased model, refer to select a monitor model. 4. Follow the wizard instructions until it ...
... monitor. The circumstances under which you turn on as an Administrator or as provided on your new BenQ color LCD flat screen monitor, you from installing software on the BenQ LCD Monitor CD-ROM. Furthermore, if your computer is connected to a network which has security access requirements..., network policy settings may prevent you should install the custom BenQ LCD Monitor driver software as a member of the purchased model, refer to select a monitor model. 4. Follow the wizard instructions until it ...
User Manual
Page 17
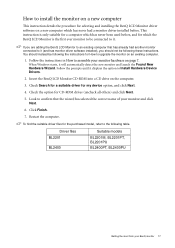
...files BL2201 BL2400 Suitable models BL2201M, BL2201PT, BL2201PU BL2400PT, BL2400PU Getting the most from your monitor hardware on page 7. How to install the monitor on a new computer This instruction details the procedure for selecting and installing the BenQ LCD Monitor driver software on a new computer which... to the following these instructions. Look to confirm that has already had a monitor driver installed before , and for which the BenQ LCD Monitor is only suitable for a computer which has never had another monitor connected to an existing computer that the wizard has selected...
...files BL2201 BL2400 Suitable models BL2201M, BL2201PT, BL2201PU BL2400PT, BL2400PU Getting the most from your monitor hardware on page 7. How to install the monitor on a new computer This instruction details the procedure for selecting and installing the BenQ LCD Monitor driver software on a new computer which... to the following these instructions. Look to confirm that has already had a monitor driver installed before , and for which the BenQ LCD Monitor is only suitable for a computer which has never had another monitor connected to an existing computer that the wizard has selected...

User Manual
Page 18
... Device Driver Wizard to automate the task and guide you have connected, and letting Windows install the corresponding driver files from your BenQ monitor The BenQ LCD Monitor driver for your Microsoft Windows computer. See: • How to install on Windows 7 system on page 19. •...and cannot guarantee its operation on those systems. Installing monitor driver software involves selecting an appropriate information file (.inf) on the BenQ LCD Monitor CD-ROM for manually updating the existing monitor driver software on your model may well function perfectly with other versions of ...
... Device Driver Wizard to automate the task and guide you have connected, and letting Windows install the corresponding driver files from your BenQ monitor The BenQ LCD Monitor driver for your Microsoft Windows computer. See: • How to install on Windows 7 system on page 19. •...and cannot guarantee its operation on those systems. Installing monitor driver software involves selecting an appropriate information file (.inf) on the BenQ LCD Monitor CD-ROM for manually updating the existing monitor driver software on your model may well function perfectly with other versions of ...
User Manual
Page 19
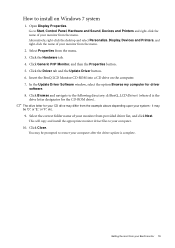
Select Properties from the example above depending upon your system - Insert the BenQ LCD Monitor CD-ROM into a CD drive on Windows 7 system 1. Click Browse and navigate to the following directory: d:\BenQ_LCD\Driver\ (where d is complete. it may be .... 10. Go to restart your computer after the driver update is the drive letter designator for driver software. 8. Select the correct folder name of your BenQ monitor 19 Open Display Properties.
Select Properties from the example above depending upon your system - Insert the BenQ LCD Monitor CD-ROM into a CD drive on Windows 7 system 1. Click Browse and navigate to the following directory: d:\BenQ_LCD\Driver\ (where d is complete. it may be .... 10. Go to restart your computer after the driver update is the drive letter designator for driver software. 8. Select the correct folder name of your BenQ monitor 19 Open Display Properties.

User Manual
Page 20
Click the Advanced Settings button. Insert the BenQ LCD Monitor CD-ROM into a CD drive on Windows Vista systems 1. This will display. 3. Right-click the desktop and select Personalize from the Personalize appearance and ... your system - The drive letter for your computer. 10. Click the Driver tab and the Update Driver button. 6. Select the correct folder name of your BenQ monitor You may be 'D:' or 'E:' or 'F:' etc. 9. The Display Settings window will display. 2. Click Continue in the prompted User Account Control window. 5. it may differ...
Click the Advanced Settings button. Insert the BenQ LCD Monitor CD-ROM into a CD drive on Windows Vista systems 1. This will display. 3. Right-click the desktop and select Personalize from the Personalize appearance and ... your system - The drive letter for your computer. 10. Click the Driver tab and the Update Driver button. 6. Select the correct folder name of your BenQ monitor You may be 'D:' or 'E:' or 'F:' etc. 9. The Display Settings window will display. 2. Click Continue in the prompted User Account Control window. 5. it may differ...

User Manual
Page 21
... your monitor model. 9. When completes, the wizard should have found and selected the BenQ driver on the computer you . 4. Click Close, OK, and OK. You may be selected for drives and the BenQ LCD Monitor CD inserted in Control Panel. Open Display Properties. In Windows XP version, Control...Properties windows. Click the Driver tab and the Update Driver button. Click Finish. Click the Settings tab and the Advanced button. Insert the BenQ LCD Monitor CD-ROM into a CD drive on the CD appropriate to continue with these instructions. 5. Check the option Search for your monitor ...
... your monitor model. 9. When completes, the wizard should have found and selected the BenQ driver on the computer you . 4. Click Close, OK, and OK. You may be selected for drives and the BenQ LCD Monitor CD inserted in Control Panel. Open Display Properties. In Windows XP version, Control...Properties windows. Click the Driver tab and the Update Driver button. Click Finish. Click the Settings tab and the Advanced button. Insert the BenQ LCD Monitor CD-ROM into a CD drive on the CD appropriate to continue with these instructions. 5. Check the option Search for your monitor ...
User Manual
Page 29
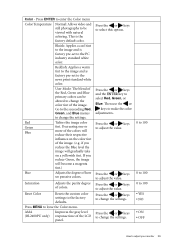
User Mode: The blend of how we perceive colors. Red Green Blue Tailors the image color tint. Saturation Adjusts the purity degree of the LCD panel. Press the or keys to the factory defaults. This is factory pre-set to the PC industry standard white color. Bluish: Applies a cool tint ...
User Mode: The blend of how we perceive colors. Red Green Blue Tailors the image color tint. Saturation Adjusts the purity degree of the LCD panel. Press the or keys to the factory defaults. This is factory pre-set to the PC industry standard white color. Bluish: Applies a cool tint ...

User Manual
Page 42
... correct and the OSD also has faulty coloration, this means one or more pixels are permanently red, green, blue or another color. • Clean the LCD screen. • Cycle power on-off , please contact your computer and monitor go into a low power "sleep" mode when not actively in use. &#...pink appearance. If the LED is illuminated in green and there is a message "Out of Range" on these losses by working through the instructions in LCD technology. If the image is a natural defect that this means you use a VGA extension cable? You can be seen: One of the supported mode....
... correct and the OSD also has faulty coloration, this means one or more pixels are permanently red, green, blue or another color. • Clean the LCD screen. • Cycle power on-off , please contact your computer and monitor go into a low power "sleep" mode when not actively in use. &#...pink appearance. If the LED is illuminated in green and there is a message "Out of Range" on these losses by working through the instructions in LCD technology. If the image is a natural defect that this means you use a VGA extension cable? You can be seen: One of the supported mode....


