
User Manual
Page 2
...company. If you to the contents hereof and specifically disclaims any warranties, merchantability or fitness for servicing. 2 Further, BenQ Corporation reserves the right to revise this product. Avoid using any person of power available, consult your monitor from time to notify any liquid, aerosol or ... without the prior written permission of the cabinet are not sure of the type of such revision or changes. Clean the LCD monitor surface with respect to dangerous voltages or other accident such as a power disconnect device for ventilation. If any particular purpose....
...company. If you to the contents hereof and specifically disclaims any warranties, merchantability or fitness for servicing. 2 Further, BenQ Corporation reserves the right to revise this product. Avoid using any person of power available, consult your monitor from time to notify any liquid, aerosol or ... without the prior written permission of the cabinet are not sure of the type of such revision or changes. Clean the LCD monitor surface with respect to dangerous voltages or other accident such as a power disconnect device for ventilation. If any particular purpose....
User Manual
Page 3
...of Contents Getting started ...4 Getting to know your monitor 5 Front View ...5 Back View ...5 How to install your monitor hardware 6 Viewing Angle Adjustment 9 Getting the most from your BenQ monitor 10 How to install the monitor on a new computer 11 How to upgrade the monitor on an existing computer 12 How to install on...adjust the screen resolution 18 How to adjust the screen refresh rate 19 How to set the picture optimization 20 How to adjust your monitor 21 A Look at the Control Panel 21 Hot Key Mode ...21 Main Menu Mode ...22 Troubleshooting ...31 Frequently Asked Questions (FAQ...
...of Contents Getting started ...4 Getting to know your monitor 5 Front View ...5 Back View ...5 How to install your monitor hardware 6 Viewing Angle Adjustment 9 Getting the most from your BenQ monitor 10 How to install the monitor on a new computer 11 How to upgrade the monitor on an existing computer 12 How to install on...adjust the screen resolution 18 How to adjust the screen refresh rate 19 How to set the picture optimization 20 How to adjust your monitor 21 A Look at the Control Panel 21 Hot Key Mode ...21 Main Menu Mode ...22 Troubleshooting ...31 Frequently Asked Questions (FAQ...
User Manual
Page 13
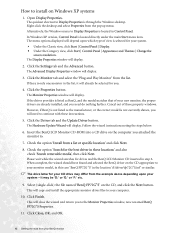
...correct model is through the Windows desktop. The menu options displayed will depend upon your system - Click the Monitor tab and select the 'Plug and Play Monitor' from a list or specific location' and click Next. 8. If the driver provider is located directly under the main Start menu item.... may differ from the example above depending upon which type of view is selected for your monitor model, in this case 'BenQ FP72G+S' in step 6. The Monitor Properties window will display. 2. Insert the BenQ LCD Monitor CD-ROM into a CD drive on the CD appropriate to your CD drive may be ...
...correct model is through the Windows desktop. The menu options displayed will depend upon your system - Click the Monitor tab and select the 'Plug and Play Monitor' from a list or specific location' and click Next. 8. If the driver provider is located directly under the main Start menu item.... may differ from the example above depending upon which type of view is selected for your monitor model, in this case 'BenQ FP72G+S' in step 6. The Monitor Properties window will display. 2. Insert the BenQ LCD Monitor CD-ROM into a CD drive on the CD appropriate to your CD drive may be ...
User Manual
Page 19
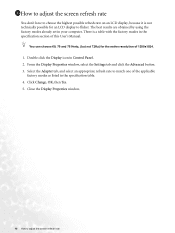
...Properties window, select the Settings tab and click the Advanced button. 3. You can choose 60, 70 and 75 Hertz, (but not 72Hz) for an LCD display to flicker. Click Change, OK, then Yes. 5. There is not technically possible for the native resolution of 1280x1024. 1. Select the Adapter tab,...rate You don't have to choose the highest possible refresh rate on an LCD display, because it is a table with the factory modes in the specification section of this User's Manual. Double click the Display icon in the specification table. 4. Close the Display Properties window. 19 How to adjust the ...
...Properties window, select the Settings tab and click the Advanced button. 3. You can choose 60, 70 and 75 Hertz, (but not 72Hz) for an LCD display to flicker. Click Change, OK, then Yes. 5. There is not technically possible for the native resolution of 1280x1024. 1. Select the Adapter tab,...rate You don't have to choose the highest possible refresh rate on an LCD display, because it is a table with the factory modes in the specification section of this User's Manual. Double click the Display icon in the specification table. 4. Close the Display Properties window. 19 How to adjust the ...
User Manual
Page 22
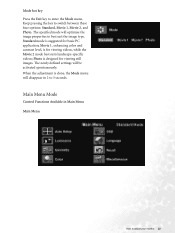
...between these four options: Standard, Movie 1, Movie 2, and Photo. The newly defined settings will optimise the image properties to adjust your monitor 22 Keep pressing the key to enter the Mode menu. The specified mode will be activated spontaneously. Standard mode is for basic PC ...application; Movie 1, enhancing color and contrast level, is suggested for viewing videos, while the Movie 2 mode best suits landscape-specific videos; When the adjustment is designed for viewing still images. Photo is done, the Mode menu will disappear in Main Menu Main Menu ...
...between these four options: Standard, Movie 1, Movie 2, and Photo. The newly defined settings will optimise the image properties to adjust your monitor 22 Keep pressing the key to enter the Mode menu. The specified mode will be activated spontaneously. Standard mode is for basic PC ...application; Movie 1, enhancing color and contrast level, is suggested for viewing videos, while the Movie 2 mode best suits landscape-specific videos; When the adjustment is designed for viewing still images. Photo is done, the Mode menu will disappear in Main Menu Main Menu ...

User Manual
Page 29
Standard mode is suggested for viewing videos, while the Movie 2 mode best suits landscape-specific videos; Movie 1, enhancing color and contrast level, is designed for viewing still images. When done, press the Enter key to previous menu, press the Exit ..., Movie 1, Movie 2, and Photo. The specified mode will be divided into two windows; Photo is for basic PC application; Miscellaneous sub menu Mode: Select your monitor
Standard mode is suggested for viewing videos, while the Movie 2 mode best suits landscape-specific videos; Movie 1, enhancing color and contrast level, is designed for viewing still images. When done, press the Enter key to previous menu, press the Exit ..., Movie 1, Movie 2, and Photo. The specified mode will be divided into two windows; Photo is for basic PC application; Miscellaneous sub menu Mode: Select your monitor