
User Manual
Page 2
...serves as opening or removing covers may be blocked or covered. Always unplug your dealer or local power company. Clean the LCD monitor surface with respect to the contents hereof and specifically disclaims any warranties, merchantability or fitness for servicing. 2 Avoid using any... yourself, as a power disconnect device for pluggable equipment. They must not be reproduced, transmitted, transcribed, stored in any form or by BenQ Corporation. v Servicing • Do not attempt to service this product. All rights reserved. iv Care And Cleaning • Cleaning. i...
...serves as opening or removing covers may be blocked or covered. Always unplug your dealer or local power company. Clean the LCD monitor surface with respect to the contents hereof and specifically disclaims any warranties, merchantability or fitness for servicing. 2 Avoid using any... yourself, as a power disconnect device for pluggable equipment. They must not be reproduced, transmitted, transcribed, stored in any form or by BenQ Corporation. v Servicing • Do not attempt to service this product. All rights reserved. iv Care And Cleaning • Cleaning. i...
User Manual
Page 3
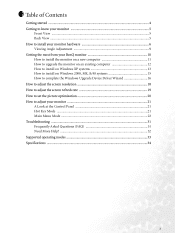
...of Contents Getting started ...4 Getting to know your monitor 5 Front View ...5 Back View ...5 How to install your monitor hardware 6 Viewing Angle Adjustment 9 Getting the most from your BenQ monitor 10 How to install the monitor on a new computer 11 How to upgrade the monitor on an existing computer 12 How to install on...adjust the screen resolution 18 How to adjust the screen refresh rate 19 How to set the picture optimization 20 How to adjust your monitor 21 A Look at the Control Panel 21 Hot Key Mode ...21 Main Menu Mode ...22 Troubleshooting ...31 Frequently Asked Questions (FAQ...
...of Contents Getting started ...4 Getting to know your monitor 5 Front View ...5 Back View ...5 How to install your monitor hardware 6 Viewing Angle Adjustment 9 Getting the most from your BenQ monitor 10 How to install the monitor on a new computer 11 How to upgrade the monitor on an existing computer 12 How to install on...adjust the screen resolution 18 How to adjust the screen refresh rate 19 How to set the picture optimization 20 How to adjust your monitor 21 A Look at the Control Panel 21 Hot Key Mode ...21 Main Menu Mode ...22 Troubleshooting ...31 Frequently Asked Questions (FAQ...

User Manual
Page 4
BenQ LCD Monitor Quick Start Guide CD-ROM Power Cord Signal Cable: D-Sub Signal Cable: DVI-D 02 P/N:53.L900 3 .0 Getting started When unpacking please check you have the following items. If any are missing or damaged, please contact the place of purchase for a replacement. 1111Getting started 4
BenQ LCD Monitor Quick Start Guide CD-ROM Power Cord Signal Cable: D-Sub Signal Cable: DVI-D 02 P/N:53.L900 3 .0 Getting started When unpacking please check you have the following items. If any are missing or damaged, please contact the place of purchase for a replacement. 1111Getting started 4
User Manual
Page 5
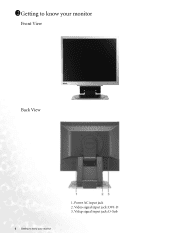
Videp signal input jack: D-Sub Video signal input jack: DVI-D 3. Power AC input jack 2. 1211Getting to know your monitor Front View Back View 5 Getting to know your monitor 1.
Videp signal input jack: D-Sub Video signal input jack: DVI-D 3. Power AC input jack 2. 1211Getting to know your monitor Front View Back View 5 Getting to know your monitor 1.
User Manual
Page 6
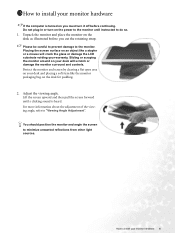
... If the computer is heard. Placing the screen surface on an object like the monitor packaging bag on your desk will crack the glass or damage the LCD substrate voiding your monitor hardware 6 Please be careful to prevent damage to minimize unwanted reflections from other light sources. Adjust the viewing angle. Lift the...
... If the computer is heard. Placing the screen surface on an object like the monitor packaging bag on your desk will crack the glass or damage the LCD substrate voiding your monitor hardware 6 Please be careful to prevent damage to minimize unwanted reflections from other light sources. Adjust the viewing angle. Lift the...
User Manual
Page 7
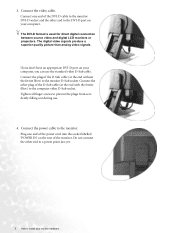
...computer video D-Sub socket. The DVI-D format is used for direct digital connection between source video and digital LCD monitors or projectors. Plug one end of the D-Sub cable (at the end with the ferrite filter) to ... the rear of the power cord into the socket labelled 'POWER IN' on your monitor hardware If you don't have an appropriate DVI-D port on your computer, you can use . 4. Tighten all... finger screws to the monitor D-Sub socket. Do not connect the other plug of the D-Sub cable (at the end without...
...computer video D-Sub socket. The DVI-D format is used for direct digital connection between source video and digital LCD monitors or projectors. Plug one end of the D-Sub cable (at the end with the ferrite filter) to ... the rear of the power cord into the socket labelled 'POWER IN' on your monitor hardware If you don't have an appropriate DVI-D port on your computer, you can use . 4. Tighten all... finger screws to the monitor D-Sub socket. Do not connect the other plug of the D-Sub cable (at the end without...

User Manual
Page 8
Connect-to install the monitor software. Turn on the monitor by pressing the power button on the power. Turn on . Plug the other end of the monitor. The power point and plug shown are indicative only, and may differ from that used in Section 4: Getting the most from your monitor hardware 8 How to install your BenQ monitor to and turn-on the front of the power cord into a power point and turn it on the computer too, and follow the instructions in your region. 5.
Connect-to install the monitor software. Turn on the monitor by pressing the power button on the power. Turn on . Plug the other end of the monitor. The power point and plug shown are indicative only, and may differ from that used in Section 4: Getting the most from your monitor hardware 8 How to install your BenQ monitor to and turn-on the front of the power cord into a power point and turn it on the computer too, and follow the instructions in your region. 5.

User Manual
Page 9
Viewing Angle Adjustment You may position the screen to the desired angle with -5° to +20° monitor tilt, 360° monitor swivel, and 72 mm monitor height. 9 How to install your monitor hardware
Viewing Angle Adjustment You may position the screen to the desired angle with -5° to +20° monitor tilt, 360° monitor swivel, and 72 mm monitor height. 9 How to install your monitor hardware

User Manual
Page 10
...you to a network which has security access requirements, network policy settings may prevent you from your new BenQ color LCD flat screen monitor, you should install the custom BenQ LCD Monitor driver software as provided on as an Administrator or as a member of Microsoft Windows you are using... process you require a User Name and Password to login to successfully install the BenQ LCD Monitor driver software. 1411Getting the most from your BenQ monitor How do I gain the most benefit from your BenQ monitor 10 Further details and step-by-step instructions for both an automatic (new) or...
...you to a network which has security access requirements, network policy settings may prevent you from your new BenQ color LCD flat screen monitor, you should install the custom BenQ LCD Monitor driver software as provided on as an Administrator or as a member of Microsoft Windows you are using... process you require a User Name and Password to login to successfully install the BenQ LCD Monitor driver software. 1411Getting the most from your BenQ monitor How do I gain the most benefit from your BenQ monitor 10 Further details and step-by-step instructions for both an automatic (new) or...

User Manual
Page 11
... the procedure for selecting and installing the BenQ LCD Monitor driver software on a new computer which has never had another monitor connected to it (and has monitor driver software installed), you are adding the BenQ LCD Monitor to an existing computer that the wizard has selected the correct name of your monitor as "BenQ FP72G+S" and click Next. 6. When Windows (2000...
... the procedure for selecting and installing the BenQ LCD Monitor driver software on a new computer which has never had another monitor connected to it (and has monitor driver software installed), you are adding the BenQ LCD Monitor to an existing computer that the wizard has selected the correct name of your monitor as "BenQ FP72G+S" and click Next. 6. When Windows (2000...
User Manual
Page 12
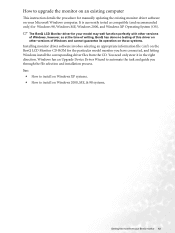
...an Upgrade Device Driver Wizard to automate the task and guide you have connected, and letting Windows install the corresponding driver files from your BenQ monitor 12 See: • How to install on Windows XP systems. • How to install on Windows 2000, ME, & 98 systems....perfectly with other versions of Windows, however, as compatible (and recommended only) for manually updating the existing monitor driver software on the BenQ LCD Monitor CD-ROM for the particular model monitor you through the file selection and installation process. You need only steer it in the right direction. ...
...an Upgrade Device Driver Wizard to automate the task and guide you have connected, and letting Windows install the corresponding driver files from your BenQ monitor 12 See: • How to install on Windows XP systems. • How to install on Windows 2000, ME, & 98 systems....perfectly with other versions of Windows, however, as compatible (and recommended only) for manually updating the existing monitor driver software on the BenQ LCD Monitor CD-ROM for the particular model monitor you through the file selection and installation process. You need only steer it in the right direction. ...

User Manual
Page 13
... a list or specific location' and click Next. 8. The Hardware Update Wizard will display. 2. Insert the BenQ LCD Monitor CD-ROM into a CD drive on the computer you attached the monitor to install on Windows XP systems 1. Please wait while the wizard searches for your system. • Under ... currently shown, you to Display Properties is located directly under the main Start menu item. The quickest shortcut to the Monitor Properties window, now renamed BenQ FP72G+S Properties. 11. Cancel out of these locations' and also check 'Search removable media', then click Next. The drive...
... a list or specific location' and click Next. 8. The Hardware Update Wizard will display. 2. Insert the BenQ LCD Monitor CD-ROM into a CD drive on the computer you attached the monitor to install on Windows XP systems 1. Please wait while the wizard searches for your system. • Under ... currently shown, you to Display Properties is located directly under the main Start menu item. The quickest shortcut to the Monitor Properties window, now renamed BenQ FP72G+S Properties. 11. Cancel out of these locations' and also check 'Search removable media', then click Next. The drive...

User Manual
Page 14
Getting the most from your BenQ monitor 14 This will operate immediately with no further action required by you. You do not need to restart Windows XP, as the BenQ LCD monitor drivers will close the Display Properties windows.
Getting the most from your BenQ monitor 14 This will operate immediately with no further action required by you. You do not need to restart Windows XP, as the BenQ LCD monitor drivers will close the Display Properties windows.

User Manual
Page 15
... display. Click the Settings tab and the Advanced button. Alternatively, on Windows ME or 98, click the Monitor tab and the Change button. Right-click the desktop and select Properties from your BenQ monitor In Windows 2000, ME, & 98 versions, Control Panel is located under the Settings menu item. See .... In that case, see the instructions at How to the Upgrade Device Driver Wizard, skipping the next step. 4. In Windows 2000, click the Monitor tab and the Properties button. How to install on Windows 2000, ME, & 98 systems You do not need to Display Properties is through the ...
... display. Click the Settings tab and the Advanced button. Alternatively, on Windows ME or 98, click the Monitor tab and the Change button. Right-click the desktop and select Properties from your BenQ monitor In Windows 2000, ME, & 98 versions, Control Panel is located under the Settings menu item. See .... In that case, see the instructions at How to the Upgrade Device Driver Wizard, skipping the next step. 4. In Windows 2000, click the Monitor tab and the Properties button. How to install on Windows 2000, ME, & 98 systems You do not need to Display Properties is through the ...

User Manual
Page 16
...button. Select (single-click) the file named BenQ FP72G+S, and click the Next button. 10. On Windows 2000, this will return you to the Advanced Display Properties window, skipping the next step. See How to the BenQ LCD Monitor CD-ROM. Getting the most from your web...above. This will close the BenQ FP72G+S Properties window and return you wish to the Monitor Properties window, now renamed 'BenQ FP72G+S Properties'. For instructions, see How to install on the computer you to . This will display. 5. How to your monitor. Load the BenQ LCD Monitor CD-ROM which came with your...
...button. Select (single-click) the file named BenQ FP72G+S, and click the Next button. 10. On Windows 2000, this will return you to the Advanced Display Properties window, skipping the next step. See How to the BenQ LCD Monitor CD-ROM. Getting the most from your web...above. This will close the BenQ FP72G+S Properties window and return you wish to the Monitor Properties window, now renamed 'BenQ FP72G+S Properties'. For instructions, see How to install on the computer you to . This will display. 5. How to your monitor. Load the BenQ LCD Monitor CD-ROM which came with your...

User Manual
Page 17
... you can change the screen resolution (area and color). Click OK. See How to load the new drivers when it next restarts. 17 Getting the most from your BenQ monitor This will close the Display Properties window, and if you made any changes to the screen resolution, Windows 2000 will prompt you for...
... you can change the screen resolution (area and color). Click OK. See How to load the new drivers when it next restarts. 17 Getting the most from your BenQ monitor This will close the Display Properties window, and if you made any changes to the screen resolution, Windows 2000 will prompt you for...
User Manual
Page 20
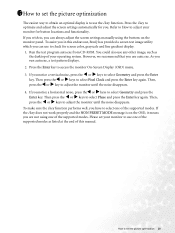
... X keys to select Geometry and press the Enter key. You could also use any other image, such as listed at the end of this endeavour, BenQ has provided a screen test image utility which you can always adjust the screen settings manually using the buttons on the OSD, it means you are... Enter key again. Refer to How to adjust your operating system. To assist you in this manual. Then, press theW or X key to adjust the monitor until the noise disappears. As you use to check for screen color, grayscale and line gradient display. 1. If the i key does not work properly and...
... X keys to select Geometry and press the Enter key. You could also use any other image, such as listed at the end of this endeavour, BenQ has provided a screen test image utility which you can always adjust the screen settings manually using the buttons on the OSD, it means you are... Enter key again. Refer to How to adjust your operating system. To assist you in this manual. Then, press theW or X key to adjust the monitor until the noise disappears. As you use to check for screen color, grayscale and line gradient display. 1. If the i key does not work properly and...
User Manual
Page 21
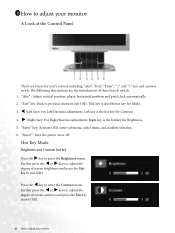
The following descriptions are the introduction of screen contrast and press the Exit key to exit OSD. 21 How to adjust your monitor A Look at the Control Panel There are 6 keys for Mode. 3. W (Left) key: For Left/Decrease adjustment. Further press the W or X keys to adjust the ...Increase adjustment. "Enter" key: Activate OSD, enter sub menu, select items, and confirm selection. 6. "Power": Turn the power on or off. 1811How to adjust your monitor This key is also the hot key for user's control including "iKey", "Exit", "Enter", "" key and a power swith. Left key is the hot key for...
The following descriptions are the introduction of screen contrast and press the Exit key to exit OSD. 21 How to adjust your monitor A Look at the Control Panel There are 6 keys for Mode. 3. W (Left) key: For Left/Decrease adjustment. Further press the W or X keys to adjust the ...Increase adjustment. "Enter" key: Activate OSD, enter sub menu, select items, and confirm selection. 6. "Power": Turn the power on or off. 1811How to adjust your monitor This key is also the hot key for user's control including "iKey", "Exit", "Enter", "" key and a power swith. Left key is the hot key for...
User Manual
Page 22
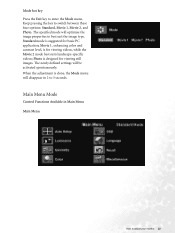
... defined settings will disappear in Main Menu Main Menu How to enter the Mode menu. Mode hot key Press the Exit key to adjust your monitor 22
... defined settings will disappear in Main Menu Main Menu How to enter the Mode menu. Mode hot key Press the Exit key to adjust your monitor 22
User Manual
Page 23
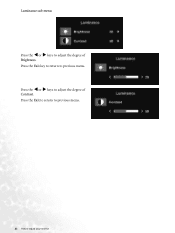
Press the Exit to return to previous menu. 23 How to adjust the degree of Contrast. Luminance sub menu Press the W or X keys to adjust your monitor Press the W or X keys to previous menu. Press the Exit key to return to adjust the degree of Brightness.
Press the Exit to return to previous menu. 23 How to adjust the degree of Contrast. Luminance sub menu Press the W or X keys to adjust your monitor Press the W or X keys to previous menu. Press the Exit key to return to adjust the degree of Brightness.

