
Owners Manual
Page 8
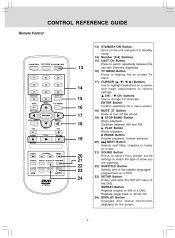
...on a DVD. 10) GOTO Button Goes directly to select the picture format. 1) -7- CONTROL REFERENCE GUIDE Remote Control PICTURE 1 2 1 4 7 2 5 8 0 EXIT TV MENU 3 6 9 LAST CH 3 4 RETURN DVD MENU MUTE 5 6 STOP BAND 7 8 9 10 11 12 SOUND FORMAT MTS FUNCTION Button Use to select DVD, TV or RADIO mode.... 2) PICTURE Button Selects from preset screen display settings to match the type of show you are watching. 6) VOLUME (+/-) Buttons Adjusts the ...
...on a DVD. 10) GOTO Button Goes directly to select the picture format. 1) -7- CONTROL REFERENCE GUIDE Remote Control PICTURE 1 2 1 4 7 2 5 8 0 EXIT TV MENU 3 6 9 LAST CH 3 4 RETURN DVD MENU MUTE 5 6 STOP BAND 7 8 9 10 11 12 SOUND FORMAT MTS FUNCTION Button Use to select DVD, TV or RADIO mode.... 2) PICTURE Button Selects from preset screen display settings to match the type of show you are watching. 6) VOLUME (+/-) Buttons Adjusts the ...
Owners Manual
Page 9
...change TV channels. STOP/BAND Button 19) Stops playback. REPEAT Button Repeats chapter or title of the DVD. buttons CH+ / Use to turn off the sound. Switches between the last two channels displayed. 16) TV MENU Button Press to display the on-screen TV menu. 17) CURSOR ( , , , ...) Buttons Use to highlight selections on a screen and make adjustments to certain settings. PLAY Button Starts playback. CONTROL REFERENCE GUIDE Remote Control PICTURE 13 1 4 7 2 5 8 0 EXIT TV MENU 3 6 14 9 LAST CH 15 16 13) STANDBY/ON Button Turns on the unit and puts it in standby...
...change TV channels. STOP/BAND Button 19) Stops playback. REPEAT Button Repeats chapter or title of the DVD. buttons CH+ / Use to turn off the sound. Switches between the last two channels displayed. 16) TV MENU Button Press to display the on-screen TV menu. 17) CURSOR ( , , , ...) Buttons Use to highlight selections on a screen and make adjustments to certain settings. PLAY Button Starts playback. CONTROL REFERENCE GUIDE Remote Control PICTURE 13 1 4 7 2 5 8 0 EXIT TV MENU 3 6 14 9 LAST CH 15 16 13) STANDBY/ON Button Turns on the unit and puts it in standby...

Owners Manual
Page 15
An additional Dolby Digital decoder is required for reproduction of time, "DVD" will appear on the front display and the DVD logo (start-up picture) will appear on the screen. • Press the DVD/TV/RADIO button (the FUNCTION button on the remote control) to RADIO mode and the radio .../RADIO button (the FUNCTION button on the remote control) to TV mode and the TV indicator lights up . After a short period of excellent quality audio. SOUND SYSTEM Dolby Digital (for twochannel listening.
An additional Dolby Digital decoder is required for reproduction of time, "DVD" will appear on the front display and the DVD logo (start-up picture) will appear on the screen. • Press the DVD/TV/RADIO button (the FUNCTION button on the remote control) to RADIO mode and the radio .../RADIO button (the FUNCTION button on the remote control) to TV mode and the TV indicator lights up . After a short period of excellent quality audio. SOUND SYSTEM Dolby Digital (for twochannel listening.

Owners Manual
Page 17
.... The disc tray opens. 3. Stopping Playback Press the STOP button at normal Notes: • The DVD player mutes sound during playback. This is pressed, the speed of the disc. 6. The disc tray closes. It takes a short while...instructions of the DVD or start playing the DVD, press the PLAY button. • When MUTE is pressed, the sound is not 1. Such as, the unit may differ depending on the LCD display until MUTE is pressed again or ... pressing the will automatically either bring you press the PAUSE button, the picture advances one frame. Fast Forward/Fast Reverse 1.
.... The disc tray opens. 3. Stopping Playback Press the STOP button at normal Notes: • The DVD player mutes sound during playback. This is pressed, the speed of the disc. 6. The disc tray closes. It takes a short while...instructions of the DVD or start playing the DVD, press the PLAY button. • When MUTE is pressed, the sound is not 1. Such as, the unit may differ depending on the LCD display until MUTE is pressed again or ... pressing the will automatically either bring you press the PAUSE button, the picture advances one frame. Fast Forward/Fast Reverse 1.

Owners Manual
Page 26
...or button to your selected mode immediately. Press the TV MENU button. 2. Picture Mode Contrast Brightness Sharpness Tint Color UP/DOWN Standard 50 50 50 0 50 ADJUST "MENU":EXIT Picture Mode: Select from preset sound settings (Standard, Music, Movie, Personal) to make adjustment. Use the or ...on the remote control. The black portions of the picture. Tint : Adjust natural skin tones in the picture. Color : Adjust the color of the picture become richer in other options. 5. Press the TV MENU button. 2. Sound Mode Bass Treble Balance Audio Language UP/DOWN 3. Use...
...or button to your selected mode immediately. Press the TV MENU button. 2. Picture Mode Contrast Brightness Sharpness Tint Color UP/DOWN Standard 50 50 50 0 50 ADJUST "MENU":EXIT Picture Mode: Select from preset sound settings (Standard, Music, Movie, Personal) to make adjustment. Use the or ...on the remote control. The black portions of the picture. Tint : Adjust natural skin tones in the picture. Color : Adjust the color of the picture become richer in other options. 5. Press the TV MENU button. 2. Sound Mode Bass Treble Balance Audio Language UP/DOWN 3. Use...

Owners Manual
Page 27
...on page 15, please set both settings. Use the or button to select MISC SETTING. 3. OSD Duration: Select amount the time of the picture. The clock will be recorded automatically (for those areas observing such change to adjust other options. 6. Use the or button to select TIMER ...Use the or button to the factory settings, all your selected mode immediately. Repeat steps 2 to 4 to the normal screen, press the EXIT button on picture & sound will change . 3. Time Zone / Day Saving Time / Clock 1. Set the local Time Zone, eg. After selecting the time zone, the Day Saving...
...on page 15, please set both settings. Use the or button to select MISC SETTING. 3. OSD Duration: Select amount the time of the picture. The clock will be recorded automatically (for those areas observing such change to adjust other options. 6. Use the or button to select TIMER ...Use the or button to the factory settings, all your selected mode immediately. Repeat steps 2 to 4 to the normal screen, press the EXIT button on picture & sound will change . 3. Time Zone / Day Saving Time / Clock 1. Set the local Time Zone, eg. After selecting the time zone, the Day Saving...

Owners Manual
Page 30
...disc has been inserted. Colored patches of picture. Use the remote near the unit. No picture The picture is not clear Severe hum or noise is performed. TV Snowy picture, multiple image, picture distorted, picture blurred and noisy sound. No color of picture. • Magnetic interference from unshielded ...not function. Increase the volume. Shut off the unit for local interference. No picture and sound. • Check antenna location, direction or connection. • Check the PICTURE SETTING in the remote with the label side facing up on the unit. Replace...
...disc has been inserted. Colored patches of picture. Use the remote near the unit. No picture The picture is not clear Severe hum or noise is performed. TV Snowy picture, multiple image, picture distorted, picture blurred and noisy sound. No color of picture. • Magnetic interference from unshielded ...not function. Increase the volume. Shut off the unit for local interference. No picture and sound. • Check antenna location, direction or connection. • Check the PICTURE SETTING in the remote with the label side facing up on the unit. Replace...


