Installation Manual
Page 1
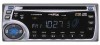
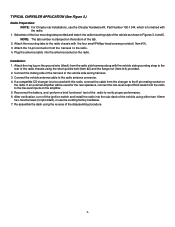
INSTALLATION MANUAL P-105 AM/FM/MPX RADIO WITH COMPACT DISC PLAYER, CD CHANGER CONTROLS AND QUARTZ CLOCK
INSTALLATION MANUAL P-105 AM/FM/MPX RADIO WITH COMPACT DISC PLAYER, CD CHANGER CONTROLS AND QUARTZ CLOCK

Installation Manual
Page 2
...will be sufficient space behind the dashboard for installation in GM and Chrysler cars, trucks, and vans with a 1-1/2 DIN radio opening. USING A WIRING ADAPTER The easiest wiring method to connect the P-105 to the vehicle is to car antenna lead, if needed . Connect an antenna extender cable (not supplied) to... for dash panel removal. 4. Do not discard any screws that may not work in low gear to allow for all screws from the Audiovox P-105 radio connector to see if there are available at 1-800-645-4994. Disconnect the wiring and antenna cable from the sub-dash. 1. Remove...
...will be sufficient space behind the dashboard for installation in GM and Chrysler cars, trucks, and vans with a 1-1/2 DIN radio opening. USING A WIRING ADAPTER The easiest wiring method to connect the P-105 to the vehicle is to car antenna lead, if needed . Connect an antenna extender cable (not supplied) to... for dash panel removal. 4. Do not discard any screws that may not work in low gear to allow for all screws from the Audiovox P-105 radio connector to see if there are available at 1-800-645-4994. Disconnect the wiring and antenna cable from the sub-dash. 1. Remove...
Installation Manual
Page 3
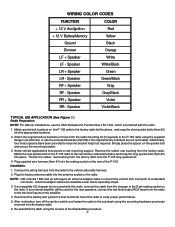
...the original factory brackets are available at car stereo speciality shops. 3. Simply place the spacer on the radio. Reconnect the battery and perform a brief functional test of the P-105. Some vehicle applications incorporate a rear mounting support. Plug supplied wire harness (Item #1) into place. Installation...as required. Speaker White/Black LR + Speaker Green LR - If a compatible CD changer is furnished with this radio, connect the cable from the radio mounting kit (if required) to the P-105 radio using the supplied flange nuts (Item #4), or use the GM Hardware Kit, ...
...the original factory brackets are available at car stereo speciality shops. 3. Simply place the spacer on the radio. Reconnect the battery and perform a brief functional test of the P-105. Some vehicle applications incorporate a rear mounting support. Plug supplied wire harness (Item #1) into place. Installation...as required. Speaker White/Black LR + Speaker Green LR - If a compatible CD changer is furnished with this radio, connect the cable from the radio mounting kit (if required) to the P-105 radio using the supplied flange nuts (Item #4), or use the GM Hardware Kit, ...
Installation Manual
Page 4
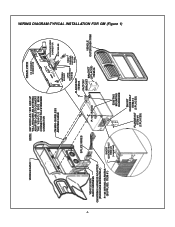
...SIDE MINI CONNECTOR TO A STANDARD CONNECTOR REAR VIEW CD CHANGER CONNECTOR VEHICLE SIDE RADIO HARNESS GM WIRING HARNESS ADAPTER (PURCHASE SEPARATELY) P-105 WIRING HARNESS (SUPPLIED, ITEM #1) GM MINI- BARBLESS ANTENNA CABLE SPLICE WIRES P-105 RADIO 14 PIN PWR/SPKR CONNECTOR OR RCA CABLES ANTENNA... SOCKET LONG QUICKIE BOLT ITEM #3 FLANGE NUT ITEM #4 REAR BUSHING FACTORY RADIO FACTORY BRACKET BRACKET (2 PLACES) ITEM #6 VEHICLE OUTER DASH TRIM SHORT ...
...SIDE MINI CONNECTOR TO A STANDARD CONNECTOR REAR VIEW CD CHANGER CONNECTOR VEHICLE SIDE RADIO HARNESS GM WIRING HARNESS ADAPTER (PURCHASE SEPARATELY) P-105 WIRING HARNESS (SUPPLIED, ITEM #1) GM MINI- BARBLESS ANTENNA CABLE SPLICE WIRES P-105 RADIO 14 PIN PWR/SPKR CONNECTOR OR RCA CABLES ANTENNA... SOCKET LONG QUICKIE BOLT ITEM #3 FLANGE NUT ITEM #4 REAR BUSHING FACTORY RADIO FACTORY BRACKET BRACKET (2 PLACES) ITEM #6 VEHICLE OUTER DASH TRIM SHORT ...
Installation Manual
Page 5
... turn off the ignition switch and install the radio into the antenna socket on the bottom of the disassembly procedure. -5- Attach the 14-pin connector from the harness to the radio antenna connector. 4. Installation: 1. If a compatible CD changer is to be used with the vehicle ...side grounding strap to the 8-pin mating socket on the radio. NOTE: The tab number is stamped on the radio. Attach the ring lug on the amplifier...
... turn off the ignition switch and install the radio into the antenna socket on the bottom of the disassembly procedure. -5- Attach the 14-pin connector from the harness to the radio antenna connector. 4. Installation: 1. If a compatible CD changer is to be used with the vehicle ...side grounding strap to the 8-pin mating socket on the radio. NOTE: The tab number is stamped on the radio. Attach the ring lug on the amplifier...
Installation Manual
Page 6
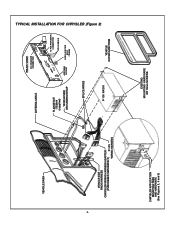
TYPICAL INSTALLATION FOR CHRYSLER (Figure 2) -6- VEHICLE DASH VEHICLE SIDE RADIO HARNESS CHRYSLER WIRING HARNESS ADAPTER (PURCHASED SEPARATELY) P-105 WIRING HARNESS ANTENNA CABLE REAR VIEW CD CHANGER CONNECTOR FLANGE NUT ITEM #4 (supplied) VEHICLE SIDE GROUNDING STRAP ANTENNA SOCKET 14 PIN PWR/SPKR CONNECTOR RCA CABLES LONG QUICKIE BOLT ITEM #3 SPLICE WIRES P-105 RADIO VEHICLE OUTER DASH TRIM CHRYSLER APPLICATION MOUNTING TABS AND HARDWARE (See Figures 3, 4 and 5) EXISTING MOUNTING HARDWARE OR 10mm SCREWS
TYPICAL INSTALLATION FOR CHRYSLER (Figure 2) -6- VEHICLE DASH VEHICLE SIDE RADIO HARNESS CHRYSLER WIRING HARNESS ADAPTER (PURCHASED SEPARATELY) P-105 WIRING HARNESS ANTENNA CABLE REAR VIEW CD CHANGER CONNECTOR FLANGE NUT ITEM #4 (supplied) VEHICLE SIDE GROUNDING STRAP ANTENNA SOCKET 14 PIN PWR/SPKR CONNECTOR RCA CABLES LONG QUICKIE BOLT ITEM #3 SPLICE WIRES P-105 RADIO VEHICLE OUTER DASH TRIM CHRYSLER APPLICATION MOUNTING TABS AND HARDWARE (See Figures 3, 4 and 5) EXISTING MOUNTING HARDWARE OR 10mm SCREWS

