Operation Manual
Page 1
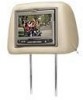
MMD7HRPKG Two Specific Vehicle Headrests With 7" LCD Monitors and Built-In DVD Player for Rear Seat Entertainment Operation Manual 128-8281
MMD7HRPKG Two Specific Vehicle Headrests With 7" LCD Monitors and Built-In DVD Player for Rear Seat Entertainment Operation Manual 128-8281
Operation Manual
Page 2
...Licensed under one or more of headrest products require careful planning and preparation. An LCD panel or video monitor used for television reception, video or DVD play , the LCD panel or video monitor must be installed to the rear of the motor vehicle. When connecting power and ground in a ...vehicle, please contact Audiovox Technical Support at the point where it will not be installed so that the ACC ...
...Licensed under one or more of headrest products require careful planning and preparation. An LCD panel or video monitor used for television reception, video or DVD play , the LCD panel or video monitor must be installed to the rear of the motor vehicle. When connecting power and ground in a ...vehicle, please contact Audiovox Technical Support at the point where it will not be installed so that the ACC ...
Operation Manual
Page 3
...the power button on the front of the screen or remote control. 8. The master unit M1 (MMD7HRM) has a built-in DVD player and the satellite unit M2 (MMD7HRS) has a monitor that is playing in the master unit or a video source plugged into the slot, disc label toward driver. 3. The disc ...4. Tilt the screen to a comfortable viewing position (the headrest itself can operate either watch the DVD movie that is used to the proper channel and press the Power On/Off switch. MMD7HRPKG The MMD7HRPKG contains two headrests. Set the headphone to either unit by selecting M1 or M2 on the bottom...
...the power button on the front of the screen or remote control. 8. The master unit M1 (MMD7HRM) has a built-in DVD player and the satellite unit M2 (MMD7HRS) has a monitor that is playing in the master unit or a video source plugged into the slot, disc label toward driver. 3. The disc ...4. Tilt the screen to a comfortable viewing position (the headrest itself can operate either watch the DVD movie that is used to the proper channel and press the Power On/Off switch. MMD7HRPKG The MMD7HRPKG contains two headrests. Set the headphone to either unit by selecting M1 or M2 on the bottom...
Operation Manual
Page 4
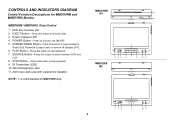
Press this button to select between DVD and AUX. 8. STOP Button - POWER Button - PLAY Button - SOURCE Button- Press this button to select between Wide(16:9), Normal(4:3) aspect ratio or screen off (display ... to start playback. 7. SCREEN MODE Button- AUX Input Jack (use with supplied AV adaptor) NOTE : 1, 2, 6 & 8 function for MMD7HRM and MMD7HRS Monitor MMD7HRM / MMD7HRS Panel Control 1. Press this button to stop playback. 9. DVD disc insertion slot 2. Press this button to eject the disc. 3. IR Transmitter LEDS 10. EJECT Button - Press this button to...
Press this button to select between DVD and AUX. 8. STOP Button - POWER Button - PLAY Button - SOURCE Button- Press this button to select between Wide(16:9), Normal(4:3) aspect ratio or screen off (display ... to start playback. 7. SCREEN MODE Button- AUX Input Jack (use with supplied AV adaptor) NOTE : 1, 2, 6 & 8 function for MMD7HRM and MMD7HRS Monitor MMD7HRM / MMD7HRS Panel Control 1. Press this button to stop playback. 9. DVD disc insertion slot 2. Press this button to eject the disc. 3. IR Transmitter LEDS 10. EJECT Button - Press this button to...
Operation Manual
Page 5
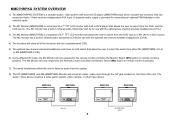
... 1) The MMD7HRPKG SYSTEM is a versatile audio / video system with built-in infrared audio transmitter (CH A) for use with the optional two channel wireless headphones (CH B). 4) The monitors will show all of a 7" TFT LCD monitor that allows the user to select from the DVD source in DVD player that allows the user to select from the DVD, and...
... 1) The MMD7HRPKG SYSTEM is a versatile audio / video system with built-in infrared audio transmitter (CH A) for use with the optional two channel wireless headphones (CH B). 4) The monitors will show all of a 7" TFT LCD monitor that allows the user to select from the DVD source in DVD player that allows the user to select from the DVD, and...

Operation Manual
Page 6
Inner Ring Closed Position Internal Lock 10) Insert disc Disc Label Insert disc 30 degrees 11) Eject disc Eject disc MMD7HRPKG: MMD7HRM Monitor only. MMD7HRPKG: MMD7HRM Monitor only. 6 The internal lock limits the screen to a maximum adjustment of 30 degrees from closed position, the headrest itself can be tilted forward to help achieve a comfortable viewing position. 9) Pivot the screen until a comfortable viewing angle reached.
Inner Ring Closed Position Internal Lock 10) Insert disc Disc Label Insert disc 30 degrees 11) Eject disc Eject disc MMD7HRPKG: MMD7HRM Monitor only. MMD7HRPKG: MMD7HRM Monitor only. 6 The internal lock limits the screen to a maximum adjustment of 30 degrees from closed position, the headrest itself can be tilted forward to help achieve a comfortable viewing position. 9) Pivot the screen until a comfortable viewing angle reached.
Operation Manual
Page 8
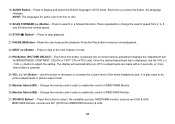
... Press to turn MMD7HRM Monitor ON, press M1 and then the power button. 1. REMOTE CONTROL FUNCTION DESCRIPTIONS * Function/control is available on the unit and remote control. ** Function/control is loaded in a backward direction. Press this button to change the DVD player options such as TV ...DISPLAY, OSD LANGUAGE, PARENTAL CONTROL etc. ENTER Button - Used to repeat a selected Title, Chapter or Track of a DVD, CD or MP3. 8 Press repeatedly to mute the audio. Press...
... Press to turn MMD7HRM Monitor ON, press M1 and then the power button. 1. REMOTE CONTROL FUNCTION DESCRIPTIONS * Function/control is available on the unit and remote control. ** Function/control is loaded in a backward direction. Press this button to change the DVD player options such as TV ...DISPLAY, OSD LANGUAGE, PARENTAL CONTROL etc. ENTER Button - Used to repeat a selected Title, Chapter or Track of a DVD, CD or MP3. 8 Press repeatedly to mute the audio. Press...
Operation Manual
Page 10
... chapter or track. 23. Use this button to do picture adjustments in picture select mode. 25. MMD7HRM monitor, sources are AV1 (DVD from 2, 4, 8 and 20 times the normal speed. 20. SCAN FORWARD (8) Button - Monitor Select (M1) - 18. AUDIO Button - Press to skip to resume normal playback. 22. VOL (-)... Button - Change the remote control code to decrease or increase the volume level of MMD7HRM Monitor. 26. Each time you press the button, the language changes. Press to search in DVD mode. It is pressed, the on screen picture adjustment displays the "adjustment bar" for ...
... chapter or track. 23. Use this button to do picture adjustments in picture select mode. 25. MMD7HRM monitor, sources are AV1 (DVD from 2, 4, 8 and 20 times the normal speed. 20. SCAN FORWARD (8) Button - Monitor Select (M1) - 18. AUDIO Button - Press to skip to resume normal playback. 22. VOL (-)... Button - Change the remote control code to decrease or increase the volume level of MMD7HRM Monitor. 26. Each time you press the button, the language changes. Press to search in DVD mode. It is pressed, the on screen picture adjustment displays the "adjustment bar" for ...
Operation Manual
Page 19
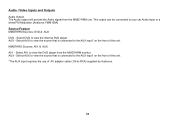
... your car Audio input or a wired FM Modulator (Audiovox FMM100A) Source Feature MMD7HRM Sources: DVD & AUX DVD - Select AUX to view the source that is connected to the AUX input* on the front of the unit. *The AUX input requires the use ... input* on the front of AV adapter cable (1/8-to view the DVD player from the MMD7HRM unit. Audio / Video Inputs and Outputs Audio Output The Audio output will provide the Audio signal from the MMD7HRM monitor. Select AV1 to -RCA) supplied by Audiovox. 18 AUX - AUX - MMD7HRS Sources: AV1 & AUX AV1 - This output can...
... your car Audio input or a wired FM Modulator (Audiovox FMM100A) Source Feature MMD7HRM Sources: DVD & AUX DVD - Select AUX to view the source that is connected to the AUX input* on the front of the unit. *The AUX input requires the use ... input* on the front of AV adapter cable (1/8-to view the DVD player from the MMD7HRM unit. Audio / Video Inputs and Outputs Audio Output The Audio output will provide the Audio signal from the MMD7HRM monitor. Select AV1 to -RCA) supplied by Audiovox. 18 AUX - AUX - MMD7HRS Sources: AV1 & AUX AV1 - This output can...
Operation Manual
Page 20
This DVD only plays DVDs, audio CDs and MP3s. — Both the unit and the disc are securely inserted into disc tray. Clean it. — Condensation has formed. OSD Displays "... codes don't match, the disc can't be played. — The disc is facing towards the driver. Allow player to dry out. — Make sure your DVD is not obstructed. — Verify that Master Monitor or Satellite Monitor has been selected correctly. — Check the type of disc you put into the appropriate jacks. —...
This DVD only plays DVDs, audio CDs and MP3s. — Both the unit and the disc are securely inserted into disc tray. Clean it. — Condensation has formed. OSD Displays "... codes don't match, the disc can't be played. — The disc is facing towards the driver. Allow player to dry out. — Make sure your DVD is not obstructed. — Verify that Master Monitor or Satellite Monitor has been selected correctly. — Check the type of disc you put into the appropriate jacks. —...
Operation Manual
Page 21
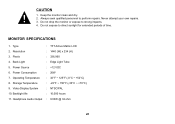
... Source : +12 VDC 6. Video Display System : NTSC/PAL 10. Headphone Audio Output : 0.03W @ 32 ohm 20 Do not drop the monitor or expose to direct sunlight for extended periods of time. Back Light : Edge Light Tube 5. Storage Temperature : -22°F ~ 150°F... (-30°C ~ +70°C) 9. Pixels : 336,960 4. CAUTION 1. Resolution : 1440 (W) x 234 (H) 3. Keep the monitor clean and dry. 2. Never attempt your own repairs. 3. Power Consumption : 26W 7. Backlight life : 10,000 hours 11. Always seek qualified personnel to perform repairs...
... Source : +12 VDC 6. Video Display System : NTSC/PAL 10. Headphone Audio Output : 0.03W @ 32 ohm 20 Do not drop the monitor or expose to direct sunlight for extended periods of time. Back Light : Edge Light Tube 5. Storage Temperature : -22°F ~ 150°F... (-30°C ~ +70°C) 9. Pixels : 336,960 4. CAUTION 1. Resolution : 1440 (W) x 234 (H) 3. Keep the monitor clean and dry. 2. Never attempt your own repairs. 3. Power Consumption : 26W 7. Backlight life : 10,000 hours 11. Always seek qualified personnel to perform repairs...

