Operation Manual
Page 3
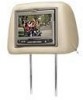
...viewing position). 9. MMD7HRPKG The MMD7HRPKG contains two headrests. The master unit M1 (MMD7HRM) has a built-in the master unit or a video source plugged into the slot, disc label toward driver. 3. The disc will light up red. Each monitor has an AUX input and wired headphone jack on the front...press M2 on the remote control. Tilt the monitor to a comfortable viewing position (the headrest itself can operate either watch the DVD movie that is playing in DVD player and the satellite unit M2 (MMD7HRS) has a monitor that is used to view program material on your head. 6. Turn ...
...viewing position). 9. MMD7HRPKG The MMD7HRPKG contains two headrests. The master unit M1 (MMD7HRM) has a built-in the master unit or a video source plugged into the slot, disc label toward driver. 3. The disc will light up red. Each monitor has an AUX input and wired headphone jack on the front...press M2 on the remote control. Tilt the monitor to a comfortable viewing position (the headrest itself can operate either watch the DVD movie that is playing in DVD player and the satellite unit M2 (MMD7HRS) has a monitor that is used to view program material on your head. 6. Turn ...
Operation Manual
Page 4
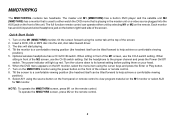
...select between Wide(16:9), Normal(4:3) aspect ratio or screen off (display OFF). 6. Press this button to eject the disc. 3. Press this button to select between DVD and AUX. 8. SCREEN MODE Button- STOP Button - AUX Input Jack (use with supplied AV adaptor) NOTE : 1, 2, 6 & 8 function for MMD7HRM ... Press this button to turn the unit ON/OFF. 5. PLAY Button - Power Indicator LED 4. IR Transmitter LEDS 10. Wired Headphone Jack 11. DVD disc insertion slot 2. POWER Button - Press to start playback. 7. Press this button to stop playback. 9. SOURCE Button-
...select between Wide(16:9), Normal(4:3) aspect ratio or screen off (display OFF). 6. Press this button to eject the disc. 3. Press this button to select between DVD and AUX. 8. SCREEN MODE Button- STOP Button - AUX Input Jack (use with supplied AV adaptor) NOTE : 1, 2, 6 & 8 function for MMD7HRM ... Press this button to turn the unit ON/OFF. 5. PLAY Button - Power Indicator LED 4. IR Transmitter LEDS 10. Wired Headphone Jack 11. DVD disc insertion slot 2. POWER Button - Press to start playback. 7. Press this button to stop playback. 9. SOURCE Button-
Operation Manual
Page 5
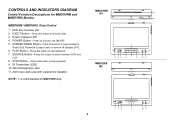
...headphones allow the user to select the audio from either M1 (MMD7HRM, CH A) or M2 (MMD7HRS,CH B). 6) Using different IR codes, the M1 Monitor will accept an audio / video input through the 1/8" jack located on remote control is pressed. MMD7HRPKG SYSTEM OVERVIEW 1) The MMD7HRPKG SYSTEM is a versatile audio / video system with built-in DVD player... that allows the user to select from the DVD, and the AUX source.
...headphones allow the user to select the audio from either M1 (MMD7HRM, CH A) or M2 (MMD7HRS,CH B). 6) Using different IR codes, the M1 Monitor will accept an audio / video input through the 1/8" jack located on remote control is pressed. MMD7HRPKG SYSTEM OVERVIEW 1) The MMD7HRPKG SYSTEM is a versatile audio / video system with built-in DVD player... that allows the user to select from the DVD, and the AUX source.
Operation Manual
Page 10
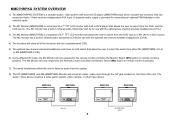
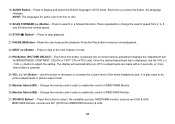
...Play button to the next chapter or track. 23. PIX Button (PICTURE SELECT) - Once the desired adjustment bar is also used to search in DVD mode. Change the remote control code to adjust the setting. SCAN FORWARD (8) Button - It is displayed, use the VOL (+) / VOL (-) button... to enable the control of the wired headphone jack. Each time you press the button, the language changes. PAUSE (II) Button - Use this button to display and select the AUDIO language in...
...Play button to the next chapter or track. 23. PIX Button (PICTURE SELECT) - Once the desired adjustment bar is also used to search in DVD mode. Change the remote control code to adjust the setting. SCAN FORWARD (8) Button - It is displayed, use the VOL (+) / VOL (-) button... to enable the control of the wired headphone jack. Each time you press the button, the language changes. PAUSE (II) Button - Use this button to display and select the AUDIO language in...
Operation Manual
Page 21
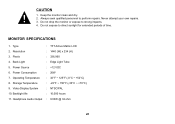
Type : TFT Active Matrix LCD 2. Backlight life : 10,000 hours 11. Never attempt your own repairs. 3. Pixels : 336,960 4. Headphone Audio Output : 0.03W @ 32 ohm 20 CAUTION 1. Do not drop the monitor or expose to direct sunlight for extended periods of time. MONITOR SPECIFICATIONS 1. Operating ...
Type : TFT Active Matrix LCD 2. Backlight life : 10,000 hours 11. Never attempt your own repairs. 3. Pixels : 336,960 4. Headphone Audio Output : 0.03W @ 32 ohm 20 CAUTION 1. Do not drop the monitor or expose to direct sunlight for extended periods of time. MONITOR SPECIFICATIONS 1. Operating ...