
User Guide
Page 2
..., heat sources, direct sunlight, and excessive dust. 2. To ensure proper ventilation and proper operation, never cover or block the slots and openings with this appliance to rain or moisture. The unit applies the latest state of the system only. 2 Please read the entire instruction manual supplied with a cloth or other material. 4. Introduction Thank you in need of reliable, trouble-free service. B. A.
..., heat sources, direct sunlight, and excessive dust. 2. To ensure proper ventilation and proper operation, never cover or block the slots and openings with this appliance to rain or moisture. The unit applies the latest state of the system only. 2 Please read the entire instruction manual supplied with a cloth or other material. 4. Introduction Thank you in need of reliable, trouble-free service. B. A.
User Guide
Page 3
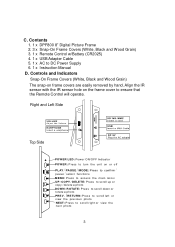
... DC 9V Plug the AC adapter POWER LED: Power ON/OFF Indicator POWER: Press to turn the unit on the frame cover to DC Power Supply 6. 1 x Instruction Manual D. C. Contents 1. 1 x DPF800 8" Digital Picture Frame 2. 3 x Snap-On Frame Covers (White, Black and Wood Grain) 3. 1 x Remote Control w/Battery (CR2025) 4. 1 x USB Adapter Cable 5. 1 x AC to ensure that the Remote Control will operate. Controls and Indicators Snap-On Frame Covers (White, Black and Wood Grain) The snap-on frame covers are easily removed by hand.
... DC 9V Plug the AC adapter POWER LED: Power ON/OFF Indicator POWER: Press to turn the unit on the frame cover to DC Power Supply 6. 1 x Instruction Manual D. C. Contents 1. 1 x DPF800 8" Digital Picture Frame 2. 3 x Snap-On Frame Covers (White, Black and Wood Grain) 3. 1 x Remote Control w/Battery (CR2025) 4. 1 x USB Adapter Cable 5. 1 x AC to ensure that the Remote Control will operate. Controls and Indicators Snap-On Frame Covers (White, Black and Wood Grain) The snap-on frame covers are easily removed by hand.
User Guide
Page 4
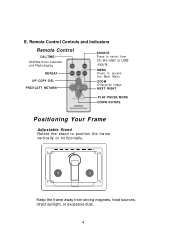
Keep the frame away from SD/MS/MMC or USB inputs MENU Press to access the Main Menu ZOOM Enlarge an image NEXT/ RI GHT PL AY/ PAU SE/ M ODE DO WN / RO TATE Positioning Your Frame Adjustable Stand Rotate the stand to select from strong magnets, heat sources, direct sunlight, or excessive dust. 4 Remote Control Controls and Indicators Remote Control CAL/TIME REPEAT UP/ COPY/ DEL SOURCE Press to position the frame vertically or horizontally. E.
Keep the frame away from SD/MS/MMC or USB inputs MENU Press to access the Main Menu ZOOM Enlarge an image NEXT/ RI GHT PL AY/ PAU SE/ M ODE DO WN / RO TATE Positioning Your Frame Adjustable Stand Rotate the stand to select from strong magnets, heat sources, direct sunlight, or excessive dust. 4 Remote Control Controls and Indicators Remote Control CAL/TIME REPEAT UP/ COPY/ DEL SOURCE Press to position the frame vertically or horizontally. E.
User Guide
Page 5
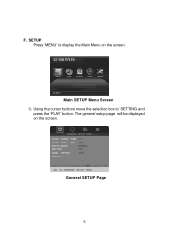
General SETUP Page 5 Main SETUP Menu Screen 1) Using the cursor buttons move the selection box to display the Main Menu on the screen. F. SETUP Press 'MENU' to 'SETTING and press the 'PLAY' button. The general setup page will be displayed on the screen.
General SETUP Page 5 Main SETUP Menu Screen 1) Using the cursor buttons move the selection box to display the Main Menu on the screen. F. SETUP Press 'MENU' to 'SETTING and press the 'PLAY' button. The general setup page will be displayed on the screen.

User Guide
Page 6
... displayed. The ON setting will allow any MP3 file to be played while the slide show display time for each photo (3, 5 or 8 seconds). Press the LEFT button to return to confirm the setting. Press MODE to the main menu. The factory setting is five seconds. SLIDE SHOW TIME b).Select SLIDE WITH MP3 using the DOWN button and then press the RIGHT button to enter the submenu. The factory setting...
... displayed. The ON setting will allow any MP3 file to be played while the slide show display time for each photo (3, 5 or 8 seconds). Press the LEFT button to return to confirm the setting. Press MODE to the main menu. The factory setting is five seconds. SLIDE SHOW TIME b).Select SLIDE WITH MP3 using the DOWN button and then press the RIGHT button to enter the submenu. The factory setting...
User Guide
Page 7
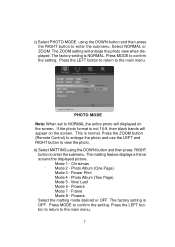
... button (Remote Control) to enlarge the photo and use the LEFT and RIGHT button to confirm the setting. Christmas ` Mode 2 - The factory setting is NORMAL. The ZOOM setting will appear on the screen. If the photo format is normal. The matting feature displays a frame around the displayed picture. Press MODE to view the photo. Flower Print Mode 4 - Vine/ Leaf Mode 6 - Frame Mode 8 - Mode 1 - Press MODE to NORMAL,the entire photo will displayed on the screen. PHOTO MODE Note: When set to confirm the setting. Photo Album...
... button (Remote Control) to enlarge the photo and use the LEFT and RIGHT button to confirm the setting. Christmas ` Mode 2 - The factory setting is NORMAL. The ZOOM setting will appear on the screen. If the photo format is normal. The matting feature displays a frame around the displayed picture. Press MODE to view the photo. Flower Print Mode 4 - Vine/ Leaf Mode 6 - Frame Mode 8 - Mode 1 - Press MODE to NORMAL,the entire photo will displayed on the screen. PHOTO MODE Note: When set to confirm the setting. Photo Album...
User Guide
Page 8
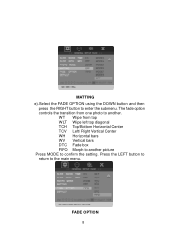
WT Wipe from one photo to confirm the setting. Press the LEFT button to return to enter the submenu. FADE OPTION 8 The fade option controls the transition from top WLT Wipe left top diagonal TCH Top/Bottom Horizontal Center TCV Left/ Right Vertical Center WH Horizontal bars WV Vertical bars DTC Fade box FIFO Morph to another picture Press MODE to another. MATTING e).Select the FADE OPTION using the DOWN button and then press the RIGHT button to the main menu.
WT Wipe from one photo to confirm the setting. Press the LEFT button to return to enter the submenu. FADE OPTION 8 The fade option controls the transition from top WLT Wipe left top diagonal TCH Top/Bottom Horizontal Center TCV Left/ Right Vertical Center WH Horizontal bars WV Vertical bars DTC Fade box FIFO Morph to another picture Press MODE to another. MATTING e).Select the FADE OPTION using the DOWN button and then press the RIGHT button to the main menu.
User Guide
Page 9
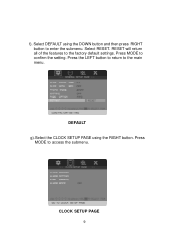
RESET will return all of the features to confirm the setting. Select RESET. DEFAULT g).Select the CLOCK SETUP PAGE using the DOWN button and then press RIGHT button to the main menu. Press MODE to the factory default settings. CLOCK SETUP PAGE 9 Select DEFAULT using the RIGHT button. Press the LEFT button to return to enter the submenu. f). Press MODE to access the submenu.
RESET will return all of the features to confirm the setting. Select RESET. DEFAULT g).Select the CLOCK SETUP PAGE using the DOWN button and then press RIGHT button to the main menu. Press MODE to the factory default settings. CLOCK SETUP PAGE 9 Select DEFAULT using the RIGHT button. Press the LEFT button to return to enter the submenu. f). Press MODE to access the submenu.
User Guide
Page 10
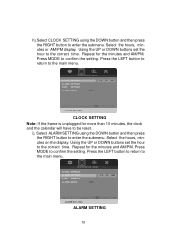
... the correct time. Press MODE to the main menu. Select the hours, minutes on the display. Press the LEFT button to return to confirm the setting. Select the hours, minutes or AM/PM display. Repeat for the minutes and AM/PM. ALARM SETTING 10 i). Press MODE to be reset. Using the UP or DOWN buttons set the hour to the correct time. CLOCK SETTING Note: If the frame is...
... the correct time. Press MODE to the main menu. Select the hours, minutes on the display. Press the LEFT button to return to confirm the setting. Select the hours, minutes or AM/PM display. Repeat for the minutes and AM/PM. ALARM SETTING 10 i). Press MODE to be reset. Using the UP or DOWN buttons set the hour to the correct time. CLOCK SETTING Note: If the frame is...

User Guide
Page 11
Press MODE to ON or OFF. The alarm can be set to confirm the setting. Press MODE to the main menu. ALARM MODE 11 DATE SETTING k).Select ALARM MODE using the UP and DOWN buttons. Press the LEFT button to return to confirm the setting. j). Set the month, day and year using the DOWN button and then press the RIGHT button to enter the submenu. Select DATE SETTING using the DOWN button and then press RIGHT button to the main menu. Press the LEFT button to return to enter the submenu.
Press MODE to ON or OFF. The alarm can be set to confirm the setting. Press MODE to the main menu. ALARM MODE 11 DATE SETTING k).Select ALARM MODE using the UP and DOWN buttons. Press the LEFT button to return to confirm the setting. j). Set the month, day and year using the DOWN button and then press the RIGHT button to enter the submenu. Select DATE SETTING using the DOWN button and then press RIGHT button to the main menu. Press the LEFT button to return to enter the submenu.
User Guide
Page 12
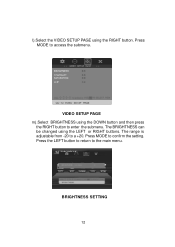
The BRIGHTNESS can be changed using the DOWN button and then press the RIGHT button to enter the submenu. Press MODE to access the submenu. BRIGHTNESS SETTING 12 Press MODE to confirm the setting. Press the LEFT button to return to a +20. VIDEO SETUP PAGE m).Select BRIGHTNESS using the LEFT or RIGHT buttons. The range is adjustable from -20 to the main menu. l).Select the VIDEO SETUP PAGE using the RIGHT button.
The BRIGHTNESS can be changed using the DOWN button and then press the RIGHT button to enter the submenu. Press MODE to access the submenu. BRIGHTNESS SETTING 12 Press MODE to confirm the setting. Press the LEFT button to return to a +20. VIDEO SETUP PAGE m).Select BRIGHTNESS using the LEFT or RIGHT buttons. The range is adjustable from -20 to the main menu. l).Select the VIDEO SETUP PAGE using the RIGHT button.

User Guide
Page 13
... RIGHT button to confirm the setting. SATURATION SETTING 13 Press MODE to enter the submenu. Press MODE to a +9. The range is adjustable from -9 to confirm the setting. Press the LEFT button to return to a +16. The SATURATION can be changed using the LEFT or RIGHT buttons. The range is adjustable from -16 to the main menu. n).Select CONTRAST using the DOWN button and...
... RIGHT button to confirm the setting. SATURATION SETTING 13 Press MODE to enter the submenu. Press MODE to a +9. The range is adjustable from -9 to confirm the setting. Press the LEFT button to return to a +16. The SATURATION can be changed using the LEFT or RIGHT buttons. The range is adjustable from -16 to the main menu. n).Select CONTRAST using the DOWN button and...
User Guide
Page 14
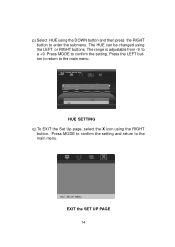
Press the LEFT button to return to confirm the setting. EXIT the SET UP PAGE 14 The HUE can be changed using the RIGHT button. Press MODE to the main menu. Press MODE to confirm the setting and return to a +9. HUE SETTING q).To EXIT the Set Up page, select the X icon using the LEFT or RIGHT buttons. The range is adjustable from -9 to the main menu. p).Select HUE using the DOWN button and then press the RIGHT button to enter the submenu.
Press the LEFT button to return to confirm the setting. EXIT the SET UP PAGE 14 The HUE can be changed using the RIGHT button. Press MODE to the main menu. Press MODE to confirm the setting and return to a +9. HUE SETTING q).To EXIT the Set Up page, select the X icon using the LEFT or RIGHT buttons. The range is adjustable from -9 to the main menu. p).Select HUE using the DOWN button and then press the RIGHT button to enter the submenu.
User Guide
Page 15
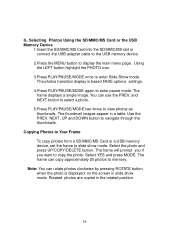
... copy approximately 20 photos to display the main menu page. Note: You can use the PREV. You can rotate photos clockwise by pressing ROTATE button when the photo is based FADE options settings. 4.Press PLAY/PAUSE/MODE again to view photos as thumbnails. Selecting Photos Using the SD/MMC/MS Card or the USB Memory Device 1.Insert the SD/MMC/MS Card into the SD/MMC/MS slot or connect the USB adapter cable to the USB memory device...
... copy approximately 20 photos to display the main menu page. Note: You can use the PREV. You can rotate photos clockwise by pressing ROTATE button when the photo is based FADE options settings. 4.Press PLAY/PAUSE/MODE again to view photos as thumbnails. Selecting Photos Using the SD/MMC/MS Card or the USB Memory Device 1.Insert the SD/MMC/MS Card into the SD/MMC/MS slot or connect the USB adapter cable to the USB memory device...
User Guide
Page 16
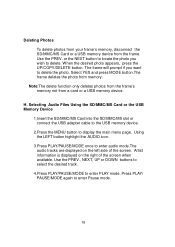
... audio mode.The audio tracks are displayed on the right of the screen. Selecting Audio Files Using the SD/MMC/MS Card or the USB Memory Device 1.Insert the SD/MMC/MS Card into the SD/MMC/MS slot or connect the USB adapter cable to the USB memory device. 2.Press the MENU button to enter PLAY mode. Deleting Photos To delete photos from your frame's memory, disconnect the SD/MMC/MS Card or a USB memory device from memory. Using the LEFT button highlight the AUDIO icon. 3.Press PLAY...
... audio mode.The audio tracks are displayed on the right of the screen. Selecting Audio Files Using the SD/MMC/MS Card or the USB Memory Device 1.Insert the SD/MMC/MS Card into the SD/MMC/MS slot or connect the USB adapter cable to the USB memory device. 2.Press the MENU button to enter PLAY mode. Deleting Photos To delete photos from your frame's memory, disconnect the SD/MMC/MS Card or a USB memory device from memory. Using the LEFT button highlight the AUDIO icon. 3.Press PLAY...
User Guide
Page 17
.... SPECIFICATIONS Audio format : MP3 Photo format: JPEG Panel size: 8 inch Power source: DC 9V Power consumption: 5 W Operating temperature: 41~95°F, 5~35°C Weight : 1.68lb 0.76Kg Dimensions (W x H x D): 10.2 X 8.4 X 1.5 inches 259 X 213 X 38mm 17 Note:The date is for reference to view dates in the future or in F. Using the LEFT button highlight the CALENDAR icon. 2.Press PLAY/PAUSE/MODE once to display the main menu page. Calendar Function 1.Press the MENU button...
.... SPECIFICATIONS Audio format : MP3 Photo format: JPEG Panel size: 8 inch Power source: DC 9V Power consumption: 5 W Operating temperature: 41~95°F, 5~35°C Weight : 1.68lb 0.76Kg Dimensions (W x H x D): 10.2 X 8.4 X 1.5 inches 259 X 213 X 38mm 17 Note:The date is for reference to view dates in the future or in F. Using the LEFT button highlight the CALENDAR icon. 2.Press PLAY/PAUSE/MODE once to display the main menu page. Calendar Function 1.Press the MENU button...
User Guide
Page 18
... assume for installation, removal or reinstallation of the product, or to damage to digital memory/media devices, gaming devices, discs, speakers, accessories, or electrical systems. This Warranty does not apply to any product or part thereof which vary from the date of original purchase, such defect(s) will be delivered with proof of the factory serial number/ bar code label(s). U.S.A. : AUDIOVOX ELECTRONICS CORPORATION, 150...
... assume for installation, removal or reinstallation of the product, or to damage to digital memory/media devices, gaming devices, discs, speakers, accessories, or electrical systems. This Warranty does not apply to any product or part thereof which vary from the date of original purchase, such defect(s) will be delivered with proof of the factory serial number/ bar code label(s). U.S.A. : AUDIOVOX ELECTRONICS CORPORATION, 150...


