
Owners Manual
Page 2
... should be read before the product is left unattended and unused for this product yourself as opening or removing covers may cause the Digital Photo Frame to insert the plug fully into the power outlet, try reversing the direction of time. This will prevent damage to the product due to service...
... should be read before the product is left unattended and unused for this product yourself as opening or removing covers may cause the Digital Photo Frame to insert the plug fully into the power outlet, try reversing the direction of time. This will prevent damage to the product due to service...
Owners Manual
Page 3
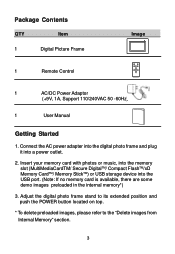
...DigitalTM/ Compact FlashTM/xD Memory CardTM/ Memory StickTM) or USB storage device into a power outlet. 2. Connect the AC power adapter into the digital photo frame and plug it into the USB port. (Note: If no memory card is available, there are some demo images preloaded in the internal memory*) 3. ...Adjust the digital photo frame stand to its extended position and push the POWER button located on top. * To delete preloaded images, please refer to the "Delete images from ...
...DigitalTM/ Compact FlashTM/xD Memory CardTM/ Memory StickTM) or USB storage device into a power outlet. 2. Connect the AC power adapter into the digital photo frame and plug it into the USB port. (Note: If no memory card is available, there are some demo images preloaded in the internal memory*) 3. ...Adjust the digital photo frame stand to its extended position and push the POWER button located on top. * To delete preloaded images, please refer to the "Delete images from ...

Owners Manual
Page 4
Photo Frame Controls and Indicators Functions Top View POWER LED POWER button PLAY/PAUSE/SELECT button MENU button UP/COPY/DELETE button DOWN/ROTATE button PREV. button NEXT button Left View Right View Volume Control CF Memory Slot SD/MMC/xD/ MS Card Slot USB Port Power Input 4
Photo Frame Controls and Indicators Functions Top View POWER LED POWER button PLAY/PAUSE/SELECT button MENU button UP/COPY/DELETE button DOWN/ROTATE button PREV. button NEXT button Left View Right View Volume Control CF Memory Slot SD/MMC/xD/ MS Card Slot USB Port Power Input 4
Owners Manual
Page 10
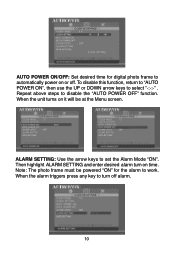
To disable this function, return to "AUTO POWER ON", then use the UP or DOWN arrow keys to disable the "AUTO POWER OFF" function. When the unit turns on it will be powered "ON" for digital photo frame to set the Alarm Mode "ON". When the alarm triggers press any key to work. Repeat above steps to select "-:-:-" . Note: The photo frame must be at the Menu screen. Then highlight ALARM SETTING and enter desired alarm turn off . ALARM SETTING: Use the arrow keys to automatically power on or off alarm. 10 AUTO POWER ON/OFF: Set desired time for the alarm to turn on time.
To disable this function, return to "AUTO POWER ON", then use the UP or DOWN arrow keys to disable the "AUTO POWER OFF" function. When the unit turns on it will be powered "ON" for digital photo frame to set the Alarm Mode "ON". When the alarm triggers press any key to work. Repeat above steps to select "-:-:-" . Note: The photo frame must be at the Menu screen. Then highlight ALARM SETTING and enter desired alarm turn off . ALARM SETTING: Use the arrow keys to automatically power on or off alarm. 10 AUTO POWER ON/OFF: Set desired time for the alarm to turn on time.
Owners Manual
Page 13
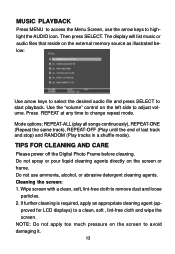
TIPS FOR CLEANING AND CARE Please power off the Digital Photo Frame before cleaning. NOTE: Do not apply too much pressure on the external memory source as illustrated below: Use arrow keys to select the desired audio ... the screen: 1. Then press SELECT. Wipe screen with a clean, soft, lint-free cloth to change repeat mode. Use the "volume" control on the screen or frame. proved for LCD displays) to adjust volume.
TIPS FOR CLEANING AND CARE Please power off the Digital Photo Frame before cleaning. NOTE: Do not apply too much pressure on the external memory source as illustrated below: Use arrow keys to select the desired audio ... the screen: 1. Then press SELECT. Wipe screen with a clean, soft, lint-free cloth to change repeat mode. Use the "volume" control on the screen or frame. proved for LCD displays) to adjust volume.
Owners Manual
Page 14
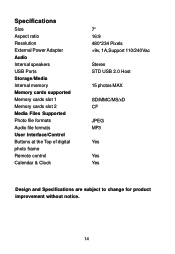
Specifications Size Aspect ratio Resolution External Power Adapter Audio Internal speakers USB Ports Storage/Media Internal memory Memory cards supported Memory cards slot 1 Memory cards slot 2 Media Files Supported Photo file formats Audio file formats User Interface/Control Buttons at the Top of digital photo frame Remote control Calendar & Clock 7" 16:9 480*234 Pixels +9v, 1A,Support 110/240Vac Stereo STD USB 2.0 Host 15 photos MAX SD/MMC/MS/xD CF JPEG MP3 Yes Yes Yes Design and Specifications are subject to change for product improvement without notice. 14
Specifications Size Aspect ratio Resolution External Power Adapter Audio Internal speakers USB Ports Storage/Media Internal memory Memory cards supported Memory cards slot 1 Memory cards slot 2 Media Files Supported Photo file formats Audio file formats User Interface/Control Buttons at the Top of digital photo frame Remote control Calendar & Clock 7" 16:9 480*234 Pixels +9v, 1A,Support 110/240Vac Stereo STD USB 2.0 Host 15 photos MAX SD/MMC/MS/xD CF JPEG MP3 Yes Yes Yes Design and Specifications are subject to change for product improvement without notice. 14
Owners Manual
Page 15
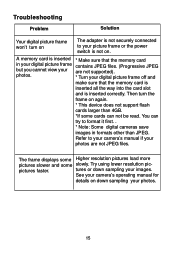
...lower resolution pic- Then turn on The adapter is not securely connected to your camera's manual if your images. Refer to your picture frame or the power switch is inserted * Make sure that the memory card is inserted all the way into the card slot and is ...inserted correctly. pictures faster. Troubleshooting Problem Solution Your digital picture frame won't turn the frame on again. * This device does not support flash cards larger than JPEG. The frame displays some Higher resolution pictures load more pictures slower and some cards can try to ...
...lower resolution pic- Then turn on The adapter is not securely connected to your camera's manual if your images. Refer to your picture frame or the power switch is inserted * Make sure that the memory card is inserted all the way into the card slot and is ...inserted correctly. pictures faster. Troubleshooting Problem Solution Your digital picture frame won't turn the frame on again. * This device does not support flash cards larger than JPEG. The frame displays some Higher resolution pictures load more pictures slower and some cards can try to ...

