User Manual
Page 1
D1917PK PORTABLE 9" LCD MONITOR AND DVD PLAYER PDF created with FinePrint pdfFactory Pro trial version http://www.fineprint.com
D1917PK PORTABLE 9" LCD MONITOR AND DVD PLAYER PDF created with FinePrint pdfFactory Pro trial version http://www.fineprint.com

User Manual
Page 2
...unless otherwise authorized by Macrovision Corporation. Use of the motor vehicle. An LCD panel or video monitor used for television reception, video or DVD play , the LCD panel or video monitor must be installed to the operator of this copyright protection technology must be authorized by method...with FinePrint pdfFactory Pro trial version http://www.fineprint.com If the LCD panel or video monitor is used for television reception, video or DVD play that operates when the vehicle is in "park" or when the vehicle's parking brake is intended for vehicle information, system control,...
...unless otherwise authorized by Macrovision Corporation. Use of the motor vehicle. An LCD panel or video monitor used for television reception, video or DVD play , the LCD panel or video monitor must be installed to the operator of this copyright protection technology must be authorized by method...with FinePrint pdfFactory Pro trial version http://www.fineprint.com If the LCD panel or video monitor is used for television reception, video or DVD play that operates when the vehicle is in "park" or when the vehicle's parking brake is intended for vehicle information, system control,...
User Manual
Page 4
... 2. B. The main features include a 9" Wide Screen (16:9 Aspect Ratio) Liquid Crystal Display (LCD) monitor and a DVD player. If the unit is designed for use . Cautions and Warnings 1. do not expose this product prior to obtain the best ...devices. The unit applies the latest state of reliable, trouble-free service, and is compact so that the D1917PK portable DVD player is designed for use in installing the system properly to using. Keep the unit away from a cold to... take it from a cold to a warm location, wait for choosing the D1917PK portable DVD player.
... 2. B. The main features include a 9" Wide Screen (16:9 Aspect Ratio) Liquid Crystal Display (LCD) monitor and a DVD player. If the unit is designed for use . Cautions and Warnings 1. do not expose this product prior to obtain the best ...devices. The unit applies the latest state of reliable, trouble-free service, and is compact so that the D1917PK portable DVD player is designed for use in installing the system properly to using. Keep the unit away from a cold to... take it from a cold to a warm location, wait for choosing the D1917PK portable DVD player.
User Manual
Page 6
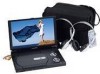
... 4. 1 x AC to DC adapter into the DC input jack on the unit, then plug the other end into the vehicle power outlet. Contents 1. 1 x 9'' LCD Monitor & DVD Player 2. 1 x Remote Control with FinePrint pdfFactory Pro trial version http://www.fineprint.com This unit's code is region 1. Powering the system indoors (Refer to Figure 1) Plug... left side of the AC to DC Adapter 5. 1 x DC Power Adapter 6. 1 x Instruction Manual 7. 1 x Rechargeable Battery 8. 1 x Carry Bag With Straps 9. 2 x Foldable Headphones D. 7.Regional Coding Both the DVD player and disc are coded by region.
... 4. 1 x AC to DC adapter into the DC input jack on the unit, then plug the other end into the vehicle power outlet. Contents 1. 1 x 9'' LCD Monitor & DVD Player 2. 1 x Remote Control with FinePrint pdfFactory Pro trial version http://www.fineprint.com This unit's code is region 1. Powering the system indoors (Refer to Figure 1) Plug... left side of the AC to DC Adapter 5. 1 x DC Power Adapter 6. 1 x Instruction Manual 7. 1 x Rechargeable Battery 8. 1 x Carry Bag With Straps 9. 2 x Foldable Headphones D. 7.Regional Coding Both the DVD player and disc are coded by region.
User Manual
Page 7
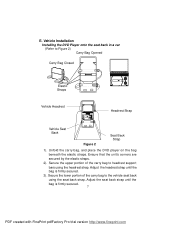
Vehicle Installation Installing the DVD Player onto the seat back in a car (Refer to the vehicle seat back using the headrest strap. Adjust the headrest strap until the bag is firmly ... Bag Opened Carry Bag Closed Elastic Straps Vehicle Headrest Headrest Strap Vehicle Seat Back Figure 2 Seat Back Strap 1). Unfold the carry bag, and place the DVD player on the bag beneath the elastic straps. E. Secure the lower portion of the carry bag to headrest support bars using the seat back strap. Ensure...
Vehicle Installation Installing the DVD Player onto the seat back in a car (Refer to the vehicle seat back using the headrest strap. Adjust the headrest strap until the bag is firmly ... Bag Opened Carry Bag Closed Elastic Straps Vehicle Headrest Headrest Strap Vehicle Seat Back Figure 2 Seat Back Strap 1). Unfold the carry bag, and place the DVD player on the bag beneath the elastic straps. E. Secure the lower portion of the carry bag to headrest support bars using the seat back strap. Ensure...
User Manual
Page 9
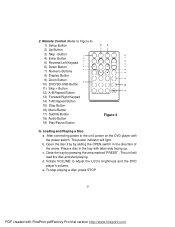
.... c. d. Rotate VOLUME to Figure 4) 1) Setup Button 2) Up Button 3) Skip - After connecting power to the unit, power on the DVD player with FinePrint pdfFactory Pro trial version http://www.fineprint.com Close the tray by sliding the OPEN switch in the tray with label side facing...disc and start playing. b. Remote Control (Refer to adjust the LCD's brightness and the DVD player's volume. Button 4) Enter Button 5) Reverse/Left Keypad 6) Down Button 7) Numeric Buttons 8) Display Button 9) Zoom Button 10) DVD/SD-USB Button 11) Skip + Button 12) A-B Repeat Button 13) Forward/Right Keypad...
.... c. d. Rotate VOLUME to Figure 4) 1) Setup Button 2) Up Button 3) Skip - After connecting power to the unit, power on the DVD player with FinePrint pdfFactory Pro trial version http://www.fineprint.com Close the tray by sliding the OPEN switch in the tray with label side facing...disc and start playing. b. Remote Control (Refer to adjust the LCD's brightness and the DVD player's volume. Button 4) Enter Button 5) Reverse/Left Keypad 6) Down Button 7) Numeric Buttons 8) Display Button 9) Zoom Button 10) DVD/SD-USB Button 11) Skip + Button 12) A-B Repeat Button 13) Forward/Right Keypad...

User Manual
Page 11
...Elapsed: The elapsed time of the chapter Chapter Remain: The remaining time of the chapter Display Off: The DVD's time Information will appear on the screen of the disc will not be displayed. Menu A DVD is not pressed. During playback press the 'DISPLAY' button to display the menu. Some... DVDs only allow you play a DVD's root menu of your TV or Monitor. PLAYING TIME AND REMAINING TIME a. Title Elapsed ...
...Elapsed: The elapsed time of the chapter Chapter Remain: The remaining time of the chapter Display Off: The DVD's time Information will appear on the screen of the disc will not be displayed. Menu A DVD is not pressed. During playback press the 'DISPLAY' button to display the menu. Some... DVDs only allow you play a DVD's root menu of your TV or Monitor. PLAYING TIME AND REMAINING TIME a. Title Elapsed ...

User Manual
Page 12
...audio language. The audio display will disappear automatically if the 'SUBTITLE' button is not pressed again within for 3 seconds. * Some DVDs only allow access to select the audio language you desire*, with the current Audio Channel Number (1) and the total number of Subtitle ...Languages (2) displayed. AUDIO During playback press 'AUDIO' to this function through the DVD menu Subtitle 3. Audio Language 12 PDF created with FinePrint pdfFactory Pro trial version http://www.fineprint.com 2. The Subtitle display will ...
...audio language. The audio display will disappear automatically if the 'SUBTITLE' button is not pressed again within for 3 seconds. * Some DVDs only allow access to select the audio language you desire*, with the current Audio Channel Number (1) and the total number of Subtitle ...Languages (2) displayed. AUDIO During playback press 'AUDIO' to this function through the DVD menu Subtitle 3. Audio Language 12 PDF created with FinePrint pdfFactory Pro trial version http://www.fineprint.com 2. The Subtitle display will ...
User Manual
Page 17
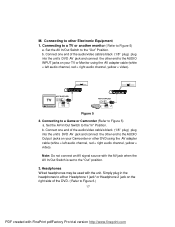
... the other end to the AUDIO Output jacks on the right side of the audio/video cable's black (1/8" plug) plug into the unit's DVD AV jack and connect the other end to the AUDIO INPUT jacks on your Camcorder or other Electronic Equipment 1. Connecting to Figure 6.) 17 PDF... created with the unit. Connect one end of the DVD. ( Refer to other DVD using the AV adapter cable (white = left audio channel, red = right audio channel, yellow = video). Connecting to a Game or Camcorder (...
... the other end to the AUDIO Output jacks on the right side of the audio/video cable's black (1/8" plug) plug into the unit's DVD AV jack and connect the other end to the AUDIO INPUT jacks on your Camcorder or other Electronic Equipment 1. Connecting to Figure 6.) 17 PDF... created with the unit. Connect one end of the DVD. ( Refer to other DVD using the AV adapter cable (white = left audio channel, red = right audio channel, yellow = video). Connecting to a Game or Camcorder (...
User Manual
Page 18
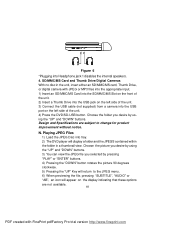
... the JPEG menu. 6) When previewing the file, pressing "SUBTITLE", "AUDIO" or "AB", an icon will appear on the left side of the unit. 4) Press the DVD/SD-USB button. Choose the picture you desire by using the "UP" and "DOWN" buttons. Playing JPEG Files 1) Load the JPEG Disc into Headphone jack... 1 disables the internal speakers. 4. SD/MMC/MS Card and Thumb Drive/Digital Cameras With no disc in a thumbnail view. N. * * Figure 6 *Plugging into tray. 2) The DVD player will return to change for product improvement without notice.
... the JPEG menu. 6) When previewing the file, pressing "SUBTITLE", "AUDIO" or "AB", an icon will appear on the left side of the unit. 4) Press the DVD/SD-USB button. Choose the picture you desire by using the "UP" and "DOWN" buttons. Playing JPEG Files 1) Load the JPEG Disc into Headphone jack... 1 disables the internal speakers. 4. SD/MMC/MS Card and Thumb Drive/Digital Cameras With no disc in a thumbnail view. N. * * Figure 6 *Plugging into tray. 2) The DVD player will return to change for product improvement without notice.

User Manual
Page 19
...ENTER to a wide screen TV, a wide picture is highlighted. General Setup Page 1)With no disc inside the player, press 'SETUP' to display the Main screen of the screen. * Wide: When the player outputs signal to confirm your selection. 6) Repeat steps 3-5 for other menus. Note: Press to exit the ...the same image remains on the full screen. Press 'SETUP' again to return the previous menu. c) Screen Saver *On: Enables screen saver *NOTE: The DVD player will not display the Angle Mark. At the same time, " " is shown on the screen. *Off: Disables screen saver (off) 19 PDF created with...
...ENTER to a wide screen TV, a wide picture is highlighted. General Setup Page 1)With no disc inside the player, press 'SETUP' to display the Main screen of the screen. * Wide: When the player outputs signal to confirm your selection. 6) Repeat steps 3-5 for other menus. Note: Press to exit the ...the same image remains on the full screen. Press 'SETUP' again to return the previous menu. c) Screen Saver *On: Enables screen saver *NOTE: The DVD player will not display the Angle Mark. At the same time, " " is shown on the screen. *Off: Disables screen saver (off) 19 PDF created with...
User Manual
Page 22
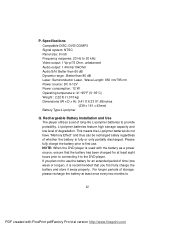
... please recharge the battery at least eight hours prior to connecting it away properly. Rechargeable Battery Installation and Use The player utilizes a set of degradation. Specifications Compatible DISC: DVD/CD/MP3 Signal system: NTSC Panel size: 9 inch Frequency response: 20 Hz to provide portability. NOTE: When the...at least once every two months to 22 PDF created with the battery as a power source, ensure that you plan not to the DVD player. Li-polymer batteries feature high storage capacity and low level of long-life Li-polymer batteries to 20 kHz Video output: 1 Vp-p/75...
... please recharge the battery at least eight hours prior to connecting it away properly. Rechargeable Battery Installation and Use The player utilizes a set of degradation. Specifications Compatible DISC: DVD/CD/MP3 Signal system: NTSC Panel size: 9 inch Frequency response: 20 Hz to provide portability. NOTE: When the...at least once every two months to 22 PDF created with the battery as a power source, ensure that you plan not to the DVD player. Li-polymer batteries feature high storage capacity and low level of long-life Li-polymer batteries to 20 kHz Video output: 1 Vp-p/75...
User Manual
Page 23
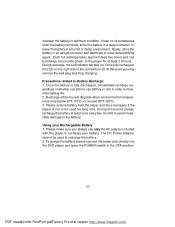
... least 2.5 hours. Recharge efficiency will stay on the right side of whether you plan to use only the AC adapter included with the player to the player for long time. Please make sure you may remove the wall plug and stop charging. To charge the battery, please connect the power... jack directly into the DVD player and leave the POWER switch in the OFF position. 23 PDF created with desiccant or other dehumidifying agent. Each full recharge takes approximately five-...
... least 2.5 hours. Recharge efficiency will stay on the right side of whether you plan to use only the AC adapter included with the player to the player for long time. Please make sure you may remove the wall plug and stop charging. To charge the battery, please connect the power... jack directly into the DVD player and leave the POWER switch in the OFF position. 23 PDF created with desiccant or other dehumidifying agent. Each full recharge takes approximately five-...
User Manual
Page 24
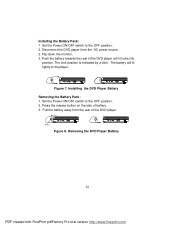
...the rear of battery. 3. Installing the DVD Player Battery Removing the Battery Pack: 1. Press Figure 8. Disconnect the DVD player from the rear of the DVD player. Figure 7. The battery will fit tightly to the OFF position. 2. Set the Power ON/OFF switch to the player. Press the release button on the side ...of the DVD player until it locks into position. Pull the battery away from the AC power source. 2. Flip down the monitor. 3....
...the rear of battery. 3. Installing the DVD Player Battery Removing the Battery Pack: 1. Press Figure 8. Disconnect the DVD player from the rear of the DVD player. Figure 7. The battery will fit tightly to the OFF position. 2. Set the Power ON/OFF switch to the player. Press the release button on the side ...of the DVD player until it locks into position. Pull the battery away from the AC power source. 2. Flip down the monitor. 3....

User Manual
Page 25
... and warning information that appears at the moment. 4. The feature is connected properly. Troubleshooting PROBLEM No sound or distorted sound SOLUTION • Make sure your DVD is not available at the beginning of movies because the disc is programmed to prohibit that is normal for some distortion to appear during forward...
... and warning information that appears at the moment. 4. The feature is connected properly. Troubleshooting PROBLEM No sound or distorted sound SOLUTION • Make sure your DVD is not available at the beginning of movies because the disc is programmed to prohibit that is normal for some distortion to appear during forward...
User Manual
Page 26
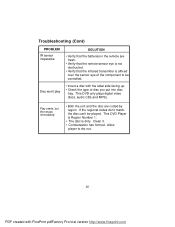
This DVD Player is Region Number 1. • The disc is affixed over the sensor eye of disc you put into disc tray. If the regional codes don't match, ... unit and the disc are fresh. • Verify that the remote sensor eye is not obstructed. • Verify that the infrared transmitter is dirty. Allow player to be played. Clean it. • Condensation has formed. This DVD only plays digital video discs, audio CDs and MP3s.
This DVD Player is Region Number 1. • The disc is affixed over the sensor eye of disc you put into disc tray. If the regional codes don't match, ... unit and the disc are fresh. • Verify that the remote sensor eye is not obstructed. • Verify that the infrared transmitter is dirty. Allow player to be played. Clean it. • Condensation has formed. This DVD only plays digital video discs, audio CDs and MP3s.


