User Manual
Page 1
D1917PK PORTABLE 9" LCD MONITOR AND DVD PLAYER PDF created with FinePrint pdfFactory Pro trial version http://www.fineprint.com
D1917PK PORTABLE 9" LCD MONITOR AND DVD PLAYER PDF created with FinePrint pdfFactory Pro trial version http://www.fineprint.com
User Manual
Page 3
Introduction 4 B. Powering and Installation 6 E. Basic Operation 10 I. Playing MP3 Discs 15 M. Contents 6 D. Menu 11 J. Controls, Indicators and Connectors 8 G. Troubleshooting 25 3 PDF created with FinePrint pdfFactory Pro trial version http://www.fineprint.com Content A. Display 11 K. Connecting to Other Electronic Equipment 17 N. Playing Audio CDS 14 L. Specifications 23 Q Rechargeable Battery Installation and Use 23 R. Playing JPEG file 18 O. Setup 20 P. Cautions and Warnings 4 C. Vehicle Installation 7 F. Loading and Playing a Disc 9 H.
Introduction 4 B. Powering and Installation 6 E. Basic Operation 10 I. Playing MP3 Discs 15 M. Contents 6 D. Menu 11 J. Controls, Indicators and Connectors 8 G. Troubleshooting 25 3 PDF created with FinePrint pdfFactory Pro trial version http://www.fineprint.com Content A. Display 11 K. Connecting to Other Electronic Equipment 17 N. Playing Audio CDS 14 L. Specifications 23 Q Rechargeable Battery Installation and Use 23 R. Playing JPEG file 18 O. Setup 20 P. Cautions and Warnings 4 C. Vehicle Installation 7 F. Loading and Playing a Disc 9 H.
User Manual
Page 4
...:9 Aspect Ratio) Liquid Crystal Display (LCD) monitor and a DVD player. The unit applies the latest state of any kind into the unit through openings; Please read the entire instruction manual supplied with this product prior to rain or moisture. B. Placement To prevent fire or electric shock, do not spill or spray liquid of the art electronics and is brought directly...
...:9 Aspect Ratio) Liquid Crystal Display (LCD) monitor and a DVD player. The unit applies the latest state of any kind into the unit through openings; Please read the entire instruction manual supplied with this product prior to rain or moisture. B. Placement To prevent fire or electric shock, do not spill or spray liquid of the art electronics and is brought directly...
User Manual
Page 5
... equivalent type. Use a cloth lightly dampened with water for cleaning the exterior of disc. Since this unit plays discs according to replace the battery incorrectly. Also refer to protect the environment, please dispose the battery properly. In order to the instructions supplied with the discs. 5 PDF created ... cleaning, make sure the system is hazardous to the disc contents the software producers designed, some playback features may not be intentionally fixed by wiping the disc from the power source. Discs Do not use liquid cleaners or aerosol cleaners. Clean the disc by software...
... equivalent type. Use a cloth lightly dampened with water for cleaning the exterior of disc. Since this unit plays discs according to replace the battery incorrectly. Also refer to protect the environment, please dispose the battery properly. In order to the instructions supplied with the discs. 5 PDF created ... cleaning, make sure the system is hazardous to the disc contents the software producers designed, some playback features may not be intentionally fixed by wiping the disc from the power source. Discs Do not use liquid cleaners or aerosol cleaners. Clean the disc by software...
User Manual
Page 6
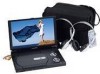
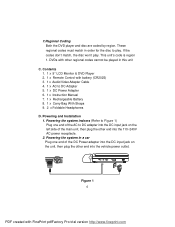
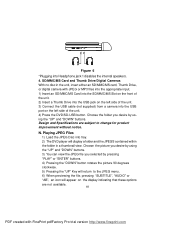
Contents 1. 1 x 9'' LCD Monitor & DVD Player 2. 1 x Remote Control with other regional codes cannot be played in this unit C. Powering the system indoors (Refer to Figure 1) Plug one end of the DC Power adapter into the DC input jack on the left side of the AC to play . If the codes don't match, the disc won't play . This unit's code is region 1. DVDs with battery (CR2025) 3. 1 x Audio/Video Adapter Cable 4. 1 x AC to DC Adapter 5. 1 x DC Power Adapter 6. 1 x Instruction Manual 7. 1 x Rechargeable Battery 8. 1 x Carry...
Contents 1. 1 x 9'' LCD Monitor & DVD Player 2. 1 x Remote Control with other regional codes cannot be played in this unit C. Powering the system indoors (Refer to Figure 1) Plug one end of the DC Power adapter into the DC input jack on the left side of the AC to play . If the codes don't match, the disc won't play . This unit's code is region 1. DVDs with battery (CR2025) 3. 1 x Audio/Video Adapter Cable 4. 1 x AC to DC Adapter 5. 1 x DC Power Adapter 6. 1 x Instruction Manual 7. 1 x Rechargeable Battery 8. 1 x Carry...
User Manual
Page 7
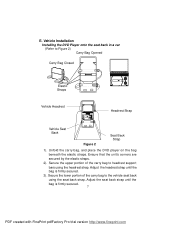
....fineprint.com Adjust the headrest strap until the bag is firmly secured. 3). Unfold the carry bag, and place the DVD player on the bag beneath the elastic straps. Ensure that the unit's corners are secured by the elastic straps. 2). Vehicle Installation Installing the DVD Player onto the seat back in a car (Refer to headrest support bars using the seat...
....fineprint.com Adjust the headrest strap until the bag is firmly secured. 3). Unfold the carry bag, and place the DVD player on the bag beneath the elastic straps. Ensure that the unit's corners are secured by the elastic straps. 2). Vehicle Installation Installing the DVD Player onto the seat back in a car (Refer to headrest support bars using the seat...
User Manual
Page 8
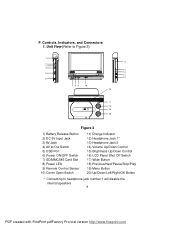
.../Out Switch 5) USB Port 6) Power ON/OFF Switch 7) SD/MMC/MS Card Slot 8) Power LED 9) Remote Control Sensor 10) Cover Open Switch 11) Charge Indicator 12) Headphone Jack 1* 13) Headphone Jack 2 14) Volume Up/Down Control 15) Brightness Up/Down Control 16) LCD Panel Shut Off Switch 17) Wide Button 18) Previous/Next/Pause/Stop/Play 19) Menu Button 20) Up/Down/Left/Right/OK Button * Connecting to headphone jack number 1 will disable the...
.../Out Switch 5) USB Port 6) Power ON/OFF Switch 7) SD/MMC/MS Card Slot 8) Power LED 9) Remote Control Sensor 10) Cover Open Switch 11) Charge Indicator 12) Headphone Jack 1* 13) Headphone Jack 2 14) Volume Up/Down Control 15) Brightness Up/Down Control 16) LCD Panel Shut Off Switch 17) Wide Button 18) Previous/Next/Pause/Stop/Play 19) Menu Button 20) Up/Down/Left/Right/OK Button * Connecting to headphone jack number 1 will disable the...
User Manual
Page 9
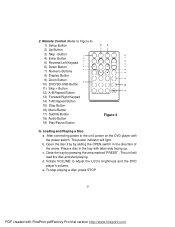
... start playing. Open the disc tray by pressing the area marked "PRESS" . Close the tray by sliding the OPEN switch in the tray with label side facing up. 2. e. Button 4) Enter Button 5) Reverse/Left Keypad 6) Down Button 7) Numeric Buttons 8) Display Button 9) Zoom Button 10) DVD/SD-USB Button 11) Skip + Button 12) A-B Repeat Button 13) Forward/Right Keypad 14) 1/All Repeat Button 15) Stop Button 16) Menu Button 17) Subtitle Button 18) Audio Button 19) Play/Pause Button Figure 4 G. Remote Control (Refer to adjust the LCD's brightness and the DVD player's volume. b.
... start playing. Open the disc tray by pressing the area marked "PRESS" . Close the tray by sliding the OPEN switch in the tray with label side facing up. 2. e. Button 4) Enter Button 5) Reverse/Left Keypad 6) Down Button 7) Numeric Buttons 8) Display Button 9) Zoom Button 10) DVD/SD-USB Button 11) Skip + Button 12) A-B Repeat Button 13) Forward/Right Keypad 14) 1/All Repeat Button 15) Stop Button 16) Menu Button 17) Subtitle Button 18) Audio Button 19) Play/Pause Button Figure 4 G. Remote Control (Refer to adjust the LCD's brightness and the DVD player's volume. b.
User Manual
Page 10
... the disc DISPLAY Display information (title, chapter, track, time, etc.). Basic Operation POWER Turn the unit on /off OPEN Remove/load the disc PAUSE Press to pause play and again to select and set items, and exit the setup menu. WIDE On the player only: change between wide screen and 4:3 picture aspect ratio. 10 PDF created with FinePrint pdfFactory Pro trial version http://www.fineprint.com SUBTITLE Select the subtitle language and turn it on /off AUDIO Select the audio language SETUP Display the setup menu...
... the disc DISPLAY Display information (title, chapter, track, time, etc.). Basic Operation POWER Turn the unit on /off OPEN Remove/load the disc PAUSE Press to pause play and again to select and set items, and exit the setup menu. WIDE On the player only: change between wide screen and 4:3 picture aspect ratio. 10 PDF created with FinePrint pdfFactory Pro trial version http://www.fineprint.com SUBTITLE Select the subtitle language and turn it on /off AUDIO Select the audio language SETUP Display the setup menu...
User Manual
Page 15
... turn it off. CD-R /RW discs that is playing. • All- When an MP3 disc is OFF. Press ENTER to select your desired folders and songs or the system plays the songs in MP3 format are compatible with FinePrint pdfFactory Pro trial version http://www.fineprint.com The CD time Information will be displayed. USING THE1/ALL REPEAT FEATURE The default mode for storing digital audio. repeats...
... turn it off. CD-R /RW discs that is playing. • All- When an MP3 disc is OFF. Press ENTER to select your desired folders and songs or the system plays the songs in MP3 format are compatible with FinePrint pdfFactory Pro trial version http://www.fineprint.com The CD time Information will be displayed. USING THE1/ALL REPEAT FEATURE The default mode for storing digital audio. repeats...
User Manual
Page 17
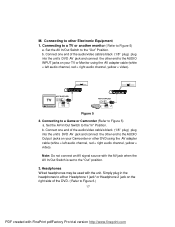
... "In" Position. Connect one end of the audio/video cable's black (1/8" plug) plug into the unit's DVD AV jack and connect the other DVD using the AV adapter cable (white = left audio channel, red = right audio channel, yellow = video). Set the AV In/Out Switch to other end to the AUDIO Output jacks on your TV or Monitor using the AV adapter cable (white = left audio channel, red = right audio channel, yellow = video). Note: Do not connect an AV signal source with...
... "In" Position. Connect one end of the audio/video cable's black (1/8" plug) plug into the unit's DVD AV jack and connect the other DVD using the AV adapter cable (white = left audio channel, red = right audio channel, yellow = video). Set the AV In/Out Switch to other end to the AUDIO Output jacks on your TV or Monitor using the AV adapter cable (white = left audio channel, red = right audio channel, yellow = video). Note: Do not connect an AV signal source with...
User Manual
Page 18
... view the JPEG file you desire by pressing "PLAY" or "ENTER" buttons. 4) Pressing the "DOWN" button rotates the picture 90 degrees clockwise. 5) Pressing the "UP" Key will return to change for product improvement without notice. Playing JPEG Files 1) Load the JPEG Disc into tray. 2) The DVD player will appear on the display indicating that these options are subject to the JPEG menu. 6) When previewing the file, pressing "SUBTITLE", "AUDIO...
... view the JPEG file you desire by pressing "PLAY" or "ENTER" buttons. 4) Pressing the "DOWN" button rotates the picture 90 degrees clockwise. 5) Pressing the "UP" Key will return to change for product improvement without notice. Playing JPEG Files 1) Load the JPEG Disc into tray. 2) The DVD player will appear on the display indicating that these options are subject to the JPEG menu. 6) When previewing the file, pressing "SUBTITLE", "AUDIO...

User Manual
Page 19
... the Screen Saver mode after approximately three minutes if the same image remains on the screen. *Off: Disables screen saver (off) 19 PDF created with a black strip at both the top and bottom of the Setup Menu on the full screen. O. General Setup Page 1)With no disc inside the player, press 'SETUP' to display the Main screen of the screen. * Wide: When the player outputs signal to a normal TV, a normal picture...
... the Screen Saver mode after approximately three minutes if the same image remains on the screen. *Off: Disables screen saver (off) 19 PDF created with a black strip at both the top and bottom of the Setup Menu on the full screen. O. General Setup Page 1)With no disc inside the player, press 'SETUP' to display the Main screen of the screen. * Wide: When the player outputs signal to a normal TV, a normal picture...
User Manual
Page 21
... using the default password to set mode. e) Default Select 'Default' using the and button, then press RIGHT to enter the submenu. Press ENTER to make all of users while some discs cannot. 21 PDF created with lock-out function or multiple rating levels. NOTE: The Default Password is not available, the player will play and display on the age of the settings return to the factory set the parental level and change the password, you have selected your selection. 6) Repeat...
... using the default password to set mode. e) Default Select 'Default' using the and button, then press RIGHT to enter the submenu. Press ENTER to make all of users while some discs cannot. 21 PDF created with lock-out function or multiple rating levels. NOTE: The Default Password is not available, the player will play and display on the age of the settings return to the factory set the parental level and change the password, you have selected your selection. 6) Repeat...
User Manual
Page 22
... a power source, ensure that you plan not to first use the battery for at least once every two months to the DVD player. If you first fully charge the battery and store it is fully or only partially discharged. Rechargeable Battery Installation and Use The player utilizes a set of storage, please recharge the battery at least eight hours prior to connecting it to 22 PDF...
... a power source, ensure that you plan not to first use the battery for at least once every two months to the DVD player. If you first fully charge the battery and store it is fully or only partially discharged. Rechargeable Battery Installation and Use The player utilizes a set of storage, please recharge the battery at least eight hours prior to connecting it to 22 PDF...
User Manual
Page 23
... 2.5 hours. Using your battery. Ideally, store the battery in an airtight container with FinePrint pdfFactory Pro trial version http://www.fineprint.com Please remove battery from the player and store it properly if the player is fully discharged, immediately recharge (regardless of the unit will turn off. To charge the battery, please connect the power jack directly into the DVD player and leave the POWER switch in...
... 2.5 hours. Using your battery. Ideally, store the battery in an airtight container with FinePrint pdfFactory Pro trial version http://www.fineprint.com Please remove battery from the player and store it properly if the player is fully discharged, immediately recharge (regardless of the unit will turn off. To charge the battery, please connect the power jack directly into the DVD player and leave the POWER switch in...
User Manual
Page 24
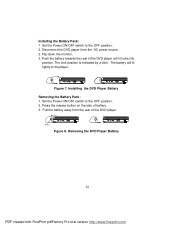
.... 3. Push the battery towards the rear of battery. 3. The battery will fit tightly to the OFF position. 2. Press the release button on the side of the DVD player until it locks into position. Pull the battery away from the AC power source. 2. Disconnect the DVD player from the rear of the DVD player. Set the Power ON/OFF switch to the player. Installing the Battery Pack: 1. Set the Power ON/OFF switch to the...
.... 3. Push the battery towards the rear of battery. 3. The battery will fit tightly to the OFF position. 2. Press the release button on the side of the DVD player until it locks into position. Pull the battery away from the AC power source. 2. Disconnect the DVD player from the rear of the DVD player. Set the Power ON/OFF switch to the player. Installing the Battery Pack: 1. Set the Power ON/OFF switch to the...

User Manual
Page 25
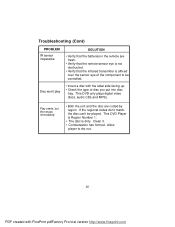
Make sure all cables are securely inserted into the appropriate jacks. Picture is connected properly. Troubleshooting PROBLEM No sound or distorted sound SOLUTION • Make sure your DVD is distorted No forward or reverse scan • The disc might be damaged. Can't advance through a movie • You can't advance through the opening credits and warning information that is programmed to prohibit skipping through the warning information...
Make sure all cables are securely inserted into the appropriate jacks. Picture is connected properly. Troubleshooting PROBLEM No sound or distorted sound SOLUTION • Make sure your DVD is distorted No forward or reverse scan • The disc might be damaged. Can't advance through a movie • You can't advance through the opening credits and warning information that is programmed to prohibit skipping through the warning information...
User Manual
Page 26
... plays digital video discs, audio CDs and MP3s. This DVD Player is Region Number 1. • The disc is affixed over the sensor eye of the component to dry out. 26 PDF created with the label side facing up. • Check the type of disc you put into disc tray. Troubleshooting (Cont) PROBLEM IR sensor inoperative Disc won't play SOLUTION • Verify that the batteries in the remote are coded by region. Allow player to be played...
... plays digital video discs, audio CDs and MP3s. This DVD Player is Region Number 1. • The disc is affixed over the sensor eye of the component to dry out. 26 PDF created with the label side facing up. • Check the type of disc you put into disc tray. Troubleshooting (Cont) PROBLEM IR sensor inoperative Disc won't play SOLUTION • Verify that the batteries in the remote are coded by region. Allow player to be played...

User Manual
Page 27
... installation, mishandling, misuse, neglect, accident, or by removal or defacement of the factory serial number/ bar code label(s). THE EXTENT OF THE COMPANY'S LIABILITY UNDER THIS WARRANTY IS LIMITED TO THE REPAIR OR REPLACEMENT ...WARRANTY Applies to Audiovox Video Products AUDIOVOX ELECTRONICS CORP. (the Company) warrants to the original retail purchaser of this product that should this product or any part thereof, under normal use and conditions, be proven defective in material or workmanship within the terms of this product. A game controller, if supplied, is in connection...
... installation, mishandling, misuse, neglect, accident, or by removal or defacement of the factory serial number/ bar code label(s). THE EXTENT OF THE COMPANY'S LIABILITY UNDER THIS WARRANTY IS LIMITED TO THE REPAIR OR REPLACEMENT ...WARRANTY Applies to Audiovox Video Products AUDIOVOX ELECTRONICS CORP. (the Company) warrants to the original retail purchaser of this product that should this product or any part thereof, under normal use and conditions, be proven defective in material or workmanship within the terms of this product. A game controller, if supplied, is in connection...


