User Guide
Page 1
D1718PK PORTABLE 7" LCD MONITOR AND DVD PLAYER
D1718PK PORTABLE 7" LCD MONITOR AND DVD PLAYER
User Guide
Page 2
Reverse engineering or disassembly is prohibited. An LCD panel or video monitor used for television reception, video or DVD play , the LCD panel or video monitor must be installed to the rear of the driver's seat where it will only function when the vehicle ... is protected by method claims of certain patents and other intellectual property rights owned by Macrovision Corporation, and is intended for television reception, video or DVD play that operates when the vehicle is in gear or when the parking brake is not applied must be installed so that these features will...
Reverse engineering or disassembly is prohibited. An LCD panel or video monitor used for television reception, video or DVD play , the LCD panel or video monitor must be installed to the rear of the driver's seat where it will only function when the vehicle ... is protected by method claims of certain patents and other intellectual property rights owned by Macrovision Corporation, and is intended for television reception, video or DVD play that operates when the vehicle is in gear or when the parking brake is not applied must be installed so that these features will...

User Guide
Page 3
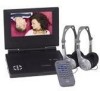
The unit is constructed to provide years of any kind into the unit through openings; Please save this manual for choosing the D1718PK portable DVD player. Do not place the set on or in the system (this manual. 3. The documentation will assist you in this may ... hotels, offices or your home. The main features include a 7" Wide Screen (16:9 Aspect Ratio) Liquid Crystal Display (LCD) monitor and a DVD player. Introduction Thank you anywhere and is designed for quick and easy installation. Placement To prevent fire or electric shock, do not spill or spray liquid...
The unit is constructed to provide years of any kind into the unit through openings; Please save this manual for choosing the D1718PK portable DVD player. Do not place the set on or in the system (this manual. 3. The documentation will assist you in this may ... hotels, offices or your home. The main features include a 7" Wide Screen (16:9 Aspect Ratio) Liquid Crystal Display (LCD) monitor and a DVD player. Introduction Thank you anywhere and is designed for quick and easy installation. Placement To prevent fire or electric shock, do not spill or spray liquid...

User Guide
Page 4
... disc won't play . This unit's code is unplugged from the unit and store it in need of discs may not be intentionally fixed by region. DVD's with water for the disc to malfunction. Do not touch the surface of electric shock and/or exposure to the disc contents the software producers... must match in this unit plays discs according to Laser Radiation. Do not stick paper, tape or glue on the disc. Regional Coding Both the DVD player and disc are coded by software producers.
... disc won't play . This unit's code is unplugged from the unit and store it in need of discs may not be intentionally fixed by region. DVD's with water for the disc to malfunction. Do not touch the surface of electric shock and/or exposure to the disc contents the software producers... must match in this unit plays discs according to Laser Radiation. Do not stick paper, tape or glue on the disc. Regional Coding Both the DVD player and disc are coded by software producers.
User Guide
Page 5
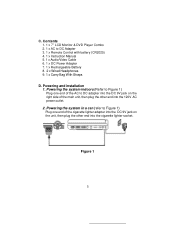
Powering and installation 1. Figure 1 5 Contents 1. 1 x 7'' LCD Monitor & DVD Player Combo 2. 1 x AC to DC adapter into the DC 9V jack on the unit, then plug the other end into the cigarette lighter socket. C. Powering the ...
Powering and installation 1. Figure 1 5 Contents 1. 1 x 7'' LCD Monitor & DVD Player Combo 2. 1 x AC to DC adapter into the DC 9V jack on the unit, then plug the other end into the cigarette lighter socket. C. Powering the ...
User Guide
Page 6
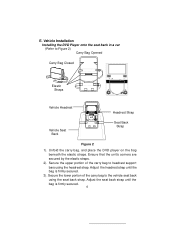
E. Vehicle Installation Installing the DVD Player onto the seat back in a car (Refer to headrest support bars using the seat back strap. Ensure that the unit's corners are secured by the ... Bag Opened Carry Bag Closed Elastic Straps Vehicle Headrest Headrest Strap Vehicle Seat Back Seat Back Strap Figure 2 1). Unfold the carry bag, and place the DVD player on the bag beneath the elastic straps.
E. Vehicle Installation Installing the DVD Player onto the seat back in a car (Refer to headrest support bars using the seat back strap. Ensure that the unit's corners are secured by the ... Bag Opened Carry Bag Closed Elastic Straps Vehicle Headrest Headrest Strap Vehicle Seat Back Seat Back Strap Figure 2 1). Unfold the carry bag, and place the DVD player on the bag beneath the elastic straps.
User Guide
Page 8
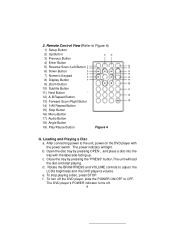
... the POWER ON/OFF to the unit, power on the DVD player with the label side facing up. Loading and Playing a Disc a. Close the tray by pressing OPEN , and place a disc into the tray with the power ... 17) Audio Button 18) Angle Button 19) Play/Pause Button Figure 4 G. To turn off . 8 Remote Control View (Refer to adjust the LCD's brightness and the DVD player's volume. Open the disc tray by pressing the "PRESS" button.The unit will light. e. To stop playing a disc, press STOP. The power indicator will load...
... the POWER ON/OFF to the unit, power on the DVD player with the label side facing up. Loading and Playing a Disc a. Close the tray by pressing OPEN , and place a disc into the tray with the power ... 17) Audio Button 18) Angle Button 19) Play/Pause Button Figure 4 G. To turn off . 8 Remote Control View (Refer to adjust the LCD's brightness and the DVD player's volume. Open the disc tray by pressing the "PRESS" button.The unit will light. e. To stop playing a disc, press STOP. The power indicator will load...
User Guide
Page 10
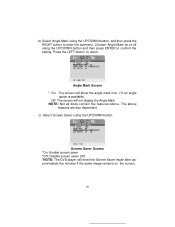
... saver *Off: Disable screen saver (off using the UP/DOWN button and then press ENTER to return. Choose Angle Mark on or off ) *NOTE: The DVD player will show the angle mark icon. (*If an angle option is available).
... saver *Off: Disable screen saver (off using the UP/DOWN button and then press ENTER to return. Choose Angle Mark on or off ) *NOTE: The DVD player will show the angle mark icon. (*If an angle option is available).
User Guide
Page 17
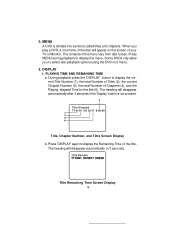
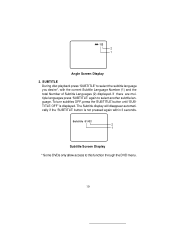
...disc. The heading will disappear automatically after 3 seconds if the 'Display' button is divided into sections called titles and chapters. Some DVDs only allow you play a DVD, a root menu of the disc will appear on the screen of Chapters (4), and the Playing elapsed Time for the title (5).... During playback press the 'DISPLAY' button to select disc playback options using the DVD root menu. 3. When you to display the current Title Number (1), the total Number of Titles (2), the current Chapter Number (3), the total ...
...disc. The heading will disappear automatically after 3 seconds if the 'Display' button is divided into sections called titles and chapters. Some DVDs only allow you play a DVD, a root menu of the disc will appear on the screen of Chapters (4), and the Playing elapsed Time for the title (5).... During playback press the 'DISPLAY' button to select disc playback options using the DVD root menu. 3. When you to display the current Title Number (1), the total Number of Titles (2), the current Chapter Number (3), the total ...
User Guide
Page 19
...is not pressed again within 3 seconds. The Subtitle display will disappear automatically if the 'SUBTITLE' button is displayed. Subtitle Screen Display * Some DVDs only allow access to select the subtitle language you desire*, with the current Subtitle Language Number (1) and the total Number of Subtitle Languages (2)... displayed. SUBTITLE During disc playback press 'SUBTITLE' to this function through the DVD menu. 19 Angle Screen Display 3. If there are multiple languages press 'SUBTITLE' again to select another subtitle language.
...is not pressed again within 3 seconds. The Subtitle display will disappear automatically if the 'SUBTITLE' button is displayed. Subtitle Screen Display * Some DVDs only allow access to select the subtitle language you desire*, with the current Subtitle Language Number (1) and the total Number of Subtitle Languages (2)... displayed. SUBTITLE During disc playback press 'SUBTITLE' to this function through the DVD menu. 19 Angle Screen Display 3. If there are multiple languages press 'SUBTITLE' again to select another subtitle language.
User Guide
Page 20
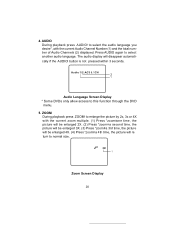
4. The audio display will re turn to this function through the DVD menu. 5. to select another audio language. Press AUDIO again to select the audio language you desire*, with the current zoom multiple. (1) Press "zoom#one time, ... be enlarged 4X. (4) Press "zoom# a 4th time, the picture will disappear automatically if the AUDIO! ZOOM During playback press ZOOM! Audio Language Screen Display * Some DVDs only allow access to normal size. to enlarge the picture by 2x, 3x or 4X with the current Audio Channel Number (1) and the total number...
4. The audio display will re turn to this function through the DVD menu. 5. to select another audio language. Press AUDIO again to select the audio language you desire*, with the current zoom multiple. (1) Press "zoom#one time, ... be enlarged 4X. (4) Press "zoom# a 4th time, the picture will disappear automatically if the AUDIO! ZOOM During playback press ZOOM! Audio Language Screen Display * Some DVDs only allow access to normal size. to enlarge the picture by 2x, 3x or 4X with the current Audio Channel Number (1) and the total number...
User Guide
Page 25
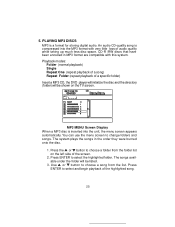
... the screen. 2. Playback modes: Folder (normal playback) Single Repeat One (repeat playback of a song) Repeat Folder (repeat playback of a specific folder) Insert a MP3 CD, the DVD player will initialize the disc and the directory (folder) will be shown on the left side of audio quality while taking up much less disc space...
... the screen. 2. Playback modes: Folder (normal playback) Single Repeat One (repeat playback of a song) Repeat Folder (repeat playback of a specific folder) Insert a MP3 CD, the DVD player will initialize the disc and the directory (folder) will be shown on the left side of audio quality while taking up much less disc space...
User Guide
Page 28
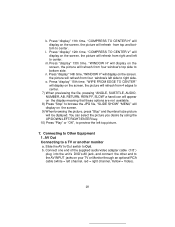
... or Monitor through an optional RCA cable (white = left top picture. 7. Connect one end of the supplied audio/video adapter cable (1/8" ) plug into the unit's DVD's AV jack, and connect the other end to Out. Press "display" 11th time, "COMPRESS TO CENTER H" will be diplayed. Press "display" 12th time, "COMPRESS TO...
... or Monitor through an optional RCA cable (white = left top picture. 7. Connect one end of the supplied audio/video adapter cable (1/8" ) plug into the unit's DVD's AV jack, and connect the other end to Out. Press "display" 11th time, "COMPRESS TO CENTER H" will be diplayed. Press "display" 12th time, "COMPRESS TO...
User Guide
Page 29
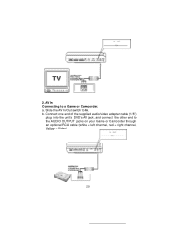
b. Connect one end of the supplied audio/video adapter cable (1/8") plug into the unit's DVD's AV jack, and connect the other end to a Game or Camcorder. AV In Connecting to the AUDIO OUTPUT jacks on your Game or Camcorder through an optional RCA cable (white = left channel, red = right channel, Yellow = Video). 29 a. Slide the AV In/Out switch to In. 2.
b. Connect one end of the supplied audio/video adapter cable (1/8") plug into the unit's DVD's AV jack, and connect the other end to a Game or Camcorder. AV In Connecting to the AUDIO OUTPUT jacks on your Game or Camcorder through an optional RCA cable (white = left channel, red = right channel, Yellow = Video). 29 a. Slide the AV In/Out switch to In. 2.
User Guide
Page 31
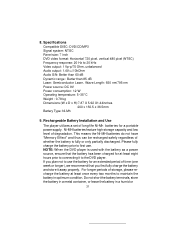
NOTE: When the DVD player is fully or only partially discharged. 8. For longer periods ...battery in a metal container, or leave the battery in optimum condition. Rechargeable Battery Installation and Use The player utilizes a set of long-life Ni-Mh batteries for an extended period of storage, please recharge the... recharged safely regardless of degradation. Please fully charge the battery prior to the DVD player. Specifications Compatible DISC: DVD/CD/MP3 Signal system: NTSC Panel size: 7 inch DVD video format: Horizontal 720 pixel, vertical 480 pixel (NTSC) Frequency response:...
NOTE: When the DVD player is fully or only partially discharged. 8. For longer periods ...battery in a metal container, or leave the battery in optimum condition. Rechargeable Battery Installation and Use The player utilizes a set of long-life Ni-Mh batteries for an extended period of storage, please recharge the... recharged safely regardless of degradation. Please fully charge the battery prior to the DVD player. Specifications Compatible DISC: DVD/CD/MP3 Signal system: NTSC Panel size: 7 inch DVD video format: Horizontal 720 pixel, vertical 480 pixel (NTSC) Frequency response:...
User Guide
Page 32
...To charge the battery, please connect the power jack directly into the DVD player and leave the POWER switch in an airtight container with the player to Battery Recharge: 1. Please remove battery from the player and store it properly if the player is fully discharged, immediately recharge (regard- During this point you plan ... 50oF (10oC) or exceed 95oF (35oC). 3. Each full recharge takes approximately five-hours and one full charge can provide power to the player for a long period, please also recharge the battery at least once two months to avoid irreparable damage to the...
...To charge the battery, please connect the power jack directly into the DVD player and leave the POWER switch in an airtight container with the player to Battery Recharge: 1. Please remove battery from the player and store it properly if the player is fully discharged, immediately recharge (regard- During this point you plan ... 50oF (10oC) or exceed 95oF (35oC). 3. Each full recharge takes approximately five-hours and one full charge can provide power to the player for a long period, please also recharge the battery at least once two months to avoid irreparable damage to the...
User Guide
Page 33
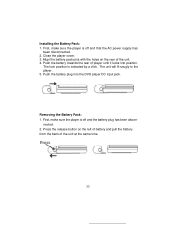
...Removing the Battery Pack: 1. Press the release button on the rear of player until it locks into the DVD player DC input jack. First, make sure the player is off and the battery plug has been discon- First, make sure the player is indicated by a click. The unit will fit snugly to the... player. 5. Installing the Battery Pack: 1. Close the player cover. 3. Push the battery ...
...Removing the Battery Pack: 1. Press the release button on the rear of player until it locks into the DVD player DC input jack. First, make sure the player is off and the battery plug has been discon- First, make sure the player is indicated by a click. The unit will fit snugly to the... player. 5. Installing the Battery Pack: 1. Close the player cover. 3. Push the battery ...


