
Owners Manual
Page 4
... into the cigarette lighter socket. Figure 1 E. C. Powering the system indoors (Refer to DC Adapter 3. 1 x Remote Control with battery (CR2025) 4. 1 x Instruction Manual 5. 1 x Audio/Video Cable 6. 1 x Cigarette Lighter Adapter 7. Controls, Indicators, and Connectors 4 Rechargeable Battery D. Contents 1. 1 x 7'' LCD Monitor & DVD Player Combo 2. 1 x AC to Figure 1) Plug one end of the main unit, then plug the other...
... into the cigarette lighter socket. Figure 1 E. C. Powering the system indoors (Refer to DC Adapter 3. 1 x Remote Control with battery (CR2025) 4. 1 x Instruction Manual 5. 1 x Audio/Video Cable 6. 1 x Cigarette Lighter Adapter 7. Controls, Indicators, and Connectors 4 Rechargeable Battery D. Contents 1. 1 x 7'' LCD Monitor & DVD Player Combo 2. 1 x AC to Figure 1) Plug one end of the main unit, then plug the other...
Owners Manual
Page 5
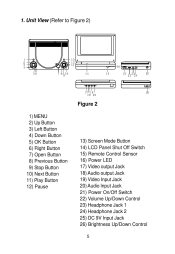
1. Unit View (Refer to Figure 2) Figure 2 1) MENU 2) Up Button 3) Left Button 4) Down Button 5) OK Button 6) Right Button 7) Open Button 8) Previous Button 9) Stop Button 10) Next Button 11) Play Button 12) Pause 13) Screen Mode Button 14) LCD Panel Shut Off Switch 15) Remote Control Sensor 16) Power LED 17) Video output Jack 18) Audio output Jack 19) Video Input Jack 20) Audio Input Jack 21) Power On/Off Switch 22) Volume Up/Down Control 23) Headphone Jack 1 24) Headphone Jack 2 25) DC 9V Input Jack 26) Brightness Up/Down Control 5
1. Unit View (Refer to Figure 2) Figure 2 1) MENU 2) Up Button 3) Left Button 4) Down Button 5) OK Button 6) Right Button 7) Open Button 8) Previous Button 9) Stop Button 10) Next Button 11) Play Button 12) Pause 13) Screen Mode Button 14) LCD Panel Shut Off Switch 15) Remote Control Sensor 16) Power LED 17) Video output Jack 18) Audio output Jack 19) Video Input Jack 20) Audio Input Jack 21) Power On/Off Switch 22) Volume Up/Down Control 23) Headphone Jack 1 24) Headphone Jack 2 25) DC 9V Input Jack 26) Brightness Up/Down Control 5

Owners Manual
Page 6
... 16) Repeat Button 17) SKIP18) SKIP+ 19) Play Button Figure 3 20) Pause Button F. b. After connecting power to the unit, power on"DVD player" with the label side facing up. Open the disc tray by pressing the "PRESS" button.The unit will light. Remote Control View (Refer to adjust the LCD's brightness and the...
... 16) Repeat Button 17) SKIP18) SKIP+ 19) Play Button Figure 3 20) Pause Button F. b. After connecting power to the unit, power on"DVD player" with the label side facing up. Open the disc tray by pressing the "PRESS" button.The unit will light. Remote Control View (Refer to adjust the LCD's brightness and the...

Owners Manual
Page 22
.... Press 'DISPLAY' one time and SINGLE REMAIN appears along with the current track playing and the amount of that track will be displayed on the remote to resume normal play. SINGLE REMAIN Screen Display 22 The options below show you what information is available using this function. SINGLE ELAPSED Screen Display...
.... Press 'DISPLAY' one time and SINGLE REMAIN appears along with the current track playing and the amount of that track will be displayed on the remote to resume normal play. SINGLE REMAIN Screen Display 22 The options below show you what information is available using this function. SINGLE ELAPSED Screen Display...


