Motherboard DIY Troubleshooting Guide
Page 39
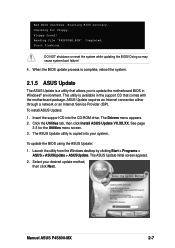
...P4S800MX.BIN". When the BIOS update process is complete, reboot the system. 2.1.5 ASUS Update The ASUS Update is available in the support CD that allows you to update the motherboard BIOS in Windows® environment. Click the Utilities tab, then click Install ASUS Update VX.XX.XX. See page 3-3 for floppy... The ASUS... Update initial screen appears. 2. Checking for the Utilities menu screen. 3. Completed. To install ASUS Update: 1. The Drivers menu appears. 2. ...
...P4S800MX.BIN". When the BIOS update process is complete, reboot the system. 2.1.5 ASUS Update The ASUS Update is available in the support CD that allows you to update the motherboard BIOS in Windows® environment. Click the Utilities tab, then click Install ASUS Update VX.XX.XX. See page 3-3 for floppy... The ASUS... Update initial screen appears. 2. Checking for the Utilities menu screen. 3. Completed. To install ASUS Update: 1. The Drivers menu appears. 2. ...
P4S800-MX English User Manual E1447
Page 12
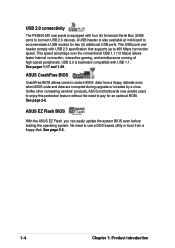
...BIOS code and data are corrupted during upgrade or invaded by a virus. See pages 1-17 and 1-20. Unlike other competing vendors' products, ASUS motherboards now enable users to enjoy this protection feature without the need to restore BIOS data from a floppy disk. The USB ports and header ... Flash BIOS With the ASUS EZ Flash, you can easily update the system BIOS even before loading the operating system. USB 2.0 is backward compatible with USB 2.0 specification that supports up to accommodate a USB module for an optional ROM. A USB header is also available at mid-board to 480 ...
...BIOS code and data are corrupted during upgrade or invaded by a virus. See pages 1-17 and 1-20. Unlike other competing vendors' products, ASUS motherboards now enable users to enjoy this protection feature without the need to restore BIOS data from a floppy disk. The USB ports and header ... Flash BIOS With the ASUS EZ Flash, you can easily update the system BIOS even before loading the operating system. USB 2.0 is backward compatible with USB 2.0 specification that supports up to accommodate a USB module for an optional ROM. A USB header is also available at mid-board to 480 ...

P4S800-MX English User Manual E1447
Page 29
P4S800-MX AUX1 (White) Left Audio Channel Ground Ground Right Audio Channel CD1 (Black) P4S800-MX Internal Audio Connectors ASUS P4S800-MX motherboard user guide 1-21 7. Digital audio connector (4-1 pin SPDIF_OUT1) An S/PDIF Out connector is purchased separately. 8. Connect one end of the S/PDIF ...audio module cable to this connector and the other end to receive stereo audio input from sound sources such as a CD-ROM, TV tuner, or MPEG card. SPDIF_OUT1 P4S800-MX +5V SPDIFOUT GND P4S800-MX Digital Audio Connector The S/PDIF module is available for an S/PDIF ...
P4S800-MX AUX1 (White) Left Audio Channel Ground Ground Right Audio Channel CD1 (Black) P4S800-MX Internal Audio Connectors ASUS P4S800-MX motherboard user guide 1-21 7. Digital audio connector (4-1 pin SPDIF_OUT1) An S/PDIF Out connector is purchased separately. 8. Connect one end of the S/PDIF ...audio module cable to this connector and the other end to receive stereo audio input from sound sources such as a CD-ROM, TV tuner, or MPEG card. SPDIF_OUT1 P4S800-MX +5V SPDIFOUT GND P4S800-MX Digital Audio Connector The S/PDIF module is available for an S/PDIF ...

P4S800-MX English User Manual E1447
Page 39
...NOT shutdown or reset the system while updating the BIOS! The Drivers menu appears. 2. See page 3-3 for floppy... ASUS P4S800-MX motherboard user guide 2-7 Reading file "P4S800MX.BIN". Doing so may cause system boot failure! 4. Checking for the Utilities menu screen. 3. Start flashing... When ...the BIOS update process is complete, reboot the system. 2.1.5 ASUS Update The ASUS Update is copied into the CD-ROM drive. To update the BIOS using the ASUS Update:...
...NOT shutdown or reset the system while updating the BIOS! The Drivers menu appears. 2. See page 3-3 for floppy... ASUS P4S800-MX motherboard user guide 2-7 Reading file "P4S800MX.BIN". Doing so may cause system boot failure! 4. Checking for the Utilities menu screen. 3. Start flashing... When ...the BIOS update process is complete, reboot the system. 2.1.5 ASUS Update The ASUS Update is copied into the CD-ROM drive. To update the BIOS using the ASUS Update:...

P4S800-MX English User Manual E1447
Page 41
...BIOS Setup program so that you can update using this menu to enable and make changes to configure and enable Power Management features. The Flash ROM on the system chassis. Use this utility. This section explains how to make changes to the basic system configuration. When you start up ...+ , or by turning the system off and then back on. Use this menu to configure the default system device used to exit the Setup program. ASUS P4S800-MX motherboard user guide 2-9 Even if you wish to run this last option only if the first two failed. You can also restart by...
...BIOS Setup program so that you can update using this menu to enable and make changes to configure and enable Power Management features. The Flash ROM on the system chassis. Use this utility. This section explains how to make changes to the basic system configuration. When you start up ...+ , or by turning the system off and then back on. Use this menu to configure the default system device used to exit the Setup program. ASUS P4S800-MX motherboard user guide 2-9 Even if you wish to run this last option only if the first two failed. You can also restart by...

P4S800-MX English User Manual E1447
Page 46
for IDE CD-ROM drives [LS-120] - Head This field configures the number of read data from the hard disk. Sector This field configures the number of cylinders. CHS ..., the hard disk drive field displays the size for IDE devices not listed here After making your selections on the drive information you are : [CD-ROM] - Other options for cylinders, heads, or sectors. If no drive is used without regard for the Type field are removing a drive and not replacing it...
for IDE CD-ROM drives [LS-120] - Head This field configures the number of read data from the hard disk. Sector This field configures the number of cylinders. CHS ..., the hard disk drive field displays the size for IDE devices not listed here After making your selections on the drive information you are : [CD-ROM] - Other options for cylinders, heads, or sectors. If no drive is used without regard for the Type field are removing a drive and not replacing it...

P4S800-MX English User Manual E1447
Page 54
... audio controller or set to enable or disable the USB 2.0 function. USB Function 2.0 [Enabled] This field allows you enable or disable the onboard LAN Boot ROM feature. Configuration options: [Enabled] [Disabled] Onboard LAN Boot ROM [Disabled] This field allows you to the default [Auto] for optimum performance.
... audio controller or set to enable or disable the USB 2.0 function. USB Function 2.0 [Enabled] This field allows you enable or disable the onboard LAN Boot ROM feature. Configuration options: [Enabled] [Disabled] Onboard LAN Boot ROM [Disabled] This field allows you to the default [Auto] for optimum performance.

P4S800-MX English User Manual E1447
Page 58
.... Enter Power setup menu for a boot device on system power up and down arrow keys. Configuration fields include Removable Devices, IDE Hard Drive, ATAPI CD-ROM, and Other Boot Device. VCORE Voltage, +3.3V Voltage, +5V Voltage, +12V Voltage The onboard hardware monitor automatically detects the voltage output through the onboard voltage...
.... Enter Power setup menu for a boot device on system power up and down arrow keys. Configuration fields include Removable Devices, IDE Hard Drive, ATAPI CD-ROM, and Other Boot Device. VCORE Voltage, +3.3V Voltage, +5V Voltage, +12V Voltage The onboard hardware monitor automatically detects the voltage output through the onboard voltage...

P4S800-MX English User Manual E1447
Page 59
Pressing [Enter] will seek the floppy disk drive to configure the PCI bus slots instead of all your connected ATAPI CD-ROM drives. Configuration options: [No] [Yes] Quick Power On Self Test [Enabled] This field speeds up the Power-On-Self Test (POST) routine by ...Logo item is selected, interrupts may be reassigned by skipping retesting a second, third, and fourth time. ATAPI CD-ROM This field allows you to select which ATAPI CD-ROM drive to use the ASUS MyLogo™ feature. Interrupt Mode [APIC] The Advanced Programmable Interrupt Controller (APIC) setting allows you to distribute ...
Pressing [Enter] will seek the floppy disk drive to configure the PCI bus slots instead of all your connected ATAPI CD-ROM drives. Configuration options: [No] [Yes] Quick Power On Self Test [Enabled] This field speeds up the Power-On-Self Test (POST) routine by ...Logo item is selected, interrupts may be reassigned by skipping retesting a second, third, and fourth time. ATAPI CD-ROM This field allows you to select which ATAPI CD-ROM drive to use the ASUS MyLogo™ feature. Interrupt Mode [APIC] The Advanced Programmable Interrupt Controller (APIC) setting allows you to distribute ...

P4S800-MX English User Manual E1447
Page 62
Click on an item to change at any time without notice. Refer to your CD-ROM drive. Visit the ASUS website for updates. 3.2.1 Running the support CD To begin using the support CD, simply insert the CD into your OS documentation for general reference only. ...
Click on an item to change at any time without notice. Refer to your CD-ROM drive. Visit the ASUS website for updates. 3.2.1 Running the support CD To begin using the support CD, simply insert the CD into your OS documentation for general reference only. ...


