
K8V SE Deluxe User's Manual
Page 19
...™ The motherboard offers an exciting feature called the ASUS POST Reporter™ to Windows™. C.P.R. (CPU Parameter Recall) The C.P.R. See page 4-4. feature of your system with customizable boot logos. ASUS EZ Flash BIOS With the ASUS EZ Flash, you to personalize and add style to your choice from a floppy disk. See page 4-12... causes of boot errors, if any. When the system hangs due to use a DOS-based utility or boot from the available options. See pages 4-28, 5-9. ASUS K8V SE Deluxe motherboard 1-5
...™ The motherboard offers an exciting feature called the ASUS POST Reporter™ to Windows™. C.P.R. (CPU Parameter Recall) The C.P.R. See page 4-4. feature of your system with customizable boot logos. ASUS EZ Flash BIOS With the ASUS EZ Flash, you to personalize and add style to your choice from a floppy disk. See page 4-12... causes of boot errors, if any. When the system hangs due to use a DOS-based utility or boot from the available options. See pages 4-28, 5-9. ASUS K8V SE Deluxe motherboard 1-5

K8V SE Deluxe User's Manual
Page 46
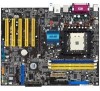
... ribbon cables of the Parallel ATA interface. • Hot plug support for Serial ATA drive and connections is not available in this motherboard. • Install Windows® XP Service Pack 1 when using Serial ATA. • Refer to 150 MB/s data transfer rate, faster than the standard parallel ATA with 133 ... ATA cables for details on Serial ATA solution: • The Serial ATA cable is smaller and more flexible allowing easier routing inside the chassis. SATA2 K8V SATA1 ® K8V SE Deluxe SATA Connectors Important notes on SATA RAID configuration. 2-24 Chapter 2: Hardware information
... ribbon cables of the Parallel ATA interface. • Hot plug support for Serial ATA drive and connections is not available in this motherboard. • Install Windows® XP Service Pack 1 when using Serial ATA. • Refer to 150 MB/s data transfer rate, faster than the standard parallel ATA with 133 ... ATA cables for details on Serial ATA solution: • The Serial ATA cable is smaller and more flexible allowing easier routing inside the chassis. SATA2 K8V SATA1 ® K8V SE Deluxe SATA Connectors Important notes on SATA RAID configuration. 2-24 Chapter 2: Hardware information

K8V SE Deluxe User's Manual
Page 61
... Messages POST Events Playing the default wave files To play the default wave files, simply click on a POST event on your desktop, or from the Windows Start menu, select Programs->Winbond Voice Editor->Voice Editor. Install the software from the Winbond Voice Editor icon on the left side of the support... The Winbond Voice Editor software allows you to use the Winbond Voice Editor. See section "5.2.3 Utilities menu" for details. The default language setting is English. ASUS K8V SE Deluxe motherboard 3-5 To avoid conflicts, do not run the Winbond Voice Editor while running the...
... Messages POST Events Playing the default wave files To play the default wave files, simply click on a POST event on your desktop, or from the Windows Start menu, select Programs->Winbond Voice Editor->Voice Editor. Install the software from the Winbond Voice Editor icon on the left side of the support... The Winbond Voice Editor software allows you to use the Winbond Voice Editor. See section "5.2.3 Utilities menu" for details. The default language setting is English. ASUS K8V SE Deluxe motherboard 3-5 To avoid conflicts, do not run the Winbond Voice Editor while running the...

K8V SE Deluxe User's Manual
Page 63
...1Mbit, so make your message for your wave files so you can locate them small. Use a recording software, such as Windows Recorder, to display the Add Wave File window. 6. From the Voice Editor screen, click the Add button to record your messages. 4. Launch the Voice Editor and take...easily do so. It is not in the selection or if you wish to record your own POST messages to customize your POST messages. 1. ASUS K8V SE Deluxe motherboard 3-7 Save the messages as possible. 3. For example, use 8-bit, mono quality at 22Khz sampling rate. Customizing your POST messages If your...
...1Mbit, so make your message for your wave files so you can locate them small. Use a recording software, such as Windows Recorder, to display the Add Wave File window. 6. From the Voice Editor screen, click the Add button to record your messages. 4. Launch the Voice Editor and take...easily do so. It is not in the selection or if you wish to record your own POST messages to customize your POST messages. 1. ASUS K8V SE Deluxe motherboard 3-7 Save the messages as possible. 3. For example, use 8-bit, mono quality at 22Khz sampling rate. Customizing your POST messages If your...

K8V SE Deluxe User's Manual
Page 67
... BIOS 2 - DOS environment Insert a 1.44 MB floppy disk into the floppy disk drive. ASUS K8V SE Deluxe motherboard 4-1 Updates the BIOS using the ASUS Update utility. 4.1.1 Creating a bootable floppy disk 1. Updates the BIOS using Windows® 98SE/ME/2000, select Full option button from the menu, then select Format. Important notes Save a copy of the following...
... BIOS 2 - DOS environment Insert a 1.44 MB floppy disk into the floppy disk drive. ASUS K8V SE Deluxe motherboard 4-1 Updates the BIOS using the ASUS Update utility. 4.1.1 Creating a bootable floppy disk 1. Updates the BIOS using Windows® 98SE/ME/2000, select Full option button from the menu, then select Format. Important notes Save a copy of the following...
K8V SE Deluxe User's Manual
Page 73
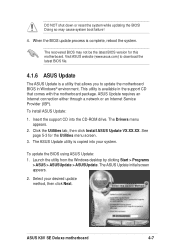
..., then click Next. See page 5-3 for this motherboard. To update the BIOS using ASUS Update: 1. Click the Utilities tab, then click Install ASUS Update VX.XX.XX. ASUS K8V SE Deluxe motherboard 4-7 The recovered BIOS may cause system boot failure! 4. DO NOT shut down ...Internet Service Provider (ISP). Launch the utility from the Windows desktop by clicking Start > Programs > ASUS > ASUSUpdate > ASUSUpdate. The ASUS Update initial screen appears. 2. Visit ASUS website (www.asus.com) to update the motherboard BIOS in Windows® environment. Doing so may not be the latest...
..., then click Next. See page 5-3 for this motherboard. To update the BIOS using ASUS Update: 1. Click the Utilities tab, then click Install ASUS Update VX.XX.XX. ASUS K8V SE Deluxe motherboard 4-7 The recovered BIOS may cause system boot failure! 4. DO NOT shut down ...Internet Service Provider (ISP). Launch the utility from the Windows desktop by clicking Start > Programs > ASUS > ASUSUpdate > ASUSUpdate. The ASUS Update initial screen appears. 2. Visit ASUS website (www.asus.com) to update the motherboard BIOS in Windows® environment. Doing so may not be the latest...

K8V SE Deluxe User's Manual
Page 77
...display a pop-up window Scroll bar Up/Down arrow keys or PageUp/ PageDown keys to display the other items (Advanced, Power, Boot, and Exit) on the menu bar have their respective menu items. Main menu items Use [ENTER], [TAB] or [SHIFT-TAB] to malfunction. ASUS K8V SE Deluxe motherboard 4-11 For ...19] [Thu 03/27/2003] [1.44M, 3.5 in the sections below may change the value of the field opposite the item. Press Pop-up window with a sub-menu on the screen. To display the sub-menu, select the item and press . 4.2.6 Configuration fields These fields show the values ...
...display a pop-up window Scroll bar Up/Down arrow keys or PageUp/ PageDown keys to display the other items (Advanced, Power, Boot, and Exit) on the menu bar have their respective menu items. Main menu items Use [ENTER], [TAB] or [SHIFT-TAB] to malfunction. ASUS K8V SE Deluxe motherboard 4-11 For ...19] [Thu 03/27/2003] [1.44M, 3.5 in the sections below may change the value of the field opposite the item. Press Pop-up window with a sub-menu on the screen. To display the sub-menu, select the item and press . 4.2.6 Configuration fields These fields show the values ...
K8V SE Deluxe User's Manual
Page 107
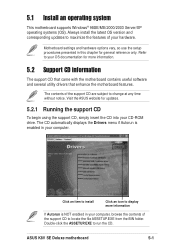
... to run the CD. Double-click the ASSETUP.EXE to change at any time without notice. ASUS K8V SE Deluxe motherboard 5-1 Always install the latest OS version and corresponding updates to your OS documentation for general ...setup procedures presented in this chapter for more information If Autorun is enabled in your computer. Visit the ASUS website for updates. 5.2.1 Running the support CD To begin using the support CD, simply insert the ...ROM drive. 5.1 Install an operating system This motherboard supports Windows® 98SE/ME/2000/2003 Server/XP operating systems (OS).
... to run the CD. Double-click the ASSETUP.EXE to change at any time without notice. ASUS K8V SE Deluxe motherboard 5-1 Always install the latest OS version and corresponding updates to your OS documentation for general ...setup procedures presented in this chapter for more information If Autorun is enabled in your computer. Visit the ASUS website for updates. 5.2.1 Running the support CD To begin using the support CD, simply insert the ...ROM drive. 5.1 Install an operating system This motherboard supports Windows® 98SE/ME/2000/2003 Server/XP operating systems (OS).
K8V SE Deluxe User's Manual
Page 119
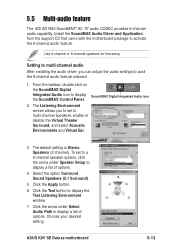
...driver, you to set to a 6-channel speaker system, click the arrow under Select Audio Path to activate the 6-channel audio feature. ASUS K8V SE Deluxe motherboard 5-13 Use 4-channel or 6-channel speakers for this setup. To set to avail the 6-channel audio feature onboard. 1. Click the...Integrated Audio icon 2. From the taskbar, double-click on the SoundMAX Digital Integrated Audio icon to display the Test Listening Environment window. 7. The Listening Environment screen allows you can adjust the audio settings to multi-channel speakers, enable or disable the Virtual ...
...driver, you to set to a 6-channel speaker system, click the arrow under Select Audio Path to activate the 6-channel audio feature. ASUS K8V SE Deluxe motherboard 5-13 Use 4-channel or 6-channel speakers for this setup. To set to avail the 6-channel audio feature onboard. 1. Click the...Integrated Audio icon 2. From the taskbar, double-click on the SoundMAX Digital Integrated Audio icon to display the Test Listening Environment window. 7. The Listening Environment screen allows you can adjust the audio settings to multi-channel speakers, enable or disable the Virtual ...

K8V SE Deluxe User's Manual
Page 121
The Advanced Controls for Volume Control window appears. To achieve 6-channel audio capability when playing DVDs, check the boxes opposite AC3 SPDIF and PCM SPDIF. 3. Click Close. ASUS K8V SE Deluxe motherboard 5-15 If you did not install an S/PDIF module. 2. After rebooting the system, click the Volume Control icon on the taskbar (lower right corner...
The Advanced Controls for Volume Control window appears. To achieve 6-channel audio capability when playing DVDs, check the boxes opposite AC3 SPDIF and PCM SPDIF. 3. Click Close. ASUS K8V SE Deluxe motherboard 5-15 If you did not install an S/PDIF module. 2. After rebooting the system, click the Volume Control icon on the taskbar (lower right corner...
K8V SE Deluxe User's Manual
Page 123
... disks on RAID configurations under different operating systems. ASUS K8V SE Deluxe motherboard 5-17 RAID 1 (called data striping) optimizes two identical hard disk drives to read and write data in the support CD for detailed information on the PRI_RAID interface, you use either Windows® XP or Windows® 2000 operating system (OS), copy first the...
... disks on RAID configurations under different operating systems. ASUS K8V SE Deluxe motherboard 5-17 RAID 1 (called data striping) optimizes two identical hard disk drives to read and write data in the support CD for detailed information on the PRI_RAID interface, you use either Windows® XP or Windows® 2000 operating system (OS), copy first the...

K8V SE Deluxe User's Manual
Page 139
If you are using this feature. From the Windows® 2000/XP operating system, click the Start button. Select Settings, then Control Panel. 2. button. Make sure the Control Panel is set it to Yes. ... and set it to Enabled. Make sure to install the Cool 'n' Quiet!™ driver and application when using Windows® 2000/XP operating system: 1. Turn on the task the CPU performs. To enable Cool 'n' Quiet!™ Technology: 1. Reboot your changes and exit BIOS Setup. 5. The following dialog box appears. 5. ASUS K8V SE Deluxe motherboard 5-33
If you are using this feature. From the Windows® 2000/XP operating system, click the Start button. Select Settings, then Control Panel. 2. button. Make sure the Control Panel is set it to Yes. ... and set it to Enabled. Make sure to install the Cool 'n' Quiet!™ driver and application when using Windows® 2000/XP operating system: 1. Turn on the task the CPU performs. To enable Cool 'n' Quiet!™ Technology: 1. Reboot your changes and exit BIOS Setup. 5. The following dialog box appears. 5. ASUS K8V SE Deluxe motherboard 5-33


