Motherboard DIY Troubleshooting Guide
Page 6
... a device. • Before connecting or removing signal cables from the motherboard, ensure that all power cables are unplugged. • Seek professional assistance before using the product, make sure all the manuals that the power cables for the devices are unplugged before the signal cables... are not damaged. Operation safety • Before installing the motherboard and adding devices on a stable surface. • If you are...
... a device. • Before connecting or removing signal cables from the motherboard, ensure that all power cables are unplugged. • Seek professional assistance before using the product, make sure all the manuals that the power cables for the devices are unplugged before the signal cables... are not damaged. Operation safety • Before installing the motherboard and adding devices on a stable surface. • If you are...
Motherboard DIY Troubleshooting Guide
Page 12
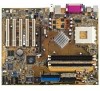
... features for a 3.5-inch floppy drive Bag of extra jumper caps I/O shield User's Manual 1-2 Before you for socket A processors. Unique ASUS features such as ASUS C.O.P., ASUS Q-Fan Technology and more are included to deliver the maximum performance for buying the ASUS® A7N8X-X motherboard! For future upgrades or system reconfiguration, this chapter provides technical information about the...
... features for a 3.5-inch floppy drive Bag of extra jumper caps I/O shield User's Manual 1-2 Before you for socket A processors. Unique ASUS features such as ASUS C.O.P., ASUS Q-Fan Technology and more are included to deliver the maximum performance for buying the ASUS® A7N8X-X motherboard! For future upgrades or system reconfiguration, this chapter provides technical information about the...

Motherboard DIY Troubleshooting Guide
Page 41
... hard disk drive type in MB. [Manual] & [CHS] Settings Manually enter the number of the Primary IDE hard disk drives to active. To make changes to this sub-menu, press the key to return to the Main menu. Refer to the drive documentation to [CHS]. ASUS A7N8X-X Motherboard 2-11 Refer to this information. When...
... hard disk drive type in MB. [Manual] & [CHS] Settings Manually enter the number of the Primary IDE hard disk drives to active. To make changes to this sub-menu, press the key to return to the Main menu. Refer to the drive documentation to [CHS]. ASUS A7N8X-X Motherboard 2-11 Refer to this information. When...
Motherboard DIY Troubleshooting Guide
Page 47
...95, 97, 100MHz] System BIOS Cacheable [Disabled] This field establishes whether or not the BIOS is automatically scaled or set to [Manual], this field permits selection of mapped memory ( in megabytes ) for the latency time between the SDRAM read command and the moment ...] [128M] [256M] [512M] AGP Frequency [Auto] This field sets the frequency of optimal AGP frequencies. Configuration options: [Enabled] [Disabled] ASUS A7N8X-X Motherboard 2-17 SDRAM RAS Precharge Delay [1] Row-precharge delay. SDRAM CAS Latency [2.5T] This field sets the override clock cycle for AGP graphic data....
...95, 97, 100MHz] System BIOS Cacheable [Disabled] This field establishes whether or not the BIOS is automatically scaled or set to [Manual], this field permits selection of mapped memory ( in megabytes ) for the latency time between the SDRAM read command and the moment ...] [128M] [256M] [512M] AGP Frequency [Auto] This field sets the frequency of optimal AGP frequencies. Configuration options: [Enabled] [Disabled] ASUS A7N8X-X Motherboard 2-17 SDRAM RAS Precharge Delay [1] Row-precharge delay. SDRAM CAS Latency [2.5T] This field sets the override clock cycle for AGP graphic data....
A7N8X-X User's Manual
Page 6
...could interrupt the grounding circuit. • Make sure that your power supply is broken, do not try to fix it , carefully read all the manuals that came with the product, contact a qualified service technician or your local power company. • If the power supply is set to or ... staples away from connectors, slots, sockets and circuitry. • Avoid dust, humidity, and temperature extremes. If possible, disconnect all power cables from the motherboard, ensure that all cables are correctly connected and the power cables are not damaged. Operation safety • Before installing the...
...could interrupt the grounding circuit. • Make sure that your power supply is broken, do not try to fix it , carefully read all the manuals that came with the product, contact a qualified service technician or your local power company. • If the power supply is set to or ... staples away from connectors, slots, sockets and circuitry. • Avoid dust, humidity, and temperature extremes. If possible, disconnect all power cables from the motherboard, ensure that all cables are correctly connected and the power cables are not damaged. Operation safety • Before installing the...

A7N8X-X User's Manual
Page 12
... IDE drives Ribbon cable for a 3.5-inch floppy drive Bag of extra jumper caps I/O shield User's Manual Check your package with value-added features for buying the ASUS® A7N8X-X motherboard! Before you for guaranteed consumer satisfaction. This motherboard is loaded with the most advanced technologies to ensure the best user experience and value in...
... IDE drives Ribbon cable for a 3.5-inch floppy drive Bag of extra jumper caps I/O shield User's Manual Check your package with value-added features for buying the ASUS® A7N8X-X motherboard! Before you for guaranteed consumer satisfaction. This motherboard is loaded with the most advanced technologies to ensure the best user experience and value in...

A7N8X-X User's Manual
Page 41
... to [Manual] and the Access Mode to make manual entries for the hard disk drive that you can write or read /write heads. When the Main menu appears, the hard disk drive field displays the size for configuring the fields below. Select [CHS] to [CHS]. ASUS A7N8X-X Motherboard 2-11...MB. Note that you configured. Precomp This field displays the precompressed volumes on the drive label for cylinders, heads, or sectors. [Manual] & [CHS] Settings Manually enter the number of cylinders, heads and sectors per track for drives with more than 504MB storage capacity. After entering the IDE ...
... to [Manual] and the Access Mode to make manual entries for the hard disk drive that you can write or read /write heads. When the Main menu appears, the hard disk drive field displays the size for configuring the fields below. Select [CHS] to [CHS]. ASUS A7N8X-X Motherboard 2-11...MB. Note that you configured. Precomp This field displays the precompressed volumes on the drive label for cylinders, heads, or sectors. [Manual] & [CHS] Settings Manually enter the number of cylinders, heads and sectors per track for drives with more than 504MB storage capacity. After entering the IDE ...

A7N8X-X User's Manual
Page 47
The default value is [Auto], therefore, the CPU vcore voltage is set manually by the user. Configuration options: [1.100V] [1.125V] ...[1.825] [1.850V] The configuration option range varies from CPU's with different clock speed. Configuration ... VCore Setting parameter is set to [Manual], this field permits selection of mapped memory ( in megabytes ) for maximum performance without stressing the CPU. The default, [Auto], permits automatic selection of the AGP controller. Configuration options: [Enabled] [Disabled] ASUS A7N8X-X Motherboard 2-17 SDRAM RAS Precharge Delay [1] ...
The default value is [Auto], therefore, the CPU vcore voltage is set manually by the user. Configuration options: [1.100V] [1.125V] ...[1.825] [1.850V] The configuration option range varies from CPU's with different clock speed. Configuration ... VCore Setting parameter is set to [Manual], this field permits selection of mapped memory ( in megabytes ) for maximum performance without stressing the CPU. The default, [Auto], permits automatic selection of the AGP controller. Configuration options: [Enabled] [Disabled] ASUS A7N8X-X Motherboard 2-17 SDRAM RAS Precharge Delay [1] ...


