
Z9NH-D12 Series User Manual
Page 17
...-iKVM SDVD 1 1 Motherboard User Guide 1 1 Documentation ASMB6-iKVM User Guide 1 1 Cable Thermistor 2 2 Packing Qty. 10 pc per carton Z9NH-D12 1 1 1 1 1 1 2 ASUS Z9NH-D12 Series 1-3 Before you for the following items. Z9NH-D12 Series ASMB6-iKVM module Standard Bulk Pack Z9NH-D12/ Z9NH- 1.1 Welcome! Thank you start installing the motherboard, and hardware devices on it another standout in the long line...
...-iKVM SDVD 1 1 Motherboard User Guide 1 1 Documentation ASMB6-iKVM User Guide 1 1 Cable Thermistor 2 2 Packing Qty. 10 pc per carton Z9NH-D12 1 1 1 1 1 1 2 ASUS Z9NH-D12 Series 1-3 Before you for the following items. Z9NH-D12 Series ASMB6-iKVM module Standard Bulk Pack Z9NH-D12/ Z9NH- 1.1 Welcome! Thank you start installing the motherboard, and hardware devices on it another standout in the long line...
Z9NH-D12 Series User Manual
Page 19
... integrated memory controller to run faster than the marked frequency if it to 8.0GT/s. ASUS Z9NH-D12 Series 1-5 1.3 Serial number label Before requesting support from the ASUS Technical Support team, you must take note of the motherboard's serial number containing 12 ... optimizes the processor's performance and automatically allows it is operating below . The Intel® EM64T feature allows your problems. Z9NH-D12 xxS2xxxxxxxx Made in China 合格 1.4 Special features 1.4.1 Product highlights Latest Processor Technology The motherboard supports the latest Intel...
... integrated memory controller to run faster than the marked frequency if it to 8.0GT/s. ASUS Z9NH-D12 Series 1-5 1.3 Serial number label Before requesting support from the ASUS Technical Support team, you must take note of the motherboard's serial number containing 12 ... optimizes the processor's performance and automatically allows it is operating below . The Intel® EM64T feature allows your problems. Z9NH-D12 xxS2xxxxxxxx Made in China 合格 1.4 Special features 1.4.1 Product highlights Latest Processor Technology The motherboard supports the latest Intel...

Z9NH-D12 Series User Manual
Page 21
...ensure stable supply of validation efforts and hardware cost for critical components. 1.4.2 Innovative ASUS features ASUS Fan Speed control technology The ASUS Fan Speed control technology smartly adjusts the fan speeds according to the system loading ... ensure quiet, cool, and efficient operation. USB 2.0 is monitored to prevent overheating and damage. ASUS provides multiple SAS solutions for different segments and purposes and PIKE saves lots of current for end users... fan rotations per minute (RPM) is an on USB 2.0. ASUS Z9NH-D12 Series 1-7 PIKE (Proprietary I /O solutions.
...ensure stable supply of validation efforts and hardware cost for critical components. 1.4.2 Innovative ASUS features ASUS Fan Speed control technology The ASUS Fan Speed control technology smartly adjusts the fan speeds according to the system loading ... ensure quiet, cool, and efficient operation. USB 2.0 is monitored to prevent overheating and damage. ASUS provides multiple SAS solutions for different segments and purposes and PIKE saves lots of current for end users... fan rotations per minute (RPM) is an on USB 2.0. ASUS Z9NH-D12 Series 1-7 PIKE (Proprietary I /O solutions.

Z9NH-D12 Series User Manual
Page 24
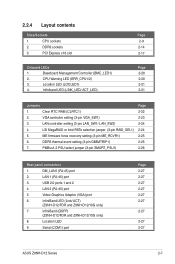
Chapter summary 2 2.1 Before you proceed 2-3 2.2 Motherboard overview 2-4 2.3 Central Processing Unit (CPU 2-9 2.4 System memory 2-14 2.5 Expansion slots 2-17 2.6 Onboard LEDs 2-20 2.7 Jumpers 2-22 2.8 Connectors 2-27 ASUS Z9NH-D12 Series
Chapter summary 2 2.1 Before you proceed 2-3 2.2 Motherboard overview 2-4 2.3 Central Processing Unit (CPU 2-9 2.4 System memory 2-14 2.5 Expansion slots 2-17 2.6 Onboard LEDs 2-20 2.7 Jumpers 2-22 2.8 Connectors 2-27 ASUS Z9NH-D12 Series
Z9NH-D12 Series User Manual
Page 25
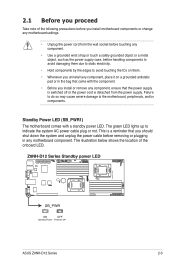
... to the motherboard, peripherals, and/or components. The illustration below shows the location of the following precautions before you install or remove any motherboard component. ASUS Z9NH-D12 Series 2-3
... to the motherboard, peripherals, and/or components. The illustration below shows the location of the following precautions before you install or remove any motherboard component. ASUS Z9NH-D12 Series 2-3

Z9NH-D12 Series User Manual
Page 27
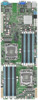
2.2.3 Motherboard layout Z9NH-D12/FDR Z9NH-D12/10G ASUS Z9NH-D12 Series 2-5
2.2.3 Motherboard layout Z9NH-D12/FDR Z9NH-D12/10G ASUS Z9NH-D12 Series 2-5
Z9NH-D12 Series User Manual
Page 29
... ACT_LED) Page 2-9 2-14 2-17 Page 2-20 2-20 2-21 2-21 Jumpers 1. DM_LAN1 (RJ-45) port 2. InfiniBand (QSFP) (Z9NH-D12/FDR and Z9NH-D12/10G only) 8. PCI Express x16 slot Onboard LEDs 1. Clear RTC RAM (CLRTC1) 2. DDR3 sockets 3. Location LED (LOCLED1) 4. InfiniBand LED (Link/... or Intel RSTe selection jumper (3-pin RAID_SEL1) 5. Serial (COM1) port Page 2-27 2-27 2-27 2-27 2-27 2-27 2-27 2-27 2-27 ASUS Z9NH-D12 Series 2-7 ME firmware force recovery setting (3-pin ME_RCVR1) 6. CPU sockets 2. 2.2.4 Layout contents Slots/Sockets 1. LAN 1 (RJ-45) port 3. LAN...
... ACT_LED) Page 2-9 2-14 2-17 Page 2-20 2-20 2-21 2-21 Jumpers 1. DM_LAN1 (RJ-45) port 2. InfiniBand (QSFP) (Z9NH-D12/FDR and Z9NH-D12/10G only) 8. PCI Express x16 slot Onboard LEDs 1. Clear RTC RAM (CLRTC1) 2. DDR3 sockets 3. Location LED (LOCLED1) 4. InfiniBand LED (Link/... or Intel RSTe selection jumper (3-pin RAID_SEL1) 5. Serial (COM1) port Page 2-27 2-27 2-27 2-27 2-27 2-27 2-27 2-27 2-27 ASUS Z9NH-D12 Series 2-7 ME firmware force recovery setting (3-pin ME_RCVR1) 6. CPU sockets 2. 2.2.4 Layout contents Slots/Sockets 1. LAN 1 (RJ-45) port 3. LAN...
Z9NH-D12 Series User Manual
Page 31
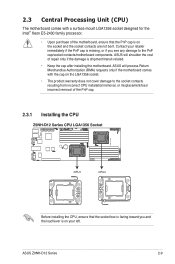
... that the PnP cap is missing, or if you and the load lever is shipment/transit-related. • Keep the cap after installing the motherboard. ASUS Z9NH-D12 Series 2-9 ASUS will process Return Merchandise Authorization (RMA) requests only if the motherboard comes with a surface mount LGA1356 socket designed for the Intel® Xeon E5...
... that the PnP cap is missing, or if you and the load lever is shipment/transit-related. • Keep the cap after installing the motherboard. ASUS Z9NH-D12 Series 2-9 ASUS will process Return Merchandise Authorization (RMA) requests only if the motherboard comes with a surface mount LGA1356 socket designed for the Intel® Xeon E5...

Z9NH-D12 Series User Manual
Page 33
... the socket, and then fit the socket alignment key into your eyes or touches your skin, wash it is spread in an even thin layer. ASUS Z9NH-D12 Series 2-11 Position the CPU over the socket, ensuring that it off immediately, and seek professional medical help. If it . Some heatsinks come with , ensuring...
... the socket, and then fit the socket alignment key into your eyes or touches your skin, wash it is spread in an even thin layer. ASUS Z9NH-D12 Series 2-11 Position the CPU over the socket, ensuring that it off immediately, and seek professional medical help. If it . Some heatsinks come with , ensuring...

Z9NH-D12 Series User Manual
Page 35
2.3.3 Installing the CPU heatsink To install the CPU heatsink: 1. Place the heatsink on the motherboard. 2. A B B A ASUS Z9NH-D12 Series Tighten the four heatsink screws in a diagonal sequence. 2-13 Twist each of the installed CPU, ensuring that the four fasteners match the holes on top of the four screws with a Philips (cross) screwdriver just enough to attach the heatsink to completely secure the heatsink. When the four screws are attached, tighten them one by one to the motherboard.
2.3.3 Installing the CPU heatsink To install the CPU heatsink: 1. Place the heatsink on the motherboard. 2. A B B A ASUS Z9NH-D12 Series Tighten the four heatsink screws in a diagonal sequence. 2-13 Twist each of the installed CPU, ensuring that the four fasteners match the holes on top of the four screws with a Philips (cross) screwdriver just enough to attach the heatsink to completely secure the heatsink. When the four screws are attached, tighten them one by one to the motherboard.

Z9NH-D12 Series User Manual
Page 37
... ECC/Non-ECC UDIMMs or 8GB, 16GB and 32GB* LR-DIMMs into the DIMM sockets using the memory configurations in this section. • *Refer to ASUS Server AVL for latest update. • Start installing the DIMMs from the same vendor. 2.4.2 Memory Configurations You may install 2GB, 4GB, 8GB, and 16GB RDIMMs... + CPU2 Configuration A2 A1 B2 B1 C2 C1 D2 D1 E2 E1 F2 F1 G2 G1 H2 H1 1 DIMM P 2 DIMMs P P 3 DIMMs P P P 4 DIMMs P P P P 6 DIMMs P P P P P P 12 DIMMs P P P P P P P P P P P P ASUS Z9NH-D12 Series 2-15
... ECC/Non-ECC UDIMMs or 8GB, 16GB and 32GB* LR-DIMMs into the DIMM sockets using the memory configurations in this section. • *Refer to ASUS Server AVL for latest update. • Start installing the DIMMs from the same vendor. 2.4.2 Memory Configurations You may install 2GB, 4GB, 8GB, and 16GB RDIMMs... + CPU2 Configuration A2 A1 B2 B1 C2 C1 D2 D1 E2 E1 F2 F1 G2 G1 H2 H1 1 DIMM P 2 DIMMs P P 3 DIMMs P P P 4 DIMMs P P P P 6 DIMMs P P P P P P 12 DIMMs P P P P P P P P P P P P ASUS Z9NH-D12 Series 2-15
Z9NH-D12 Series User Manual
Page 39
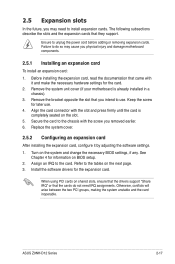
.... 1. Replace the system cover. 2.5.2 Configuring an expansion card After installing the expansion card, configure it and make the necessary hardware settings for the expansion card. ASUS Z9NH-D12 Series 2-17 Remove the system unit cover (if your motherboard is completely seated on the system and change the necessary BIOS settings, if any. 2.5 Expansion...
.... 1. Replace the system cover. 2.5.2 Configuring an expansion card After installing the expansion card, configure it and make the necessary hardware settings for the expansion card. ASUS Z9NH-D12 Series 2-17 Remove the system unit cover (if your motherboard is completely seated on the system and change the necessary BIOS settings, if any. 2.5 Expansion...
Z9NH-D12 Series User Manual
Page 41
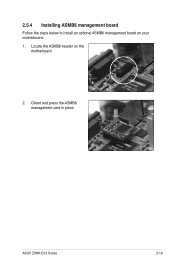
2.5.4 Installing ASMB6 management board Follow the steps below to install an optional ASMB6 management board on the motherboard. 2. Orient and press the ASMB6 management card in place. Locate the ASMB6 header on your motherboard. 1. ASUS Z9NH-D12 Series 2-19
2.5.4 Installing ASMB6 management board Follow the steps below to install an optional ASMB6 management board on the motherboard. 2. Orient and press the ASMB6 management card in place. Locate the ASMB6 header on your motherboard. 1. ASUS Z9NH-D12 Series 2-19

Z9NH-D12 Series User Manual
Page 43
Activity LED indicates Infiniband activity status. ASUS Z9NH-D12 Series 2-21 Location LED (LOCLED1) This LED allows you to know the server location. 4. Infiniband LED (ACT_LED/ LINK_LED) LINK LED indicates Infiniband link status. 3.
Activity LED indicates Infiniband activity status. ASUS Z9NH-D12 Series 2-21 Location LED (LOCLED1) This LED allows you to know the server location. 4. Infiniband LED (ACT_LED/ LINK_LED) LINK LED indicates Infiniband link status. 3.
Z9NH-D12 Series User Manual
Page 45
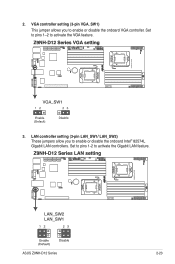
Set to pins 1-2 to activate the Gigabit LAN feature. Set to pins 1-2 to activate the VGA feature. 3. 2. VGA controller setting (3-pin VGA_SW1) This jumper allows you to enable or disable the onboard VGA controller. ASUS Z9NH-D12 Series 2-23 LAN controller setting (3-pin LAN_SW1/ LAN_SW2) These jumpers allow you to enable or disable the onboard Intel® 82574L Gigabit LAN controllers.
Set to pins 1-2 to activate the Gigabit LAN feature. Set to pins 1-2 to activate the VGA feature. 3. 2. VGA controller setting (3-pin VGA_SW1) This jumper allows you to enable or disable the onboard VGA controller. ASUS Z9NH-D12 Series 2-23 LAN controller setting (3-pin LAN_SW1/ LAN_SW2) These jumpers allow you to enable or disable the onboard Intel® 82574L Gigabit LAN controllers.
Z9NH-D12 Series User Manual
Page 47
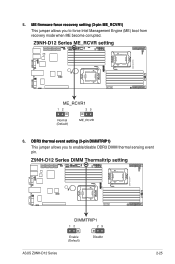
...;D��IM��M�T��R�I�P�1�) This jumper allows you to enable/disable DDR3 DIMM thermal sensing event pin. ASUS Z9NH-D12 Series 2-25
...;D��IM��M�T��R�I�P�1�) This jumper allows you to enable/disable DDR3 DIMM thermal sensing event pin. ASUS Z9NH-D12 Series 2-25
Z9NH-D12 Series User Manual
Page 49
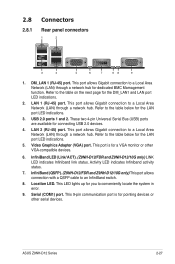
... pointing devices or other VGA-compatible devices. 6. This port allows Gigabit connection to a Local Area Network (LAN) through a network hub. ASUS Z9NH-D12 Series 2-27 USB 2.0 ports 1 and 2. This LED lights up for the DM_LAN1 and LAN port LED indications. 2. LAN 2 (RJ-45) port...port allows Gigabit connection to the table on the next page for you to an InfiniBand switch. 8. InfiniBand LED (Link/ ACT). (Z9NH-D12/FDR and Z9NH-D12/10G only) LINK LED indicates Infiniband link status. DM_LAN 1 (RJ-45) port. Refer to the table below for dedicated BMC ...
... pointing devices or other VGA-compatible devices. 6. This port allows Gigabit connection to a Local Area Network (LAN) through a network hub. ASUS Z9NH-D12 Series 2-27 USB 2.0 ports 1 and 2. This LED lights up for the DM_LAN1 and LAN port LED indications. 2. LAN 2 (RJ-45) port...port allows Gigabit connection to the table on the next page for you to an InfiniBand switch. 8. InfiniBand LED (Link/ ACT). (Z9NH-D12/FDR and Z9NH-D12/10G only) LINK LED indicates Infiniband link status. DM_LAN 1 (RJ-45) port. Refer to the table below for dedicated BMC ...
Z9NH-D12 Series User Manual
Page 51
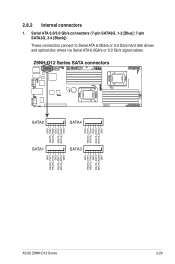
Serial ATA 6.0/3.0 Gb/s connectors (7-pin SATA6G_1-2 [Blue]; 7-pin SATA3G_3-4 [Black]) These connectors connect to Serial ATA 6.0Gb/s or 3.0 Gb/s hard disk drives and optical disc drives via Serial ATA 6.0Gb/s or 3.0 Gb/s signal cables. 2.8.2 Internal connectors 1. ASUS Z9NH-D12 Series 2-29
Serial ATA 6.0/3.0 Gb/s connectors (7-pin SATA6G_1-2 [Blue]; 7-pin SATA3G_3-4 [Black]) These connectors connect to Serial ATA 6.0Gb/s or 3.0 Gb/s hard disk drives and optical disc drives via Serial ATA 6.0Gb/s or 3.0 Gb/s signal cables. 2.8.2 Internal connectors 1. ASUS Z9NH-D12 Series 2-29
Z9NH-D12 Series User Manual
Page 53
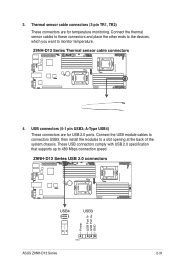
ASUS Z9NH-D12 Series 2-31 Connect the USB module cables to connectors USB3, then install the modules to 480 Mbps connection speed. Thermal sensor cable connectors (3-pin TR1, TR2) These connectors are for temperature monitoring. USB connectors (5-1 pin USB3; These USB connectors comply with USB 2.0 specification that supports up to a slot opening at the back of the system chassis. A-Type USB4) These connectors are for USB 2.0 ports. Connect the thermal sensor cables to these connectors and place the other ends to the devices, which you want to monitor temperature. 4. 3.
ASUS Z9NH-D12 Series 2-31 Connect the USB module cables to connectors USB3, then install the modules to 480 Mbps connection speed. Thermal sensor cable connectors (3-pin TR1, TR2) These connectors are for temperature monitoring. USB connectors (5-1 pin USB3; These USB connectors comply with USB 2.0 specification that supports up to a slot opening at the back of the system chassis. A-Type USB4) These connectors are for USB 2.0 ports. Connect the thermal sensor cables to these connectors and place the other ends to the devices, which you want to monitor temperature. 4. 3.
Z9NH-D12 Series User Manual
Page 55
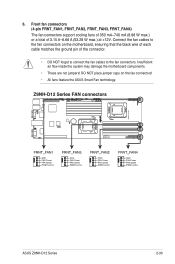
... connect the fan cables to the fan connectors. Connect the fan cables to the fan connectors on the fan connectors! • All fans feature the ASUS Smart Fan technology. ASUS Z9NH-D12 Series 2-33 6.
... connect the fan cables to the fan connectors. Connect the fan cables to the fan connectors on the fan connectors! • All fans feature the ASUS Smart Fan technology. ASUS Z9NH-D12 Series 2-33 6.


