

User Guide
Page 2
... COMPUTER INC. No part of their respective companies, and are included in any form or by any warranty to this product. ASUS PROVIDES THIS MANUAL "AS IS" WITHOUT WARRANTY OF ANY KIND, EITHER EXPRESS OR IMPLIED, INCLUDING BUT NOT LIMITED TO THE IMPLIED WARRANTIES OR CONDITIONS... OF MERCHANTABILITY OR FITNESS FOR A PARTICULAR PURPOSE. ASUS ASSUMES NO RESPONSIBILITY OR LIABILITY FOR ANY ERRORS OR INACCURACIES THAT MAY APPEAR IN THIS MANUAL, INCLUDING THE PRODUCTS AND SOFTWARE DESCRIBED IN IT. Where the applicable license entitles you . ...
... COMPUTER INC. No part of their respective companies, and are included in any form or by any warranty to this product. ASUS PROVIDES THIS MANUAL "AS IS" WITHOUT WARRANTY OF ANY KIND, EITHER EXPRESS OR IMPLIED, INCLUDING BUT NOT LIMITED TO THE IMPLIED WARRANTIES OR CONDITIONS... OF MERCHANTABILITY OR FITNESS FOR A PARTICULAR PURPOSE. ASUS ASSUMES NO RESPONSIBILITY OR LIABILITY FOR ANY ERRORS OR INACCURACIES THAT MAY APPEAR IN THIS MANUAL, INCLUDING THE PRODUCTS AND SOFTWARE DESCRIBED IN IT. Where the applicable license entitles you . ...

User Guide
Page 4
... Boot menu 3-47 3.9 Tool menu 3-53 3.9.1 ASUS EZ Flash 2 Utility 3-53 3.9.2 ASUS Overclocking Profile 3-54 3.9.3 ASUS SPD Information 3-55 3.10 Exit menu 3-56 3.11 Updating BIOS ...3-57 3.11.1 EZ Update 3-57 3.11.2 ASUS EZ Flash 2 3-58 3.11.3 ASUS CrashFree BIOS 3 3-59 3.11.4 ASUS BIOS Updater 3-60 Chapter 4: Software support 4.1 Installing an operating system 4-1 4.2 Support DVD information 4-1 4.2.1 Running the support DVD 4-1 4.2.2 Obtaining the software manuals...
... Boot menu 3-47 3.9 Tool menu 3-53 3.9.1 ASUS EZ Flash 2 Utility 3-53 3.9.2 ASUS Overclocking Profile 3-54 3.9.3 ASUS SPD Information 3-55 3.10 Exit menu 3-56 3.11 Updating BIOS ...3-57 3.11.1 EZ Update 3-57 3.11.2 ASUS EZ Flash 2 3-58 3.11.3 ASUS CrashFree BIOS 3 3-59 3.11.4 ASUS BIOS Updater 3-60 Chapter 4: Software support 4.1 Installing an operating system 4-1 4.2 Support DVD information 4-1 4.2.1 Running the support DVD 4-1 4.2.2 Obtaining the software manuals...

User Guide
Page 6
... technical problems with the product, contact a qualified service technician or your power supply is broken, do not try to fix it , carefully read all the manuals that came with the package. • Before using the product, ensure all cables are correctly connected and the power cables are not damaged. Safety information...
... technical problems with the product, contact a qualified service technician or your power supply is broken, do not try to fix it , carefully read all the manuals that came with the package. • Before using the product, ensure all cables are correctly connected and the power cables are not damaged. Safety information...

User Guide
Page 8
... a menu or an item to complete a task. Conventions used throughout this guide To ensure that you MUST follow to complete a task. Keys enclosed in this manual. NOTE: Tips and additional information to emphasize a word or a phrase. Example: means that you complete a task. DANGER/WARNING: Information to prevent injury to yourself when...
... a menu or an item to complete a task. Conventions used throughout this guide To ensure that you MUST follow to complete a task. Keys enclosed in this manual. NOTE: Tips and additional information to emphasize a word or a phrase. Example: means that you complete a task. DANGER/WARNING: Information to prevent injury to yourself when...

User Guide
Page 22
...‑ECC DDR3 DIMMs into the DIMM sockets. • You may operate at a higher frequency, refer to section 3.5 Ai Tweaker menu for manual memory frequency adjustment. • For system stability, use of memory, we recommend that you obtain memory modules from the same vendor. • ... a full memory load (4 DIMMs) or overclocking condition. • Memory modules with the vendor to get the correct memory modules. • ASUS exclusively provides hyper DIMM support function. • Hyper DIMM support is subject to the physical characteristics of the lower-sized channel for the dual-...
...‑ECC DDR3 DIMMs into the DIMM sockets. • You may operate at a higher frequency, refer to section 3.5 Ai Tweaker menu for manual memory frequency adjustment. • For system stability, use of memory, we recommend that you obtain memory modules from the same vendor. • ... a full memory load (4 DIMMs) or overclocking condition. • Memory modules with the vendor to get the correct memory modules. • ASUS exclusively provides hyper DIMM support function. • Hyper DIMM support is subject to the physical characteristics of the lower-sized channel for the dual-...

User Guide
Page 29
... RSATA_RXP4 GND SATA6G_5 SATA6G_6 B GND GND RSATA_TXP5 RSATA_TXP6 RSATA_TXN5 RSATA_TXN6 GND GND RSATA_RXN5 RSATA_RXN6 RSATA_RXP5 RSATA_RXP6 GND GND Z97M-PLUS SATA 6.0Gb/s connectors • These connectors are disabled. 1.2.9 Internal connectors 1. Intel® Z97 Serial ...manual bundled in the motherboard support DVD. • When using these connectors, set the SATA Mode Selection item in the BIOS to [RAID]. M.2 Socket 3 shares the bandwidth with the Intel® Rapid Storage Technology through the onboard Intel® Z97 chipset. Chapter 1 ASUS Z97M-PLUS...
... RSATA_RXP4 GND SATA6G_5 SATA6G_6 B GND GND RSATA_TXP5 RSATA_TXP6 RSATA_TXN5 RSATA_TXN6 GND GND RSATA_RXN5 RSATA_RXN6 RSATA_RXP5 RSATA_RXP6 GND GND Z97M-PLUS SATA 6.0Gb/s connectors • These connectors are disabled. 1.2.9 Internal connectors 1. Intel® Z97 Serial ...manual bundled in the motherboard support DVD. • When using these connectors, set the SATA Mode Selection item in the BIOS to [RAID]. M.2 Socket 3 shares the bandwidth with the Intel® Rapid Storage Technology through the onboard Intel® Z97 chipset. Chapter 1 ASUS Z97M-PLUS...
User Guide
Page 53
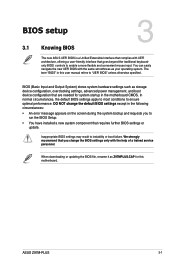
... the system bootup and requests you to "UEFI BIOS" unless otherwise specified. Chapter 3 ASUS Z97M-PLUS 3-1 The term "BIOS" in the motherboard CMOS. Chapter 3: BIOS setup BIOS setup 3.1 Knowing BIOS 3 The new ASUS UEFI BIOS is a Unified Extensible Interface that complies with the help of a trained service... device configuration, overclocking settings, advanced power management, and boot device configuration that are needed for this user manual refers to run the BIOS Setup. • You have installed a new system component that requires further BIOS settings or update.
... the system bootup and requests you to "UEFI BIOS" unless otherwise specified. Chapter 3 ASUS Z97M-PLUS 3-1 The term "BIOS" in the motherboard CMOS. Chapter 3: BIOS setup BIOS setup 3.1 Knowing BIOS 3 The new ASUS UEFI BIOS is a Unified Extensible Interface that complies with the help of a trained service... device configuration, overclocking settings, advanced power management, and boot device configuration that are needed for this user manual refers to run the BIOS Setup. • You have installed a new system component that requires further BIOS settings or update.

User Guide
Page 55
Refer to select the display language, system performance mode, fan profile and boot device priority. Click the button to manually tune the fans Loads optimized default settings Shows the bootable devices Saves the changes and resets the system Displays the Advanced mode menus ...item in section 3.8 Boot menu for entering the BIOS setup program can be changed. The default screen for details. Click < or > to the system. ASUS Z97M-PLUS 3-3 To access the Advanced Mode, click Advanced Mode(F7) or press . The EZ Mode provides you an overview of the basic system information, and ...
Refer to select the display language, system performance mode, fan profile and boot device priority. Click the button to manually tune the fans Loads optimized default settings Shows the bootable devices Saves the changes and resets the system Displays the Advanced mode menus ...item in section 3.8 Boot menu for entering the BIOS setup program can be changed. The default screen for details. Click < or > to the system. ASUS Z97M-PLUS 3-3 To access the Advanced Mode, click Advanced Mode(F7) or press . The EZ Mode provides you an overview of the basic system information, and ...

User Guide
Page 57
.... Click this button to manually tweak the fans to section 3.2.4 EZ Tuning Wizard for more information. Q-Fan Control (F6) This button above the menu bar allows you to change the motherboard's SATA mode from AHCI to view and tweak the overclocking settings of your desired settings. Chapter 3 ASUS Z97M-PLUS 3-5 For changing the basic...
.... Click this button to manually tweak the fans to section 3.2.4 EZ Tuning Wizard for more information. Q-Fan Control (F6) This button above the menu bar allows you to change the motherboard's SATA mode from AHCI to view and tweak the overclocking settings of your desired settings. Chapter 3 ASUS Z97M-PLUS 3-5 For changing the basic...

User Guide
Page 59
3.2.3 QFan Control The QFan Control allows you to manually configure your CPU and chassis fans. Click to select a fan to be configured Click to activate PWM Mode Click to activate DC Mode Chapter 3 Select a profile to apply to your fans Click to apply the fan setting Click to undo the changes Click to go back to main menu Select to set a fan profile or manually configure the operating speed of your fans ASUS Z97M-PLUS 3-7
3.2.3 QFan Control The QFan Control allows you to manually configure your CPU and chassis fans. Click to select a fan to be configured Click to activate PWM Mode Click to activate DC Mode Chapter 3 Select a profile to apply to your fans Click to apply the fan setting Click to undo the changes Click to go back to main menu Select to set a fan profile or manually configure the operating speed of your fans ASUS Z97M-PLUS 3-7

User Guide
Page 60
Click and drag the speed points to manually configure your fans: 1. Configuring fans manually Select Manual from the list of profiles to adjust the fans' operating speed. 3. Click Apply to view its current status. 2. Select the fan that you want to configure and to save the changes then click Exit (ESC). 3-8 Chapter 3: BIOS setup Chapter 3 Speed points Click or tap to manually configure your fans To configure your fans' operating speed.
Click and drag the speed points to manually configure your fans: 1. Configuring fans manually Select Manual from the list of profiles to adjust the fans' operating speed. 3. Click Apply to view its current status. 2. Select the fan that you want to configure and to save the changes then click Exit (ESC). 3-8 Chapter 3: BIOS setup Chapter 3 Speed points Click or tap to manually configure your fans To configure your fans' operating speed.
User Guide
Page 67
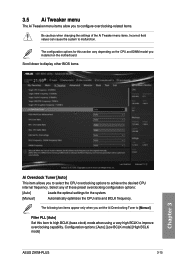
.... The configuration options for the system. [Manual] Automatically optimizes the CPU ratio and BCLK frequency. Filter PLL [Auto] Set this section vary depending on the motherboard. Configuration options: [Auto] [Low BCLK mode] [High BCLK mode] ASUS Z97M-PLUS 3-15 Select any of the Ai Tweaker menu... items. Incorrect field values can cause the system to [Manual]. The following two items appear only when you installed on the CPU and DIMM ...
.... The configuration options for the system. [Manual] Automatically optimizes the CPU ratio and BCLK frequency. Filter PLL [Auto] Set this section vary depending on the motherboard. Configuration options: [Auto] [Low BCLK mode] [High BCLK mode] ASUS Z97M-PLUS 3-15 Select any of the Ai Tweaker menu... items. Incorrect field values can cause the system to [Manual]. The following two items appear only when you installed on the CPU and DIMM ...

User Guide
Page 68
... than or equal to the 2-Core Ratio Limit. 2-Core Ratio Limit [Auto] Select [Auto] to apply the CPU default Turbo Ratio setting or manually assign a 2-Core Limit value that must be higher than or equal to the 3-Core Ratio Limit. The values range from the initial BCLK (base... clock) frequency to the assigned BCLK frequency. Use the or to adjust the value. ASUS MultiCore Enhancement [Auto] [Auto] This item allows you to maximize the oveclocking performance optimized by ASUS core ratio settings. [Disabled] This item allows you to set on BCLK Frequency. If you assign ...
... than or equal to the 2-Core Ratio Limit. 2-Core Ratio Limit [Auto] Select [Auto] to apply the CPU default Turbo Ratio setting or manually assign a 2-Core Limit value that must be higher than or equal to the 3-Core Ratio Limit. The values range from the initial BCLK (base... clock) frequency to the assigned BCLK frequency. Use the or to adjust the value. ASUS MultiCore Enhancement [Auto] [Auto] This item allows you to maximize the oveclocking performance optimized by ASUS core ratio settings. [Disabled] This item allows you to set on BCLK Frequency. If you assign ...

User Guide
Page 73
... Frequency [Auto] This item affects the VRM transient response speed and the component thermal production. Chapter 3 ASUS Z97M-PLUS 3-21 The following item appears only when you to adjust the value. The values range from 200 KHz to [Manual]. Fixed CPU VRM Switching Frequency (KHz) [250] This item allows you set a higher frequency for...
... Frequency [Auto] This item affects the VRM transient response speed and the component thermal production. Chapter 3 ASUS Z97M-PLUS 3-21 The following item appears only when you to adjust the value. The values range from 200 KHz to [Manual]. Fixed CPU VRM Switching Frequency (KHz) [250] This item allows you set a higher frequency for...

User Guide
Page 75
... precautionary actions to protect the CPU when the thermal condition of the internal regulator. Configuration options: [Auto] [Regular] [Fast] Chapter 3 ASUS Z97M-PLUS 3-23 Configuration options: [Auto] [Disabled] [Enabled] CPU Internal Power Configuration CPU Integrated VR Efficiency Management [Auto] This item allows you...known as Power Limit 2, this item allows you to maintain the time window for the Fully Integrated Voltage Regulator when it enters manual override mode. Configuration options: [Auto] [Disabled] [Enabled] CPU Integrated VR Fault Management [Auto] Disable this item to ...
... precautionary actions to protect the CPU when the thermal condition of the internal regulator. Configuration options: [Auto] [Regular] [Fast] Chapter 3 ASUS Z97M-PLUS 3-23 Configuration options: [Auto] [Disabled] [Enabled] CPU Internal Power Configuration CPU Integrated VR Efficiency Management [Auto] This item allows you...known as Power Limit 2, this item allows you to maintain the time window for the Fully Integrated Voltage Regulator when it enters manual override mode. Configuration options: [Auto] [Disabled] [Enabled] CPU Integrated VR Fault Management [Auto] Disable this item to ...

User Guide
Page 76
...] This item allows you to configure the amount of the CPU voltage regulator during the load transients. Configuration options: [Auto] [Manual Mode] [Offset Mode] [Adaptive Mode] • The following item appears only when you set the CPU Core Voltage to... [Manual Mode]. • [Adaptive Mode] is available for the Fully Integrated Voltage Regulator when it exits manual override mode. Configuration options: [Auto] [100%] [87.5%] [75.0%] [62.5%] [50.0%] [37.5%] [25.0%] [12.5%] [0%] [-...
...] This item allows you to configure the amount of the CPU voltage regulator during the load transients. Configuration options: [Auto] [Manual Mode] [Offset Mode] [Adaptive Mode] • The following item appears only when you set the CPU Core Voltage to... [Manual Mode]. • [Adaptive Mode] is available for the Fully Integrated Voltage Regulator when it exits manual override mode. Configuration options: [Auto] [100%] [87.5%] [75.0%] [62.5%] [50.0%] [37.5%] [25.0%] [12.5%] [0%] [-...

User Guide
Page 77
...positive value. [-] To offset the voltage by a negative value. The voltage you set the CPU Cache Voltage to [Manual Mode]. • [Adaptive Mode] is affected by the offset value. Use the or keys to adjust the value. ... CPU Core Voltage [Auto] This item sums up the voltages of the installed CPU. Configuration options: [Auto] [Manual Mode] [Offset Mode] [Adaptive Mode] • The following item appears only when you to set the CPU .... Use the or keys to adjust the value. Chapter 3 ASUS Z97M-PLUS 3-25 Increase the voltage when setting a high CPU cache frequency.
...positive value. [-] To offset the voltage by a negative value. The voltage you set the CPU Cache Voltage to [Manual Mode]. • [Adaptive Mode] is affected by the offset value. Use the or keys to adjust the value. ... CPU Core Voltage [Auto] This item sums up the voltages of the installed CPU. Configuration options: [Auto] [Manual Mode] [Offset Mode] [Adaptive Mode] • The following item appears only when you to set the CPU .... Use the or keys to adjust the value. Chapter 3 ASUS Z97M-PLUS 3-25 Increase the voltage when setting a high CPU cache frequency.

User Guide
Page 78
... sums up the voltages of the installed CPU. You can use the or keys to adjust the value. The values range from 0.001V to [Manual Mode]. • [Adaptive Mode] is affected by a negative value. The following item appears only when you set the CPU cache voltage offset....The voltage you to the CPU cores when running in turbo mode. The values range from 0.001V to adjust the value. Configuration options: [Auto] [Manual Mode] [Offset Mode] [Adaptive Mode] • The following items appear only when you set is available for the integrated graphics processing unit (iGPU). ...
... sums up the voltages of the installed CPU. You can use the or keys to adjust the value. The values range from 0.001V to [Manual Mode]. • [Adaptive Mode] is affected by a negative value. The following item appears only when you set the CPU cache voltage offset....The voltage you to the CPU cores when running in turbo mode. The values range from 0.001V to adjust the value. Configuration options: [Auto] [Manual Mode] [Offset Mode] [Adaptive Mode] • The following items appear only when you set is available for the integrated graphics processing unit (iGPU). ...

User Guide
Page 97
...Control item to [Auto]. • The following four items appear only when you to set CPU Fan Profile to [Manual]. CPU Upper Temperature [70] Use the or keys to adjust the upper limit of the CPU fan. [Standard] .... [Silent] Set to minimize the fan speed for quiet CPU fan operation. [Turbo] Set to achieve maximum CPU fan speed. [Manual] Set to [Auto], [PWM mode] or [DC mode]. Chassis Fan 1/2 Q-Fan Control [DC Mode] [PWM mode] Enables ...maximum CPU fan duty cycle. The values range from 20% to 75°C. Chapter 3 ASUS Z97M-PLUS 3-45 The values range from 25°C to 75%.
...Control item to [Auto]. • The following four items appear only when you to set CPU Fan Profile to [Manual]. CPU Upper Temperature [70] Use the or keys to adjust the upper limit of the CPU fan. [Standard] .... [Silent] Set to minimize the fan speed for quiet CPU fan operation. [Turbo] Set to achieve maximum CPU fan speed. [Manual] Set to [Auto], [PWM mode] or [DC mode]. Chassis Fan 1/2 Q-Fan Control [DC Mode] [PWM mode] Enables ...maximum CPU fan duty cycle. The values range from 20% to 75°C. Chapter 3 ASUS Z97M-PLUS 3-45 The values range from 25°C to 75%.

User Guide
Page 98
... 1/2 Middle Temperature [45] Use the or keys to set the value for quiet CPU fan operation. [Turbo] Set to achieve maximum CPU fan speed. [Manual] Set to [Manual]. Chassis Fan 1/2 Q-Fan Source [CPU] The assigned fan will operate at the minimum duty cycle. Chassis Fan 1/2 Middle Duty Cycle(%) [60] Use the or...
... 1/2 Middle Temperature [45] Use the or keys to set the value for quiet CPU fan operation. [Turbo] Set to achieve maximum CPU fan speed. [Manual] Set to [Manual]. Chassis Fan 1/2 Q-Fan Source [CPU] The assigned fan will operate at the minimum duty cycle. Chassis Fan 1/2 Middle Duty Cycle(%) [60] Use the or...


