
User Manual
Page 6
... 5-27 5.3.3 Deleting a RAID set 5-29 5.3.4 Resetting disks to Non-RAID 5-30 5.3.5 5.3.6 Recovery Volume Options 5-31 Exiting the Intel® Matrix Storage Manager 5-32 6.3.7 Rebuilding the RAID 5-32 5.3.8 Setting the Boot array in the BIOS Setup Utility 5-34 Chapter 6: Driver installation 6.1 RAID driver installation 6-3 6.1.1 Creating a RAID driver ... support CD 6-23 6.5.2 Drivers menu 6-23 6.5.3 Utilities menu 6-24 6.5.4 Make disk menu 6-24 6.5.5 Contact information 6-24 Appendix: Reference information A.1 Z8PE-D12 block diagram A-3 A.2 Z8PE-D12X block diagram A-4 vi
... 5-27 5.3.3 Deleting a RAID set 5-29 5.3.4 Resetting disks to Non-RAID 5-30 5.3.5 5.3.6 Recovery Volume Options 5-31 Exiting the Intel® Matrix Storage Manager 5-32 6.3.7 Rebuilding the RAID 5-32 5.3.8 Setting the Boot array in the BIOS Setup Utility 5-34 Chapter 6: Driver installation 6.1 RAID driver installation 6-3 6.1.1 Creating a RAID driver ... support CD 6-23 6.5.2 Drivers menu 6-23 6.5.3 Utilities menu 6-24 6.5.4 Make disk menu 6-24 6.5.5 Contact information 6-24 Appendix: Reference information A.1 Z8PE-D12 block diagram A-3 A.2 Z8PE-D12X block diagram A-4 vi
User Manual
Page 29
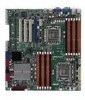
... 2-29 2-30 Page 2-31 2-31 2-31 2-31 2-31 2-31 2-31 2-31 ASUS Z8PE-D12 Series 2-9 VGA controller setting (3-pin VGA_SW1)) 3. iBTN RAID setting (3-pin IBTN_SEL1) 9. 2.2.4 Layout contents Slots/Soocket 1. USB 2.0 ports 1 and 2 5. CPU sockets 2. DDR3 voltage control setting (4-pin LVDDR3_SEL1; Force BIOS recovery setting (3-pin RECOVERY1) Rear panel connectors 1. MIO PCIE slot 4. Clear RTC RAM...
... 2-29 2-30 Page 2-31 2-31 2-31 2-31 2-31 2-31 2-31 2-31 ASUS Z8PE-D12 Series 2-9 VGA controller setting (3-pin VGA_SW1)) 3. iBTN RAID setting (3-pin IBTN_SEL1) 9. 2.2.4 Layout contents Slots/Soocket 1. USB 2.0 ports 1 and 2 5. CPU sockets 2. DDR3 voltage control setting (4-pin LVDDR3_SEL1; Force BIOS recovery setting (3-pin RECOVERY1) Rear panel connectors 1. MIO PCIE slot 4. Clear RTC RAM...

User Manual
Page 50
To update the BIOS: 1. Insert the USB flash and turn on the system. 2-30 Chapter 2: Hardware information Turn on the system to quickly update or recover the BIOS settings when it becomes corrupted. Force BIOS recovery setting (3-pin RECOVERY1) This jumper allows you to update the BIOS. 4. 10. Set the jumper back to pins 2-3. 3. Prepare a USB flash disk that contains the original or latest BIOS for the motherboard (XXXXXX.ROM) and the AFUDOS.EXE utility. 2. Shut down the system. 5. Set the jumper to pins 1-2. 6.
To update the BIOS: 1. Insert the USB flash and turn on the system. 2-30 Chapter 2: Hardware information Turn on the system to quickly update or recover the BIOS settings when it becomes corrupted. Force BIOS recovery setting (3-pin RECOVERY1) This jumper allows you to update the BIOS. 4. 10. Set the jumper back to pins 2-3. 3. Prepare a USB flash disk that contains the original or latest BIOS for the motherboard (XXXXXX.ROM) and the AFUDOS.EXE utility. 2. Shut down the system. 5. Set the jumper to pins 1-2. 6.
User Manual
Page 72
... resets the system when the BIOS recovery finished. 4.1.2 ASUS CrashFree BIOS 3 utility The ASUS CrashFree BIOS 3 is an auto recovery tool that contains the updated BIOS file. The utility will automatically recover the BIOS. Visit the ASUS website at www.asus.com to one USB port on the system. 3. You can update a corrupted BIOS file using this motherboard. Prepare a USB flash drive containing...
... resets the system when the BIOS recovery finished. 4.1.2 ASUS CrashFree BIOS 3 utility The ASUS CrashFree BIOS 3 is an auto recovery tool that contains the updated BIOS file. The utility will automatically recover the BIOS. Visit the ASUS website at www.asus.com to one USB port on the system. 3. You can update a corrupted BIOS file using this motherboard. Prepare a USB flash drive containing...

User Manual
Page 131
... POST, press to Non-RAID 4. The RAID BIOS setup screens shown in this section are connected to...Matrix Storage Manager Option ROM utility allows you to move through the menus and select the menu options. Create RAID Volume 2. Recovery Volume Options RAID Volumes: None defined. Physical Disks: Port Drive Model 0 ST3160812AS 1 ST3160812AS 2 ST3160812AS 3 ST3160812AS [ DISK/... 5. Turn on your screen. All Rights Reserved. [ MAIN MENU ] 1. ASUS Z8PE-D12 Series 5-25 Reset Disks to display the utility main menu. Install all the Serial ATA hard disk drives. 2. Exit 3....
... POST, press to Non-RAID 4. The RAID BIOS setup screens shown in this section are connected to...Matrix Storage Manager Option ROM utility allows you to move through the menus and select the menu options. Create RAID Volume 2. Recovery Volume Options RAID Volumes: None defined. Physical Disks: Port Drive Model 0 ST3160812AS 1 ST3160812AS 2 ST3160812AS 3 ST3160812AS [ DISK/... 5. Turn on your screen. All Rights Reserved. [ MAIN MENU ] 1. ASUS Z8PE-D12 Series 5-25 Reset Disks to display the utility main menu. Install all the Serial ATA hard disk drives. 2. Exit 3....


