
User Guide
Page 6
...5-32 5.3.8 Setting the Boot array in the BIOS Setup Utility 5-34 Chapter 6: Driver installation 6.1 RAID driver installation 6-3 6.1.1 6.1.2 6.1.3 Creating a RAID driver disk 6-3 Windows® OS 6-6 Red Hat® Enterprise Linux OS 6-9 ...driver installation 6-19 6.4 Display driver installation 6-23 6.5 Management applications and utilitie installation 6-26 6.5.1 Running the support DVD 6-26 6.5.2 Drivers menu 6-26 6.5.3 Utilities menu 6-27 6.5.4 Make disk menu 6-27 6.5.5 Contact information 6-27 Appendix: Reference information A.1 Z8NA-D6 block diagram A-3 A.2 Z8NA...
...5-32 5.3.8 Setting the Boot array in the BIOS Setup Utility 5-34 Chapter 6: Driver installation 6.1 RAID driver installation 6-3 6.1.1 6.1.2 6.1.3 Creating a RAID driver disk 6-3 Windows® OS 6-6 Red Hat® Enterprise Linux OS 6-9 ...driver installation 6-19 6.4 Display driver installation 6-23 6.5 Management applications and utilitie installation 6-26 6.5.1 Running the support DVD 6-26 6.5.2 Drivers menu 6-26 6.5.3 Utilities menu 6-27 6.5.4 Make disk menu 6-27 6.5.5 Contact information 6-27 Appendix: Reference information A.1 Z8NA-D6 block diagram A-3 A.2 Z8NA...
User Guide
Page 9
... parts: • Chapter 1: Product introduction This chapter describes the features of the standard package. ASUS websites The ASUS website provides updated information on the motherboard. • Chapter 3: Powering up This chapter describes the power up , creating, and configuring ...RAID sets using the available utilities. • Chapter 6: Driver installation This chapter provides instructions for installing the necessary drivers ...
... parts: • Chapter 1: Product introduction This chapter describes the features of the standard package. ASUS websites The ASUS website provides updated information on the motherboard. • Chapter 3: Powering up This chapter describes the power up , creating, and configuring ...RAID sets using the available utilities. • Chapter 6: Driver installation This chapter provides instructions for installing the necessary drivers ...
User Guide
Page 38
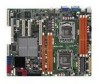
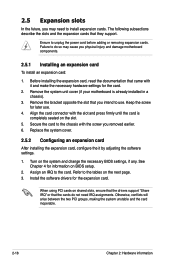
...2.5 Expansion slots In the future, you removed earlier. 6. Failure to install expansion cards. Remove the system unit cover (if your motherboard is completely seated on BIOS setup. 2. Secure the card to the chassis with it by adjusting the software settings. 1. Refer to...the expansion card, read the documentation that they support. Install the software drivers for later use . Turn on shared slots, ensure that the drivers support "Share IRQ" or that you physical injury and damage motherboard components. 2.5.1 Installing an expansion card To install an expansion card: ...
...2.5 Expansion slots In the future, you removed earlier. 6. Failure to install expansion cards. Remove the system unit cover (if your motherboard is completely seated on BIOS setup. 2. Secure the card to the chassis with it by adjusting the software settings. 1. Refer to...the expansion card, read the documentation that they support. Install the software drivers for later use . Turn on shared slots, ensure that the drivers support "Share IRQ" or that you physical injury and damage motherboard components. 2.5.1 Installing an expansion card To install an expansion card: ...
User Guide
Page 75
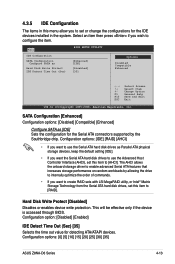
...(Sec) [35] Options Disabled Compatible Enhanced ←→ Select Screen ↑↓ Select Item +- The AHCI allows the onboard storage driver to [AHCI]. Main BIOS SETUP UTILITY IDE Configuration SATA Configuration [Enhanced] Configure SATA as [IDE] Sets the configuration for the Serial ATA... Disk Write Protect [Disabled] Disables or enables device write protection. Configuration options: [0] [5] [10] [15] [20] [25] [30] [35] ASUS Z8NA-D6 Series 4-13 Configuration options: [IDE] [RAID] [AHCI] • If you want the Serial ATA hard disk drives to use the Serial ATA hard ...
...(Sec) [35] Options Disabled Compatible Enhanced ←→ Select Screen ↑↓ Select Item +- The AHCI allows the onboard storage driver to [AHCI]. Main BIOS SETUP UTILITY IDE Configuration SATA Configuration [Enhanced] Configure SATA as [IDE] Sets the configuration for the Serial ATA... Disk Write Protect [Disabled] Disables or enables device write protection. Configuration options: [0] [5] [10] [15] [20] [25] [30] [35] ASUS Z8NA-D6 Series 4-13 Configuration options: [IDE] [RAID] [AHCI] • If you want the Serial ATA hard disk drives to use the Serial ATA hard ...
User Guide
Page 105
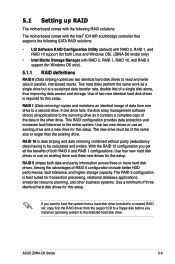
... the support CD to the selected hard disk drive. 5.1 Setting up RAID The motherboard comes with the following RAID solutions: The motherboard comes with RAID 0, RAID 1, RAID 10, and RAID 5 support (for Windows...fault tolerance to read and write data in a created RAID set, copy first the RAID driver from a hard disk drive included in parallel, interleaved stacks. With the RAID 10 configuration...default) with RAID 0, RAID 1, and RAID 10 support (for both Linux and Windows OS). (Z8NA-D6 model only) • Intel Matrix Storage Manager with the Intel® ICH10R southbridge controller that ...
... the support CD to the selected hard disk drive. 5.1 Setting up RAID The motherboard comes with the following RAID solutions: The motherboard comes with RAID 0, RAID 1, RAID 10, and RAID 5 support (for Windows...fault tolerance to read and write data in a created RAID set, copy first the RAID driver from a hard disk drive included in parallel, interleaved stacks. With the RAID 10 configuration...default) with RAID 0, RAID 1, and RAID 10 support (for both Linux and Windows OS). (Z8NA-D6 model only) • Intel Matrix Storage Manager with the Intel® ICH10R southbridge controller that ...

User Guide
Page 137
This chapter provides instructions for installing the necessary drivers for different system components. 6Driver installation
This chapter provides instructions for installing the necessary drivers for different system components. 6Driver installation

User Guide
Page 138
Chapter summary 6 6.1 RAID driver installation 6-3 6.2 Intel chipset device software installation 6-15 6.3 LAN driver installation 6-19 6.4 Display driver installation 6-23 6.5 Management application and utilities installation 6-26 ASUS Z8NA-D6 Series
Chapter summary 6 6.1 RAID driver installation 6-3 6.2 Intel chipset device software installation 6-15 6.3 LAN driver installation 6-19 6.4 Display driver installation 6-23 6.5 Management application and utilities installation 6-26 ASUS Z8NA-D6 Series

User Guide
Page 139
...in DOS environment: 1. Restart the computer. Use the arrow keys to select the type of RAID driver disk you are now ready to install an operating system to enter the sub-menu. ASUS Z8NA-D6 6-3 Restart the computer, then enter the BIOS Setup. 3. Save your server system, you want...Internet. Select the optical drive as the first boot priority to create the RAID driver disk from the system/motherboard support DVD or from the support DVD. Place the motherboard support DVD in a RAID set. 6.1 RAID driver installation After creating the RAID sets for your changes, then exit the BIOS ...
...in DOS environment: 1. Restart the computer. Use the arrow keys to select the type of RAID driver disk you are now ready to install an operating system to enter the sub-menu. ASUS Z8NA-D6 6-3 Restart the computer, then enter the BIOS Setup. 3. Save your server system, you want...Internet. Select the optical drive as the first boot priority to create the RAID driver disk from the system/motherboard support DVD or from the support DVD. Place the motherboard support DVD in a RAID set. 6.1 RAID driver installation After creating the RAID sets for your changes, then exit the BIOS ...

User Guide
Page 140
... 32 bit Windows 64 bit Back Exit ICH10R LSI RAID Driver ICH10R LSI RAID Driver Windows XP 32 bit Windows XP 64 bit Windows Server 2003 32 bit Windows Server 2003 64 bit Windows Vista 32 bit Windows Vista 64 ... 64 bit SLES 10 SP1 32 bit SLES 10 SP1 64 bit SLES 10 SP2 32 bit SLES 10 SP2 64 bit Back Exit 6-4 Chapter 6: Driver installation
... 32 bit Windows 64 bit Back Exit ICH10R LSI RAID Driver ICH10R LSI RAID Driver Windows XP 32 bit Windows XP 64 bit Windows Server 2003 32 bit Windows Server 2003 64 bit Windows Vista 32 bit Windows Vista 64 ... 64 bit SLES 10 SP1 32 bit SLES 10 SP1 64 bit SLES 10 SP2 32 bit SLES 10 SP2 64 bit Back Exit 6-4 Chapter 6: Driver installation

User Guide
Page 141
ITE IT8213F Linux Driver ITE IT8213F Linux Driver RHEL 4 UP6 32/64 bit RHEL 4 UP7 32/64 bit RHEL 5 UP1 32/64 bit RHEL 5 UP2 32/64 bit SLES 9 SP3 32 bit SLES 9 SP3 64 bit SLES 10 32 bit SLES 10 64 bit FreeBSD 7 32/64 bit Back Exit 6. Follow onscreen instructions to the floppy disk drive. 7. ASUS Z8NA-D6 6-5 Locate the RAID driver and place a blank, high-density floppy disk to create the driver disk. Press . 8.
ITE IT8213F Linux Driver ITE IT8213F Linux Driver RHEL 4 UP6 32/64 bit RHEL 4 UP7 32/64 bit RHEL 5 UP1 32/64 bit RHEL 5 UP2 32/64 bit SLES 9 SP3 32 bit SLES 9 SP3 64 bit SLES 10 32 bit SLES 10 64 bit FreeBSD 7 32/64 bit Back Exit 6. Follow onscreen instructions to the floppy disk drive. 7. ASUS Z8NA-D6 6-5 Locate the RAID driver and place a blank, high-density floppy disk to create the driver disk. Press . 8.
User Guide
Page 142
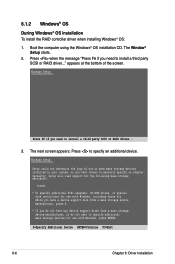
... to specify additional mass storage devices for use with Windows, press ENTER. Press to install a third party SCSI or RAID driver..." S=Specify Additional Device ENTER=Continue F3=Exit 6-6 Chapter 6: Driver installation The next screen appears. appears at the bottom of one or more mass storage devices installed in your system, or... F6 if you have any device support disks from a mass storage device manufacturer, press S. * If you need to install a third party SCSI or RAID driver... 3. 6.1.2 Windows® OS During Windows® OS installation To install the RAID controller...
... to specify additional mass storage devices for use with Windows, press ENTER. Press to install a third party SCSI or RAID driver..." S=Specify Additional Device ENTER=Continue F3=Exit 6-6 Chapter 6: Driver installation The next screen appears. appears at the bottom of one or more mass storage devices installed in your system, or... F6 if you have any device support disks from a mass storage device manufacturer, press S. * If you need to install a third party SCSI or RAID driver... 3. 6.1.2 Windows® OS During Windows® OS installation To install the RAID controller...

User Guide
Page 143
... created earlier to the floppy disk drive, then press . ASUS Z8NA-D6 6-7 Follow screen instructions to continue installation. 7. ENTER=Continue ESC=Cancel F3=Exit 5. Setup then proceeds with the OS installation. The Windows® Setup loads the RAID controller drivers from the list, then press . 6. When next screen appears, press to continue. 4. Windows Setup...
... created earlier to the floppy disk drive, then press . ASUS Z8NA-D6 6-7 Follow screen instructions to continue installation. 7. ENTER=Continue ESC=Cancel F3=Exit 5. Setup then proceeds with the OS installation. The Windows® Setup loads the RAID controller drivers from the list, then press . 6. When next screen appears, press to continue. 4. Windows Setup...

User Guide
Page 144
...automatically detects the RAID controller and displays a New Hardware Found window. The wizard searches the RAID controller drivers. Click Finish after the driver installation is done. 6-8 Chapter 6: Driver installation Click the Hardware tab, then click the Device Manager button to the floppy disk drive. 9. The... Upgrade Device Driver Wizard window appears. Select the option Search for a suitable driver for my device (recommended), then click Next. 10. When found, click Next to install the drivers. 11. Right-click the RAID controller item, then ...
...automatically detects the RAID controller and displays a New Hardware Found window. The wizard searches the RAID controller drivers. Click Finish after the driver installation is done. 6-8 Chapter 6: Driver installation Click the Hardware tab, then click the Device Manager button to the floppy disk drive. 9. The... Upgrade Device Driver Wizard window appears. Select the option Search for a suitable driver for my device (recommended), then click Next. 10. When found, click Next to install the drivers. 11. Right-click the RAID controller item, then ...

User Guide
Page 145
... Yes No 4. At the boot:, type linux dd noprobe=ata1 noprobe=ata2..., then press . Main Menu Do you have the driver disk, then press . Driver Disk Source You have a driver disk? The number of ata varies with 6 hard disk drives, type command line: linux dd noprobe=ata1 noprobe=ata2 noprobe=ata3... Select Yes using the key when asked if you like to OK, then press . Press to move the cursor to use? fd0 scd0 OK Cancel ASUS Z8NA-D6 6-9 To install or upgrade in graphical mode, press the key. - Boot the system from the Red Hat® OS installation CD. 2. Which ...
... Yes No 4. At the boot:, type linux dd noprobe=ata1 noprobe=ata2..., then press . Main Menu Do you have the driver disk, then press . Driver Disk Source You have a driver disk? The number of ata varies with 6 hard disk drives, type command line: linux dd noprobe=ata1 noprobe=ata2 noprobe=ata3... Select Yes using the key when asked if you like to OK, then press . Press to move the cursor to use? fd0 scd0 OK Cancel ASUS Z8NA-D6 6-9 To install or upgrade in graphical mode, press the key. - Boot the system from the Red Hat® OS installation CD. 2. Which ...

User Guide
Page 146
... is completed, DO NOT click Reboot. Yes No 7. More Driver Disks? 5. Do you will load additional RAID controller drivers, select No, then press . mkdir /mnt/driver mount /dev/fd0 /mnt/driver cd /mnt/driver sh replace_ahci.sh reboot 6-10 Chapter 6: Driver installation Insert Driver Disk Insert your driver disk into /dev/fd0 and press "OK" to the system...
... is completed, DO NOT click Reboot. Yes No 7. More Driver Disks? 5. Do you will load additional RAID controller drivers, select No, then press . mkdir /mnt/driver mount /dev/fd0 /mnt/driver cd /mnt/driver sh replace_ahci.sh reboot 6-10 Chapter 6: Driver installation Insert Driver Disk Insert your driver disk into /dev/fd0 and press "OK" to the system...

User Guide
Page 147
cat /proc/partitions Write down the Major and Minor number before sdb for later use. Type the following commands when using a USB floppy. mknod /dev/sdb b [major number] [minor number] mkdir /mnt/driver mount /dev/sdb /mnt/driver cd /mnt/driver sh replace_ahci.sh reboot ASUS Z8NA-D6 6-11
cat /proc/partitions Write down the Major and Minor number before sdb for later use. Type the following commands when using a USB floppy. mknod /dev/sdb b [major number] [minor number] mkdir /mnt/driver mount /dev/sdb /mnt/driver cd /mnt/driver sh replace_ahci.sh reboot ASUS Z8NA-D6 6-11

User Guide
Page 148
...Settings Rescue System Memory Test Boot Options | Yes No File F1 Help F2 Language F3 1280 x 1024 F4 DVD F5 Driver 6-12 Chapter 6: Driver installation The number of ata varies with 6 hard disk drives, type command line: linux dd noprobe=ata1 noprobe=ata2 noprobe...3. For example, if you have when building a RAID set. 6.1.4 SUSE Linux Enterprise Server OS To install the RAID controller driver when installing�S��U�S��E��L�i�n�u�x��E�n�t�e�r�p�r�...
...Settings Rescue System Memory Test Boot Options | Yes No File F1 Help F2 Language F3 1280 x 1024 F4 DVD F5 Driver 6-12 Chapter 6: Driver installation The number of ata varies with 6 hard disk drives, type command line: linux dd noprobe=ata1 noprobe=ata2 noprobe...3. For example, if you have when building a RAID set. 6.1.4 SUSE Linux Enterprise Server OS To install the RAID controller driver when installing�S��U�S��E��L�i�n�u�x��E�n�t�e�r�p�r�...

User Guide
Page 149
... to the system. Boot from the Boot Options menu is selected, then press . Please choose the Driver Update medium. 5. ASUS Z8NA-D6 6-13 When below screen appears, select the floppy disk drive (fd0) as the driver update medium. Make sure that Installation from Hard Disk Installation Installation--ACPI Disabled Installation--Local APIC Disabled Installation--Safe...
... to the system. Boot from the Boot Options menu is selected, then press . Please choose the Driver Update medium. 5. ASUS Z8NA-D6 6-13 When below screen appears, select the floppy disk drive (fd0) as the driver update medium. Make sure that Installation from Hard Disk Installation Installation--ACPI Disabled Installation--Local APIC Disabled Installation--Safe...

User Guide
Page 150
mkdir /mnt/driver mount /dev/fd0 /mnt/driver cd /mnt/driver sh replace_ahci.sh reboot Type the following commands when using a USB floppy. 7. Type the following commands when using a Legacy floppy. cat /proc/partitions Write down the Major and Minor number before sdb for later use. mknod /dev/sdb b [major number] [minor number] mkdir /mnt/driver mount /dev/sdb /mnt/driver cd /mnt/driver sh replace_ahci.sh reboot 6-14 Chapter 6: Driver installation When the installation is completed, press + + to switch to the command-line interface from graphic user interface. 8.
mkdir /mnt/driver mount /dev/fd0 /mnt/driver cd /mnt/driver sh replace_ahci.sh reboot Type the following commands when using a USB floppy. 7. Type the following commands when using a Legacy floppy. cat /proc/partitions Write down the Major and Minor number before sdb for later use. mknod /dev/sdb b [major number] [minor number] mkdir /mnt/driver mount /dev/sdb /mnt/driver cd /mnt/driver sh replace_ahci.sh reboot 6-14 Chapter 6: Driver installation When the installation is completed, press + + to switch to the command-line interface from graphic user interface. 8.

User Guide
Page 151
...Insert the motherboard/system support DVD to install the Plug and Play components for the Intel® chipset on the system. 6.2 Intel chipset device software installation This section provides instructions on how to the optical drive. The support DVD automatically displays the Drivers menu if... Autorun is enabled in your computer. 3. Click the item Intel Chipset Device Software from the menu. You need to manually install the Intel® chipset software on with Administrator privileges. 2. To install the Intel® chipset software: 1. ASUS Z8NA-D6 6-15...
...Insert the motherboard/system support DVD to install the Plug and Play components for the Intel® chipset on the system. 6.2 Intel chipset device software installation This section provides instructions on how to the optical drive. The support DVD automatically displays the Drivers menu if... Autorun is enabled in your computer. 3. Click the item Intel Chipset Device Software from the menu. You need to manually install the Intel® chipset software on with Administrator privileges. 2. To install the Intel® chipset software: 1. ASUS Z8NA-D6 6-15...


