
User Guide
Page 1
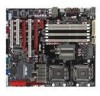
Z7S WS Motherboard
Z7S WS Motherboard

User Guide
Page 3
......iii Notices...vii Safety information viii About this guide ix Z7S WS specifications summary xi Chapter 1: Product introduction 1.1 Welcome 1-1 1.2 Package contents 1-1 1.3 Special features 1-2 1.3.1 Product highlights 1-2 1.3.2 Innovative ASUS features 1-4 Chapter 2: Hardware information 2.1 Before you proceed 2-1 2.2 Motherboard overview 2-2 2.2.1 Placement direction 2-2 2.2.2 Screw holes 2-2 2.2.3 Support kits for the motherboard 2-3 2.2.4 Motherboard layout 2-6 2.2.5 Audio card layout 2-6 2.2.6 Layout contents 2-7 2.3 Central Processing Unit (CPU...
......iii Notices...vii Safety information viii About this guide ix Z7S WS specifications summary xi Chapter 1: Product introduction 1.1 Welcome 1-1 1.2 Package contents 1-1 1.3 Special features 1-2 1.3.1 Product highlights 1-2 1.3.2 Innovative ASUS features 1-4 Chapter 2: Hardware information 2.1 Before you proceed 2-1 2.2 Motherboard overview 2-2 2.2.1 Placement direction 2-2 2.2.2 Screw holes 2-2 2.2.3 Support kits for the motherboard 2-3 2.2.4 Motherboard layout 2-6 2.2.5 Audio card layout 2-6 2.2.6 Layout contents 2-7 2.3 Central Processing Unit (CPU...

User Guide
Page 8
... are using, contact your local power company. • If the power supply is set to fix it by yourself. Operation safety • Before installing the motherboard and adding devices on it may become wet. • Place the product on a stable surface. • If you are unplugged. • Seek professional assistance before...; Before connecting or removing signal cables from the existing system before the signal cables are not damaged. If possible, disconnect all power cables from the motherboard, ensure that your retailer.
... are using, contact your local power company. • If the power supply is set to fix it by yourself. Operation safety • Before installing the motherboard and adding devices on it may become wet. • Place the product on a stable surface. • If you are unplugged. • Seek professional assistance before...; Before connecting or removing signal cables from the existing system before the signal cables are not damaged. If possible, disconnect all power cables from the motherboard, ensure that your retailer.

User Guide
Page 9
...description of the switches, jumpers, and connectors on ASUS hardware and software products. Optional documentation Your product package may include optional documentation, such as warranty flyers, that may refer to when configuring the motherboard. About this guide is organized This user guide...; Chapter 4: BIOS setup This chapter tells how to change system settings through the BIOS Setup menus. ix ASUS websites The ASUS website provides updated information on the motherboard. • Chapter 3: Powering up This chapter describes the power up , creating, and configuring RAID sets ...
...description of the switches, jumpers, and connectors on ASUS hardware and software products. Optional documentation Your product package may include optional documentation, such as warranty flyers, that may refer to when configuring the motherboard. About this guide is organized This user guide...; Chapter 4: BIOS setup This chapter tells how to change system settings through the BIOS Setup menus. ix ASUS websites The ASUS website provides updated information on the motherboard. • Chapter 3: Powering up This chapter describes the power up , creating, and configuring RAID sets ...

User Guide
Page 15
This chapter describes the motherboard 1 features and the new technologies it supports. Chapter 1: Product introduction
This chapter describes the motherboard 1 features and the new technologies it supports. Chapter 1: Product introduction

User Guide
Page 17
.... 1.1 Welcome! Retail version only) 2 x CPU Fan Plate G.P. ASUS Z7S WS 1-1 Diagnosis Card (Retail version only) MIO Audio Card (Retail version only) Application DVD ASUS motherboard support DVD Documentation User guide If any of the above items is damaged or missing, contact your motherboard package for the following items. Motherboard ASUS Z7S WS I /O shield 1 x ASUS Q-Connector Kit (USB, 1394, system panel; Before...
.... 1.1 Welcome! Retail version only) 2 x CPU Fan Plate G.P. ASUS Z7S WS 1-1 Diagnosis Card (Retail version only) MIO Audio Card (Retail version only) Application DVD ASUS motherboard support DVD Documentation User guide If any of the above items is damaged or missing, contact your motherboard package for the following items. Motherboard ASUS Z7S WS I /O shield 1 x ASUS Q-Connector Kit (USB, 1394, system panel; Before...

User Guide
Page 18
... performance while still providing backward compatibility to meet demands for faster and more powerful processing. See page 2-9 for the motherboard. Intel® EM64T The motherboard supports Intel processors with improved signal integrity and reduced errors. Intel® Seaburg and Intel® ESB2E chipset The ...8209;Core and Quad-Core Intel® Xeon™ processors with 1600/1333/1066 MHz Front Side Bus (FSB). PCIe 2.0 This motherboard supports the latest PCIe 2.0 device for processor, quad-channel FB-DIMM memory support, and two PCI Express 2.0 interfaces. The MCH provides...
... performance while still providing backward compatibility to meet demands for faster and more powerful processing. See page 2-9 for the motherboard. Intel® EM64T The motherboard supports Intel processors with improved signal integrity and reduced errors. Intel® Seaburg and Intel® ESB2E chipset The ...8209;Core and Quad-Core Intel® Xeon™ processors with 1600/1333/1066 MHz Front Side Bus (FSB). PCIe 2.0 This motherboard supports the latest PCIe 2.0 device for processor, quad-channel FB-DIMM memory support, and two PCI Express 2.0 interfaces. The MCH provides...

User Guide
Page 19
See page 2-29 for details. ASUS SASsaby cards support This motherboard is fully compatible with a better choice for audio/video appliances such as a network gateway for high-speed data retrieval and saves. Faster, safer and more stable, SAS will provide users with ASUS SASsaby cards (optional). ASUS Z7S WS 1-3 See page 2-29 for details. G.P. It allows to...
See page 2-29 for details. ASUS SASsaby cards support This motherboard is fully compatible with a better choice for audio/video appliances such as a network gateway for high-speed data retrieval and saves. Faster, safer and more stable, SAS will provide users with ASUS SASsaby cards (optional). ASUS Z7S WS 1-3 See page 2-29 for details. G.P. It allows to...

User Guide
Page 21
Chapter 2: 2 Hardware information This chapter lists the hardware setup procedures that you have to perform when installing system components. It includes description of the jumpers and connectors on the motherboard.
Chapter 2: 2 Hardware information This chapter lists the hardware setup procedures that you have to perform when installing system components. It includes description of the jumpers and connectors on the motherboard.

User Guide
Page 22
Diagnosis card installation 2-42 ASUS Z7S WS Chapter summary 2 2.1 Before you proceed 2-1 2.2 Motherboard overview 2-2 2.3 Central Processing Unit (CPU 2-9 2.4 System memory 2-14 2.5 Expansion slots 2-20 2.6 Jumpers 2-25 2.7 Switches 2-27 2.8 Audio card installation 2-28 2.9 Connectors 2-29 2.10 G.P.
Diagnosis card installation 2-42 ASUS Z7S WS Chapter summary 2 2.1 Before you proceed 2-1 2.2 Motherboard overview 2-2 2.3 Central Processing Unit (CPU 2-9 2.4 System memory 2-14 2.5 Expansion slots 2-20 2.6 Jumpers 2-25 2.7 Switches 2-27 2.8 Audio card installation 2-28 2.9 Connectors 2-29 2.10 G.P.

User Guide
Page 23
... is ON, in sleep mode, or in soft-off mode. The green LED lights up to the motherboard, peripherals, and/or components. Onboard LED The motherboard comes with the component. • Before you should shut down the system and unplug the power cable ...motherboard components or change any motherboard settings. • Unplug the power cord from the power supply. Failure to do so may cause severe damage to indicate that came with a standby power LED. 2.1 Before you proceed Take note of the onboard LED Z7S WS ® Z7S WS Onboard LED SB_PWR ON Standby Power OFF Powered Off ASUS Z7S WS...
... is ON, in sleep mode, or in soft-off mode. The green LED lights up to the motherboard, peripherals, and/or components. Onboard LED The motherboard comes with the component. • Before you should shut down the system and unplug the power cable ...motherboard components or change any motherboard settings. • Unplug the power cord from the power supply. Failure to do so may cause severe damage to indicate that came with a standby power LED. 2.1 Before you proceed Take note of the onboard LED Z7S WS ® Z7S WS Onboard LED SB_PWR ON Standby Power OFF Powered Off ASUS Z7S WS...

User Guide
Page 24
... NOT overtighten the screws! 2.2 Motherboard overview Before you install it in an SSI CEB 1.1 compliant chassis. Failure to ensure that you install the motherboard, study the configuration of your chassis to do so can damage the motherboard. The edge with external ports goes to the rear part of the chassis Z7S WS ® 2-2 Chapter 2: Hardware information Place...
... NOT overtighten the screws! 2.2 Motherboard overview Before you install it in an SSI CEB 1.1 compliant chassis. Failure to ensure that you install the motherboard, study the configuration of your chassis to do so can damage the motherboard. The edge with external ports goes to the rear part of the chassis Z7S WS ® 2-2 Chapter 2: Hardware information Place...

User Guide
Page 25
... for CPU1 Socket for the motherboard For additional protection from motherboard breakage due to the weight of the CPU heatsinks, your chassis is SSI CEB 1.1 compliant, we recommend that you use the CEK springs; If your motherboard package comes with CEK springs that you can use the support plates kit. ASUS Z7S WS 2-3 Hook To install the CEK...
... for CPU1 Socket for the motherboard For additional protection from motherboard breakage due to the weight of the CPU heatsinks, your chassis is SSI CEB 1.1 compliant, we recommend that you use the CEK springs; If your motherboard package comes with CEK springs that you can use the support plates kit. ASUS Z7S WS 2-3 Hook To install the CEK...

User Guide
Page 27
... the eight (8) CEK spring screw holes. Refer to section 2.2.2 Screw holes for CPU0 Make sure that should be right on top of their respective standoffs. ASUS Z7S WS 2-5 Install the motherboard with eight (8) screws. otherwise, you can not install the CPU heatsinks properly. 8. Standoffs for CPU0 Standoffs for CPU1 7. 6.
... the eight (8) CEK spring screw holes. Refer to section 2.2.2 Screw holes for CPU0 Make sure that should be right on top of their respective standoffs. ASUS Z7S WS 2-5 Install the motherboard with eight (8) screws. otherwise, you can not install the CPU heatsinks properly. 8. Standoffs for CPU0 Standoffs for CPU1 7. 6.

User Guide
Page 31
... socket box is on the socket and the socket contacts are not bent. ASUS will shoulder the cost of the PnP cap. 2.3.1 Installing the CPU To install a CPU: 1. ASUS Z7S WS 2-9 ASUS will process Return Merchandise Authorization (RMA) requests only if the motherboard comes with installation instructions for the CPU and heatsink. Locate the CPU socket...
... socket box is on the socket and the socket contacts are not bent. ASUS will shoulder the cost of the PnP cap. 2.3.1 Installing the CPU To install a CPU: 1. ASUS Z7S WS 2-9 ASUS will process Return Merchandise Authorization (RMA) requests only if the motherboard comes with installation instructions for the CPU and heatsink. Locate the CPU socket...

User Guide
Page 36
...) chip that you obtain memory modules from DDR2 DIMMs so you cannot install DDR2 DIMMs on the ASUS web site. • This motherboard does not support memory modules made up of the FB-DIMM sockets: Z7S WS ® Z7S WS 240-pin DDR2 FB-DIMM sockets 2.4.2 Memory configurations You may install 256 MB, 512 MB, 1...that allows memory-to-CPU connection at gigabit speed. Installing into the white socket labeled DIMM_00. 112 Pins 128 Pins 2.4 System memory 2.4.1 Overview The motherboard comes with six fully-buffered DIMM (FB-DIMM) sockets to the Qualified Vendors List on an FB-DIMM socket.
...) chip that you obtain memory modules from DDR2 DIMMs so you cannot install DDR2 DIMMs on the ASUS web site. • This motherboard does not support memory modules made up of the FB-DIMM sockets: Z7S WS ® Z7S WS 240-pin DDR2 FB-DIMM sockets 2.4.2 Memory configurations You may install 256 MB, 512 MB, 1...that allows memory-to-CPU connection at gigabit speed. Installing into the white socket labeled DIMM_00. 112 Pins 128 Pins 2.4 System memory 2.4.1 Overview The motherboard comes with six fully-buffered DIMM (FB-DIMM) sockets to the Qualified Vendors List on an FB-DIMM socket.

User Guide
Page 39
... so that the notch on the DIMM matches the break on the socket. 3. The DIMM might get damaged when it fits in only one direction. ASUS Z7S WS 2-17 To install a DIMM: 1. Firmly insert the DIMM into a socket to avoid damaging the DIMM. • The FB-DIMM sockets do so may cause severe...-DIMM notch • A FB-DIMM is keyed with extra force. 2. Failure to do not support DDR DIMMs. DO NOT install DDR DIMMs to both the motherboard and the components.
... so that the notch on the DIMM matches the break on the socket. 3. The DIMM might get damaged when it fits in only one direction. ASUS Z7S WS 2-17 To install a DIMM: 1. Firmly insert the DIMM into a socket to avoid damaging the DIMM. • The FB-DIMM sockets do so may cause severe...-DIMM notch • A FB-DIMM is keyed with extra force. 2. Failure to do not support DDR DIMMs. DO NOT install DDR DIMMs to both the motherboard and the components.

User Guide
Page 40
... cover clamp Top cover hook Fan base 3. Disengage the fan top cover from the fan base. Locate the three FB-DIMM fan holes on the motherboard. 2.
... cover clamp Top cover hook Fan base 3. Disengage the fan top cover from the fan base. Locate the three FB-DIMM fan holes on the motherboard. 2.

User Guide
Page 42
See Chapter 4 for later use . Remove the system unit cover (if your motherboard is completely seated on the next page. 3. Align the card connector with the screw you removed earlier. 6. Refer to use . 4. The following sub‑sections... the it and make the necessary hardware settings for the expansion card. 2.5 Expansion slots In the future, you may cause you physical injury and damage motherboard components. 2.5.1 Installing an expansion card To install an expansion card: 1. Assign an IRQ to unplug the power cord before adding or removing expansion cards. ...
See Chapter 4 for later use . Remove the system unit cover (if your motherboard is completely seated on the next page. 3. Align the card connector with the screw you removed earlier. 6. Refer to use . 4. The following sub‑sections... the it and make the necessary hardware settings for the expansion card. 2.5 Expansion slots In the future, you may cause you physical injury and damage motherboard components. 2.5.1 Installing an expansion card To install an expansion card: 1. Assign an IRQ to unplug the power cord before adding or removing expansion cards. ...

User Guide
Page 43
...slot This motherboard supports PCI Express x1 audio cards, network cards, SCSI cards and other cards that support PCI Express 2.0 x16 graphic cards complying with the PCI Express specifications. Refer to the figure on the next page for the location of PCI Express card you install. ASUS Z7S WS 2-21 ... holder for PCI steering* * These IRQs are usually available for the location of the slot. 2.5.5 PCI Express 2.0 x16 slots (red) This motherboard has two PCI Express 2.0 x16 slots that comply with a maximum speed of the slots. 2.5.6 Universal PCI Express x16 slot (white) This...
...slot This motherboard supports PCI Express x1 audio cards, network cards, SCSI cards and other cards that support PCI Express 2.0 x16 graphic cards complying with the PCI Express specifications. Refer to the figure on the next page for the location of PCI Express card you install. ASUS Z7S WS 2-21 ... holder for PCI steering* * These IRQs are usually available for the location of the slot. 2.5.5 PCI Express 2.0 x16 slots (red) This motherboard has two PCI Express 2.0 x16 slots that comply with a maximum speed of the slots. 2.5.6 Universal PCI Express x16 slot (white) This...


