
User Guide
Page 2
... and the location where you want to obtain the corresponding source code and your request please provide the name, model number and version, as source code archives, etc. ii E10131 First Edition January 2015 Copyright© 2015 ASUSTeK COMPUTER INC. SPECIFICATIONS AND INFORMATION CONTAINED IN THIS MANUAL ARE FURNISHED FOR INFORMATIONAL USE ONLY, AND ARE SUBJECT TO CHANGE AT...
... and the location where you want to obtain the corresponding source code and your request please provide the name, model number and version, as source code archives, etc. ii E10131 First Edition January 2015 Copyright© 2015 ASUSTeK COMPUTER INC. SPECIFICATIONS AND INFORMATION CONTAINED IN THIS MANUAL ARE FURNISHED FOR INFORMATIONAL USE ONLY, AND ARE SUBJECT TO CHANGE AT...

User Guide
Page 8
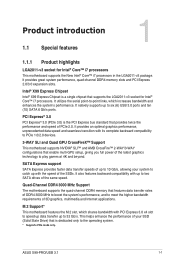
...x16/x8) 1 x PCI Express 2.0 x16 slot*** (max. Supports NVIDIA® 3-WAY/Quad GPU SLI™ Technology (with 2 PCIe x16 graphics card) Supports AMD® 3-WAY/Quad-GPU CrossFireX™ Technology New Intel® Core™ i7 processors - 2 x M.2 x4 Socket 3 with M Key, type 2230*/2242/2260/2280/22110 storage devices support** (supports PCIe SSD only) Intel® X99 Express Chipset with RAID 0, 1, 5, 10 and Intel® Rapid Storage Technology 13 support - 1 x SATA Express port (gray, compatible with PCIe x1 and PCIe x4 devices) 2 x PCI Express 2.0 x1 slot*** 28-LANE CPU 3 x PCI Express...
...x16/x8) 1 x PCI Express 2.0 x16 slot*** (max. Supports NVIDIA® 3-WAY/Quad GPU SLI™ Technology (with 2 PCIe x16 graphics card) Supports AMD® 3-WAY/Quad-GPU CrossFireX™ Technology New Intel® Core™ i7 processors - 2 x M.2 x4 Socket 3 with M Key, type 2230*/2242/2260/2280/22110 storage devices support** (supports PCIe SSD only) Intel® X99 Express Chipset with RAID 0, 1, 5, 10 and Intel® Rapid Storage Technology 13 support - 1 x SATA Express port (gray, compatible with PCIe x1 and PCIe x4 devices) 2 x PCI Express 2.0 x1 slot*** 28-LANE CPU 3 x PCI Express...

User Guide
Page 9
... to the audio configuration - support ASUS USB 3.1 Boost - 2 x USB 3.1/3.0/2.0 ports at rear panel) ASMedia® USB 3.1 controller - Absolute Pitch 192 khz/24 bit True BD Lossless Sound - Supports jack-detection, multi-streaming and front panel jack- X99-PRO/USB 3.1 specifications summary Storage Wi-Fi Bluetooth LAN Audio USB * Type 2230 storage device is only available on ASUS HYPER M.2x 4 card ** 1 at onboard, 1 at rear I/O Intel® X99 Express Chipset - retasking (MIC) - Speedy Wi-Fi 802.11 a/b/g/n/ac supports dual frequency band 2.4/5 GHz - Audio shielding ensures...
... to the audio configuration - support ASUS USB 3.1 Boost - 2 x USB 3.1/3.0/2.0 ports at rear panel) ASMedia® USB 3.1 controller - Absolute Pitch 192 khz/24 bit True BD Lossless Sound - Supports jack-detection, multi-streaming and front panel jack- X99-PRO/USB 3.1 specifications summary Storage Wi-Fi Bluetooth LAN Audio USB * Type 2230 storage device is only available on ASUS HYPER M.2x 4 card ** 1 at onboard, 1 at rear I/O Intel® X99 Express Chipset - retasking (MIC) - Speedy Wi-Fi 802.11 a/b/g/n/ac supports dual frequency band 2.4/5 GHz - Audio shielding ensures...

User Guide
Page 13
...ASUS DRAM SPD (Serial Presence Detect) memory information WfM 2.0, DMI 2.7, WOL by PME, PXE Drivers ASUS Utilities EZ Update Anti-virus software (OEM version) Windows® 8.1 Windows® 8 Windows® 7 ATX Form Factor, 12 in . (30.5 cm x 24.4 cm) Specifications are subject to change without notice. X99-PRO/USB 3.1 specifications summary Internal I/O Connectors BIOS Features Manageability Support DVD Operating system Form Factors 1 x 4-pin CPU Fan connector for both 3-pin (DC mode) and 4-pin (PWM mode) CPU coolers control with auto detection 1 x 4-pin CPU OPT Fan connector 4 x 4-pin...
...ASUS DRAM SPD (Serial Presence Detect) memory information WfM 2.0, DMI 2.7, WOL by PME, PXE Drivers ASUS Utilities EZ Update Anti-virus software (OEM version) Windows® 8.1 Windows® 8 Windows® 7 ATX Form Factor, 12 in . (30.5 cm x 24.4 cm) Specifications are subject to change without notice. X99-PRO/USB 3.1 specifications summary Internal I/O Connectors BIOS Features Manageability Support DVD Operating system Form Factors 1 x 4-pin CPU Fan connector for both 3-pin (DC mode) and 4-pin (PWM mode) CPU coolers control with auto detection 1 x 4-pin CPU OPT Fan connector 4 x 4-pin...
User Guide
Page 17
.... SATA Express support SATA Express provides faster data transfer speeds of up to 10 Gb/s, allowing your SSD (Solid State Drive) that is the PCI Express bus standard that enable multi-GPU setup, giving you full power of the SSDs. Chapter 1 ASUS X99-PRO/USB 3.1 1-1 It provides great system performance, quad-channel DDR4 memory slots and PCI Express 2.0/3.0 expansion slots. It also features backward compatibility with the speed of the latest graphics technology to 32 Gb/s. M.2 Support* This motherboard...
.... SATA Express support SATA Express provides faster data transfer speeds of up to 10 Gb/s, allowing your SSD (Solid State Drive) that is the PCI Express bus standard that enable multi-GPU setup, giving you full power of the SSDs. Chapter 1 ASUS X99-PRO/USB 3.1 1-1 It provides great system performance, quad-channel DDR4 memory slots and PCI Express 2.0/3.0 expansion slots. It also features backward compatibility with the speed of the latest graphics technology to 32 Gb/s. M.2 Support* This motherboard...

User Guide
Page 21
...25. USB 3.0 connectors (20-1 pin USB3_12, USB3_34) 8. Q-Code LEDs 20. Power-on button 22. CPU, CPU optional, extension, and chassis fan connectors (4-pin CPU_FAN, 4-pin CPU_OPT, 5-pin EXT_FAN, 4-pin CHA_FAN1-4 ) 3. TPU switch 11. DirectKey connector (2-pin DRCT) 15. Serial port connector (10-1 pin COM) 23. Layout contents Connectors/Jumpers/Buttons and switches/Slots 1. ATX power connectors (24-pin EATXPWR; 8-pin EATX12V) 5. USB1314) 16. Clear RTC RAM jumper (3-pin CLRTC) 18. Front panel audio connector (10-1 pin AAFP) 24. CPU Over Voltage jumper (3-pin...
...25. USB 3.0 connectors (20-1 pin USB3_12, USB3_34) 8. Q-Code LEDs 20. Power-on button 22. CPU, CPU optional, extension, and chassis fan connectors (4-pin CPU_FAN, 4-pin CPU_OPT, 5-pin EXT_FAN, 4-pin CHA_FAN1-4 ) 3. TPU switch 11. DirectKey connector (2-pin DRCT) 15. Serial port connector (10-1 pin COM) 23. Layout contents Connectors/Jumpers/Buttons and switches/Slots 1. ATX power connectors (24-pin EATXPWR; 8-pin EATX12V) 5. USB1314) 16. Clear RTC RAM jumper (3-pin CLRTC) 18. Front panel audio connector (10-1 pin AAFP) 24. CPU Over Voltage jumper (3-pin...
User Guide
Page 33
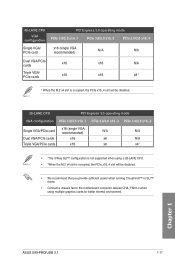
...) N/A N/A Dual VGA/PCIe cards x16 x8 N/A Triple VGA/PCIe cards x16 x8 x4* • *The 3-Way SLI™ configuration is not supported when using a 28-LANE CPU. • *When the M.2 x4 slot is occupied, the PCIe x16_4 slot will be disabled. • We recommend that you provide sufficient power when running CrossFireX™ or SLI™ mode. • Connect a chassis fan to the motherboard connector labeled CHA_FAN1-4 when using multiple graphics cards for better thermal environment. Chapter 1 ASUS X99-PRO/USB...
...) N/A N/A Dual VGA/PCIe cards x16 x8 N/A Triple VGA/PCIe cards x16 x8 x4* • *The 3-Way SLI™ configuration is not supported when using a 28-LANE CPU. • *When the M.2 x4 slot is occupied, the PCIe x16_4 slot will be disabled. • We recommend that you provide sufficient power when running CrossFireX™ or SLI™ mode. • Connect a chassis fan to the motherboard connector labeled CHA_FAN1-4 when using multiple graphics cards for better thermal environment. Chapter 1 ASUS X99-PRO/USB...

User Guide
Page 37
... in the AI Suite 3 application, adjust the BIOS setup program or enable the TPU switch at the same time. ASUS X99-PRO/USB 3.1 1-21 However, the system will be activated after the next system bootup. • You may use the last setting you set to TPU_I mode or TPU_II mode. Chapter 1 • The TPU LEDs (TPU_LED) near the TPU switch light up when you have made. 4.
... in the AI Suite 3 application, adjust the BIOS setup program or enable the TPU switch at the same time. ASUS X99-PRO/USB 3.1 1-21 However, the system will be activated after the next system bootup. • You may use the last setting you set to TPU_I mode or TPU_II mode. Chapter 1 • The TPU LEDs (TPU_LED) near the TPU switch light up when you have made. 4.
User Guide
Page 45
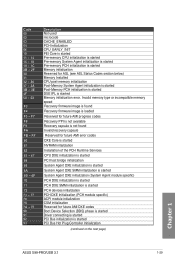
... 91 92 93 Description Not used microcode CACHE_ENABLED PCH initialization CPU_EARLY_INIT PEI Core is started Pre-memory CPU initialization is started Pre-memory System Agent initialization is started Pre-memory PCH initialization is started Memory initialization Reserved for future AMI DXE codes Boot Device Selection (BDS) phase is started Driver connecting is started PCI Bus initialization is started PCI Bus Hot Plug Controller Initialization (continued on the next page) Chapter 1 ASUS X99-PRO/USB 3.1 1-29 F7 F8 F9 FA...
... 91 92 93 Description Not used microcode CACHE_ENABLED PCH initialization CPU_EARLY_INIT PEI Core is started Pre-memory CPU initialization is started Pre-memory System Agent initialization is started Pre-memory PCH initialization is started Memory initialization Reserved for future AMI DXE codes Boot Device Selection (BDS) phase is started Driver connecting is started PCI Bus initialization is started PCI Bus Hot Plug Controller Initialization (continued on the next page) Chapter 1 ASUS X99-PRO/USB 3.1 1-29 F7 F8 F9 FA...

User Guide
Page 46
... started IDE Reset IDE Detect IDE Enable SCSI initialization is started SCSI Reset SCSI Detect SCSI Enable Setup Verifying Password Start of Setup Reserved for ASL (see ASL Status Codes section below) Setup Input Wait Reserved for ASL (see ASL Status Codes section below) Ready To Boot event Legacy Boot event Exit Boot Services event Runtime Set Virtual Address MAP Begin Runtime Set Virtual Address MAP End Legacy Option ROM Initialization System Reset USB hot plug PCI bus hot plug Clean-up of NVRAM Configuration Reset (reset...
... started IDE Reset IDE Detect IDE Enable SCSI initialization is started SCSI Reset SCSI Detect SCSI Enable Setup Verifying Password Start of Setup Reserved for ASL (see ASL Status Codes section below) Setup Input Wait Reserved for ASL (see ASL Status Codes section below) Ready To Boot event Legacy Boot event Exit Boot Services event Runtime Set Virtual Address MAP Begin Runtime Set Virtual Address MAP End Legacy Option ROM Initialization System Reset USB hot plug PCI bus hot plug Clean-up of NVRAM Configuration Reset (reset...

User Guide
Page 48
... manual bundled in the BIOS to [RAID Mode]. If you can support one SATA Express device or two SATA devices. • Due to create a Serial ATA RAID set using these connectors, set the SATA Mode item in the motherboard support DVD. • The SATAEXPRESS_1 connector can create a RAID 0, 1, 5, and 10 configuration with the Intel® Rapid Storage Technology through the onboard Intel® X99 chipset. If you installed Serial ATA hard disk drives, you intend to chipset behavior, the SATA6G_78 and SATA6G_910 ports (black) do not support...
... manual bundled in the BIOS to [RAID Mode]. If you can support one SATA Express device or two SATA devices. • Due to create a Serial ATA RAID set using these connectors, set the SATA Mode item in the motherboard support DVD. • The SATAEXPRESS_1 connector can create a RAID 0, 1, 5, and 10 configuration with the Intel® Rapid Storage Technology through the onboard Intel® X99 chipset. If you installed Serial ATA hard disk drives, you intend to chipset behavior, the SATA6G_78 and SATA6G_910 ports (black) do not support...

User Guide
Page 50
... an installed USB 3.0 module, you to connect a USB 3.0 module for USB-chargeable devices, optimized power efficiency, and backward compatibility with USB 2.0. USB 3.0 connectors (20-1 pin USB3_12, USB3_34) These connectors allow you can enjoy all the benefits of USB 3.0 including faster data transfer speeds of up to fully use the USB 3.0 ports under Windows® 7. • The plugged USB 3.0 device may run on xHCI or EHCI mode depending on the operating system's setting. • These USB 3.0 ports support...
... an installed USB 3.0 module, you to connect a USB 3.0 module for USB-chargeable devices, optimized power efficiency, and backward compatibility with USB 2.0. USB 3.0 connectors (20-1 pin USB3_12, USB3_34) These connectors allow you can enjoy all the benefits of USB 3.0 including faster data transfer speeds of up to fully use the USB 3.0 ports under Windows® 7. • The plugged USB 3.0 device may run on xHCI or EHCI mode depending on the operating system's setting. • These USB 3.0 ports support...

User Guide
Page 81
... of the BIOS setup program configures system overclocking Chapter 3 Enables or disables the SATA RAID mode for details. Refer to the system. The EZ Mode provides you to select the display language, system performance mode and boot device priority. Displays the CPU/motherboard temperature, CPU voltage output, CPU/chassis/power fan speed, and SATA information Displays the system properties of the selected mode. ASUS X99-PRO/USB 3.1 3-3 Click the button to manually tune the fans Shows the bootable devices Loads optimized default settings Saves the changes and resets the system...
... of the BIOS setup program configures system overclocking Chapter 3 Enables or disables the SATA RAID mode for details. Refer to the system. The EZ Mode provides you to select the display language, system performance mode and boot device priority. Displays the CPU/motherboard temperature, CPU voltage output, CPU/chassis/power fan speed, and SATA information Displays the system properties of the selected mode. ASUS X99-PRO/USB 3.1 3-3 Click the button to manually tune the fans Shows the bootable devices Loads optimized default settings Saves the changes and resets the system...

User Guide
Page 102
Configuration options: [Auto] [Enabled] [Disabled] DRAM Training [Auto] This item allows your CPU specification. Use the or to CPU loading. The values range from 0.80 V to 2.7 V with a 0.10 V increment. The CPU working voltage decreases proportionally to adjust the value. Chapter 3 3-24 Chapter 3: BIOS setup Configuration options: [Auto] [Enabled] [Disabled] Attempt Fast Cold Boot [Auto] This item allows the portion of the memory reference code to be skipped when possible to increase boot speed. Higher load-line calibration could get higher...
Configuration options: [Auto] [Enabled] [Disabled] DRAM Training [Auto] This item allows your CPU specification. Use the or to CPU loading. The values range from 0.80 V to 2.7 V with a 0.10 V increment. The CPU working voltage decreases proportionally to adjust the value. Chapter 3 3-24 Chapter 3: BIOS setup Configuration options: [Auto] [Enabled] [Disabled] Attempt Fast Cold Boot [Auto] This item allows the portion of the memory reference code to be skipped when possible to increase boot speed. Higher load-line calibration could get higher...

User Guide
Page 115
... show [Not Installed]. Due to Intel® chipset specification, the SATA ports from the SATA hard disk drives. SATA Controller 1 Mode Selection [AHCI] This item allows you to set the SATA configuration. [Disabled] Disables the SATA function. [IDE] Set to [IDE] when you want to use the Serial ATA hard disk drives as Parallel ATA physical storage devices. [AHCI] Set to [AHCI Mode] when you want the SATA hard disk drives to use the AHCI (Advanced Host Controller Interface). Configuration options: [Disabled] [Enabled] Chapter 3 ASUS X99-PRO/USB 3.1 3-37 If some ports are not...
... show [Not Installed]. Due to Intel® chipset specification, the SATA ports from the SATA hard disk drives. SATA Controller 1 Mode Selection [AHCI] This item allows you to set the SATA configuration. [Disabled] Disables the SATA function. [IDE] Set to [IDE] when you want to use the Serial ATA hard disk drives as Parallel ATA physical storage devices. [AHCI] Set to [AHCI Mode] when you want the SATA hard disk drives to use the AHCI (Advanced Host Controller Interface). Configuration options: [Disabled] [Enabled] Chapter 3 ASUS X99-PRO/USB 3.1 3-37 If some ports are not...

User Guide
Page 117
... Virtualization Technology for Directed I/O (VT-d) by reporting the I /O (VT-d). Chapter 3 The Mass Storage Devices item shows the auto-detected values. ASUS X99-PRO/USB 3.1 3-39 If no USB device is installed in this menu allow you to change the USB-related features. Configuration options: [Enabled] [Disabled] 3.6.5 USB Configuration The items in the operating system. [Smart Auto] Upon detection, the xHCI driver supports the USB 3.0 mode during both POST and operating system. [Enabled] Enables the xHCI controller. [Disabled] Disables the xHCI controller. Intel xHCI Mode...
... Virtualization Technology for Directed I/O (VT-d) by reporting the I /O (VT-d). Chapter 3 The Mass Storage Devices item shows the auto-detected values. ASUS X99-PRO/USB 3.1 3-39 If no USB device is installed in this menu allow you to change the USB-related features. Configuration options: [Enabled] [Disabled] 3.6.5 USB Configuration The items in the operating system. [Smart Auto] Upon detection, the xHCI driver supports the USB 3.0 mode during both POST and operating system. [Enabled] Enables the xHCI controller. [Disabled] Disables the xHCI controller. Intel xHCI Mode...

User Guide
Page 131
... Error [Enabled] This item allows your system supports 64-bit PCI decoding. Configuration options: [Disabled] [Enabled] Option ROM Messages [Force BIOS] This item allows you to set the display mode for INT19 immediately. [Postponed] Executes the trap during legacy boot. Chapter 3 ASUS X99-PRO/USB 3.1 3-53 Bootup NumLock State [On] This item allows you to on/off when you to fully support the non-UEFI driver add-on state of the NumLock. Launch CSM [Enabled] [Auto...
... Error [Enabled] This item allows your system supports 64-bit PCI decoding. Configuration options: [Disabled] [Enabled] Option ROM Messages [Force BIOS] This item allows you to set the display mode for INT19 immediately. [Postponed] Executes the trap during legacy boot. Chapter 3 ASUS X99-PRO/USB 3.1 3-53 Bootup NumLock State [On] This item allows you to on/off when you to fully support the non-UEFI driver add-on state of the NumLock. Launch CSM [Enabled] [Auto...
User Guide
Page 139
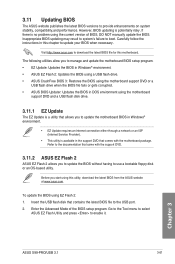
...'s failure to provide enhancements on system stability, compatibility,and performance. Enter the Advanced Mode of BIOS, DO NOT manually update the BIOS. Chapter 3 ASUS X99-PRO/USB 3.1 3-61 Carefully follow the instructions in the support DVD that comes with the support DVD. 3.11.2 ASUS EZ Flash 2 ASUS EZ Flash 2 allows you start using this chapter to the USB port. 2. The following utilities allow you to manage and update the motherboard BIOS setup program. • EZ Update: Updates the BIOS in Windows® environment. • ASUS...
...'s failure to provide enhancements on system stability, compatibility,and performance. Enter the Advanced Mode of BIOS, DO NOT manually update the BIOS. Chapter 3 ASUS X99-PRO/USB 3.1 3-61 Carefully follow the instructions in the support DVD that comes with the support DVD. 3.11.2 ASUS EZ Flash 2 ASUS EZ Flash 2 allows you start using this chapter to the USB port. 2. The following utilities allow you to manage and update the motherboard BIOS setup program. • EZ Update: Updates the BIOS in Windows® environment. • ASUS...
User Guide
Page 141
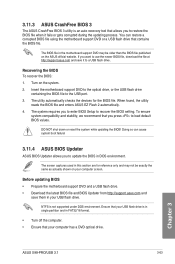
... system while updating the BIOS! Chapter 3 ASUS X99-PRO/USB 3.1 3-63 You can cause system boot failure! 3.11.4 ASUS BIOS Updater ASUS BIOS Updater allows you to restore the BIOS file when it to the USB port. 3. Insert the motherboard support DVD to the optical drive, or the USB flash drive containing the BIOS file to a USB flash drive. When found, the utility reads the BIOS file and enters ASUS EZ Flash 2 automatically. 4. NTFS is in single partition and in FAT32/16 format. • Turn off the...
... system while updating the BIOS! Chapter 3 ASUS X99-PRO/USB 3.1 3-63 You can cause system boot failure! 3.11.4 ASUS BIOS Updater ASUS BIOS Updater allows you to restore the BIOS file when it to the USB port. 3. Insert the motherboard support DVD to the optical drive, or the USB flash drive containing the BIOS file to a USB flash drive. When found, the utility reads the BIOS file and enters ASUS EZ Flash 2 automatically. 4. NTFS is in single partition and in FAT32/16 format. • Turn off the...
User Guide
Page 142
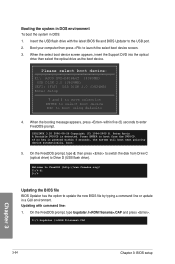
... USB port. 2. C:/> d: D:/> Updating the BIOS file BIOS Updater has the option to launch the select boot device screen. 3. When the select boot device screen appears, insert the Support DVD into the optical drive then select the optical drive as the boot device. Please select boot device: E1: ASUS DVD-E818A6T (4069MB) USB DISK 2.0 (3824MB) UEFI: (FAT) USB DISK 2.0 (3824MB) Enter Setup and to move selection ENTER to select boot device ESC to Drive D (USB flash drive). On the FreeDOS prompt, type d: then press to switch the disk from the DVD...
... USB port. 2. C:/> d: D:/> Updating the BIOS file BIOS Updater has the option to launch the select boot device screen. 3. When the select boot device screen appears, insert the Support DVD into the optical drive then select the optical drive as the boot device. Please select boot device: E1: ASUS DVD-E818A6T (4069MB) USB DISK 2.0 (3824MB) UEFI: (FAT) USB DISK 2.0 (3824MB) Enter Setup and to move selection ENTER to select boot device ESC to Drive D (USB flash drive). On the FreeDOS prompt, type d: then press to switch the disk from the DVD...


