
Vintage-PE2 Quick Installation Guide for English Edition
Page 5
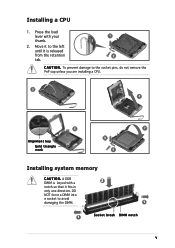
Press the load lever with a notch so that it fits in only one direction. To prevent damage to the left until it to the socket pins, do not remove the PnP cap unless you are installing a CPU. 5 3 4 6 7 Alignment key Gold triangle mark 8 9 Installing system memory C A U T I O N . Move it is keyed with your 1 thumb. 2. Installing a CPU 1. C A U T I O N . DO NOT force a DIMM into a socket to avoid damaging the DIMM. 1 1 Socket break DIMM notch v A DDR 2 DIMM is released from the retention 2 tab.
Press the load lever with a notch so that it fits in only one direction. To prevent damage to the left until it to the socket pins, do not remove the PnP cap unless you are installing a CPU. 5 3 4 6 7 Alignment key Gold triangle mark 8 9 Installing system memory C A U T I O N . Move it is keyed with your 1 thumb. 2. Installing a CPU 1. C A U T I O N . DO NOT force a DIMM into a socket to avoid damaging the DIMM. 1 1 Socket break DIMM notch v A DDR 2 DIMM is released from the retention 2 tab.
Vintage-PE2 User''s Manual for English Edition
Page 3
... side plates and front cover 2-3 2.4 Installing a CPU 2-5 2.4.1 Installing the CPU 2-5 2.4.2 Installing the CPU fan and heatsink 2-8 2.4.3 Uninstalling the CPU fan and heatsink 2-10 2.5 Installing system memory 2-12 2.5.1 Memory configurations 2-12 2.5.2 Installing a DIMM 2-16 2.5.3 Removing a DIMM 2-16 2.6 Installing an expansion card 2-17 2.6.1 Expansion slots 2-17 2.6.2 Expansion card installation 2-19 2.6.3 Configuring an expansion card...
... side plates and front cover 2-3 2.4 Installing a CPU 2-5 2.4.1 Installing the CPU 2-5 2.4.2 Installing the CPU fan and heatsink 2-8 2.4.3 Uninstalling the CPU fan and heatsink 2-10 2.5 Installing system memory 2-12 2.5.1 Memory configurations 2-12 2.5.2 Installing a DIMM 2-16 2.5.3 Removing a DIMM 2-16 2.6 Installing an expansion card 2-17 2.6.1 Expansion slots 2-17 2.6.2 Expansion card installation 2-19 2.6.3 Configuring an expansion card...

Vintage-PE2 User''s Manual for English Edition
Page 15
...P o w e r s u p p l y u n i t f a n v e n t . Setting the switch to the voltage supply in a 230 V environment will seriously damage the system! 115 V/230 V Voltage selector ASUS Vintage-PE2 1-5 This vent is for the PSU fan that came with the system has a voltage selector switch below the power socket. This 25-pin port connects...other devices. 1 1 . This port allows connection to the system. You can insert expansion boards into these slots to add memory and graphics capabilities to a Local Area Network (LAN) through a network hub. 1 3 . L A N ( R J - 4 5 ) p o r t .
...P o w e r s u p p l y u n i t f a n v e n t . Setting the switch to the voltage supply in a 230 V environment will seriously damage the system! 115 V/230 V Voltage selector ASUS Vintage-PE2 1-5 This vent is for the PSU fan that came with the system has a voltage selector switch below the power socket. This 25-pin port connects...other devices. 1 1 . This port allows connection to the system. You can insert expansion boards into these slots to add memory and graphics capabilities to a Local Area Network (LAN) through a network hub. 1 3 . L A N ( R J - 4 5 ) p o r t .

Vintage-PE2 User''s Manual for English Edition
Page 18
.... Unplug the power cable from the power outlet and make sure that you have all the components that you plan to install 1. DDR Dual Inline Memory Module (DIMM) 3. Floppy disk drive Tool Phillips (cross) screw driver 2.2 Before you proceed Take note of the following precautions before you install components into the...
.... Unplug the power cable from the power outlet and make sure that you have all the components that you plan to install 1. DDR Dual Inline Memory Module (DIMM) 3. Floppy disk drive Tool Phillips (cross) screw driver 2.2 Before you proceed Take note of the following precautions before you install components into the...

Vintage-PE2 User''s Manual for English Edition
Page 28
...Rate (DDR) Dual Inline Memory Module(s) (DIMM) sockets. Refer to 4 GB system memory using 256 MB, 512 MB, and 1 GB DDR DIMMs. • Installing DDR DIMMS other than 4 GB system memory when you obtain memory modules from the same vendor. Visit www.asus.com for details. •...; Due to use only identical, ASUS-certified memory modules. 2.5 Installing system memory The system may come with the same CAS latency. These sockets...
...Rate (DDR) Dual Inline Memory Module(s) (DIMM) sockets. Refer to 4 GB system memory using 256 MB, 512 MB, and 1 GB DDR DIMMs. • Installing DDR DIMMS other than 4 GB system memory when you obtain memory modules from the same vendor. Visit www.asus.com for details. •...; Due to use only identical, ASUS-certified memory modules. 2.5 Installing system memory The system may come with the same CAS latency. These sockets...

Vintage-PE2 User''s Manual for English Edition
Page 29
... two pairs of modules inserted into the blue and black slots as one pair of Dual-channel memory configuration. C - Recommended memory configurations Channel Channel A Channel B Sockets DIMM_A1 and DIMM_B1 DIMM_A2 and DIMM_B2 Color Blue Black DDR ... 2.5 2.5 2.5 2.5 2.5 • • • S S - Double-sided C L- Visit the ASUS website (www.asus.com) for the latest DDR Qualified Vendors List. Single-sided D S - B - ASUS Vintage-PE2 2-13 supports one pair of Dual-channel memory configuration. supports four modules inserted into either slot, in a Single-channel...
... two pairs of modules inserted into the blue and black slots as one pair of Dual-channel memory configuration. C - Recommended memory configurations Channel Channel A Channel B Sockets DIMM_A1 and DIMM_B1 DIMM_A2 and DIMM_B2 Color Blue Black DDR ... 2.5 2.5 2.5 2.5 2.5 • • • S S - Double-sided C L- Visit the ASUS website (www.asus.com) for the latest DDR Qualified Vendors List. Single-sided D S - B - ASUS Vintage-PE2 2-13 supports one pair of Dual-channel memory configuration. supports four modules inserted into either slot, in a Single-channel...

Vintage-PE2 User''s Manual for English Edition
Page 31
...8226; 3 •• • S S - Double-sided C L- CAS Latency DIMM support: A - VT VT VT VT MOSEL MOSEL - - DS - Single-sided D S - B - ASUS Vintage-PE2 2-15 Ballistix Ballistix CEON CEON Aeneon DS KDL388P4LA-50 SS NT5DS32M8CT-5T DS NT5DS32M8CT-5T SS NT5DS32M16BT-5T DS NT5DS64M8BT-5T SS K4H560838D-TCC4 DS... A2S56D30CTP SS GL3LC32G88TG-35 DS GL3LC32G88TG-35 SS GL3LC32G88TG-5A SS WLCSP Package SS - supports one pair of Dual-channel memory configuration. C - SAMSUNG SAMSUNG SAMSUNG SAMSUNG - - - - DDR (400 MHz) Qualified Vendors List Size Vendor Model...
...8226; 3 •• • S S - Double-sided C L- CAS Latency DIMM support: A - VT VT VT VT MOSEL MOSEL - - DS - Single-sided D S - B - ASUS Vintage-PE2 2-15 Ballistix Ballistix CEON CEON Aeneon DS KDL388P4LA-50 SS NT5DS32M8CT-5T DS NT5DS32M8CT-5T SS NT5DS32M16BT-5T DS NT5DS64M8BT-5T SS K4H560838D-TCC4 DS... A2S56D30CTP SS GL3LC32G88TG-35 DS GL3LC32G88TG-35 SS GL3LC32G88TG-5A SS WLCSP Package SS - supports one pair of Dual-channel memory configuration. C - SAMSUNG SAMSUNG SAMSUNG SAMSUNG - - - - DDR (400 MHz) Qualified Vendors List Size Vendor Model...
Vintage-PE2 User''s Manual for English Edition
Page 55
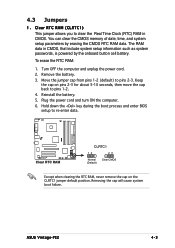
... to pins 1-2. 4. Turn OFF the computer and unplug the power cord. 2. Hold down the key during the boot process and enter BIOS setup to pins 2-3. ASUS Vintage-PE2 4-3 Move the jumper cap from pins 1-2 (default) to re-enter data. ® Clear RTC RAM CLRTC1 12 23 Normal (Default) Clear CMOS Except when clearing...: 1. Remove the battery. 3. Keep the cap on the CLRTC1 jumper default position. The RAM data in CMOS. Reinstall the battery. 5. You can clear the CMOS memory of date, time, and system setup parameters by the onboard button cell battery.
... to pins 1-2. 4. Turn OFF the computer and unplug the power cord. 2. Hold down the key during the boot process and enter BIOS setup to pins 2-3. ASUS Vintage-PE2 4-3 Move the jumper cap from pins 1-2 (default) to re-enter data. ® Clear RTC RAM CLRTC1 12 23 Normal (Default) Clear CMOS Except when clearing...: 1. Remove the battery. 3. Keep the cap on the CLRTC1 jumper default position. The RAM data in CMOS. Reinstall the battery. 5. You can clear the CMOS memory of date, time, and system setup parameters by the onboard button cell battery.

Vintage-PE2 User''s Manual for English Edition
Page 79
... MHz Count : 1 System Memory Size : 248MB AMI BIOS Displays the auto-detected BIOS information. In this menu. Processor Displays the auto-detected CPU specification. The P-ATA+S-ATA and P-ATA options are for detecting ATA/ATAPI devices. If you did not install any of the general system specifications. ASUS Vintage-PE2 5-17 Enhanced Mode Support... This menu gives you an overview of these options and encounter problems, revert to use legacy OS on Serial ATA and Parallel ATA ports. System Memory Displays the auto-detected system...
... MHz Count : 1 System Memory Size : 248MB AMI BIOS Displays the auto-detected BIOS information. In this menu. Processor Displays the auto-detected CPU specification. The P-ATA+S-ATA and P-ATA options are for detecting ATA/ATAPI devices. If you did not install any of the general system specifications. ASUS Vintage-PE2 5-17 Enhanced Mode Support... This menu gives you an overview of these options and encounter problems, revert to use legacy OS on Serial ATA and Parallel ATA ports. System Memory Displays the auto-detected system...

Vintage-PE2 User''s Manual for English Edition
Page 83
...between the DDR SDRAM active command and the read command and the time the data actually becomes available. Configuration options: [4] [8] ASUS Vintage-PE2 5-21 When disabled, you to change the advanced chipset settings. 5.4.3 Chipset The Chipset menu allows you can manually set according... through the DRAM sub-items. The following sub-items appear when this item is Disabled. Configure DRAM Timing by SPD Pre-allocated Graphics Memory Graphics Memory Type [Enabled] [Enabled, 8MB] [Auto] Enable or disable DRAM timing. Configuration options: [2 Clocks] [3 Clocks] [4 Clocks] ...
...between the DDR SDRAM active command and the read command and the time the data actually becomes available. Configuration options: [4] [8] ASUS Vintage-PE2 5-21 When disabled, you to change the advanced chipset settings. 5.4.3 Chipset The Chipset menu allows you can manually set according... through the DRAM sub-items. The following sub-items appear when this item is Disabled. Configure DRAM Timing by SPD Pre-allocated Graphics Memory Graphics Memory Type [Enabled] [Enabled, 8MB] [Auto] Enable or disable DRAM timing. Configuration options: [2 Clocks] [3 Clocks] [4 Clocks] ...

Vintage-PE2 User''s Manual for English Edition
Page 84
...ROM in the onboard LAN controller. Configuration options: [Disabled] [378] [278] [3BC] 5-22 Chapter 5: BIOS setup Pre-allocated Graphics Memory [Enabled, 8MB] Allows user to select the Parallel Port base addresses. Configuration options: [Auto] [DVMT] [FIX] [DVMT+FIX] ... [DMA3] [IRQ7] Enable or disable Azalia controller. Configuration options: [Enabled, 1MB] [Enabled, 8MB] Graphics Memory Type [Auto] Selects the size of system memory pre-allocated by the internal graphics device. Onboard AC97 Controller [Enabled] Enables or disables the onboard AC97 controller. Configuration...
...ROM in the onboard LAN controller. Configuration options: [Disabled] [378] [278] [3BC] 5-22 Chapter 5: BIOS setup Pre-allocated Graphics Memory [Enabled, 8MB] Allows user to select the Parallel Port base addresses. Configuration options: [Auto] [DVMT] [FIX] [DVMT+FIX] ... [DMA3] [IRQ7] Enable or disable Azalia controller. Configuration options: [Enabled, 1MB] [Enabled, 8MB] Graphics Memory Type [Auto] Selects the size of system memory pre-allocated by the internal graphics device. Onboard AC97 Controller [Enabled] Enables or disables the onboard AC97 controller. Configuration...

Vintage-PE2 User''s Manual for English Edition
Page 85
... required for PCI/PnP devices. The menu includes setting IRQ and DMA channel resources for either PCI/PnP or legacy ISA devices, and setting the memory size block for legacy ISA devices. Parallel Port Mode [ECP] Allows you to set to E P P. Plug And Play O/S PCI Latency Timer Allocate...-5 assigned to IRQ-7 assigned to IRQ-9 assigned to IRQ-10 assigned to IRQ-11 assigned to IRQ-14 assigned to IRQ-15 assigned to malfunction. ASUS Vintage-PE2 5-23 This item allows you to select the Parallel Port mode. Configuration options: [Normal] [Bi-directional] [EPP] [ECP] ECP Mode DMA Channel [...
... required for PCI/PnP devices. The menu includes setting IRQ and DMA channel resources for either PCI/PnP or legacy ISA devices, and setting the memory size block for legacy ISA devices. Parallel Port Mode [ECP] Allows you to set to E P P. Plug And Play O/S PCI Latency Timer Allocate...-5 assigned to IRQ-7 assigned to IRQ-9 assigned to IRQ-10 assigned to IRQ-11 assigned to IRQ-14 assigned to IRQ-15 assigned to malfunction. ASUS Vintage-PE2 5-23 This item allows you to select the Parallel Port mode. Configuration options: [Normal] [Bi-directional] [EPP] [ECP] ECP Mode DMA Channel [...

