
Vintage-PE2 User''s Manual for English Edition
Page 55
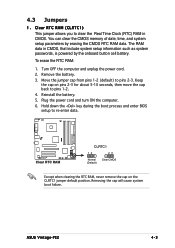
... cap will cause system boot failure. You can clear the CMOS memory of date, time, and system setup parameters by the onboard button cell battery. ASUS Vintage-PE2 4-3 The RAM data in CMOS. Move the jumper cap from pins 1-2 (default) to re-enter data. ® Clear RTC... 2-3 for about 5-10 seconds, then move the cap back to clear the Real Time Clock (RTC) RAM in CMOS, that include system setup information such as system passwords, is powered by erasing the CMOS RTC RAM data. 4.3 Jumpers 1. Turn OFF the computer and unplug the power cord. 2. Hold down the key during...
... cap will cause system boot failure. You can clear the CMOS memory of date, time, and system setup parameters by the onboard button cell battery. ASUS Vintage-PE2 4-3 The RAM data in CMOS. Move the jumper cap from pins 1-2 (default) to re-enter data. ® Clear RTC... 2-3 for about 5-10 seconds, then move the cap back to clear the Real Time Clock (RTC) RAM in CMOS, that include system setup information such as system passwords, is powered by erasing the CMOS RTC RAM data. 4.3 Jumpers 1. Turn OFF the computer and unplug the power cord. 2. Hold down the key during...

Vintage-PE2 User''s Manual for English Edition
Page 73
... Exit Menu." • The BIOS setup screens shown in the future. otherwise, POST continues with the opportunity to ensure optimum performance. ASUS Vintage-PE2 5-11 This requires you scroll through the various sub-menus and make it lets you to reconfigure your system using the navigation keys. &#... record them in section "5.1 Managing and updating your system using the provided utility described in the CMOS RAM of your screen. • Visit the ASUS website (www.asus.com) to enter the Setup utility; Even if you are for most conditions to run this section ...
... Exit Menu." • The BIOS setup screens shown in the future. otherwise, POST continues with the opportunity to ensure optimum performance. ASUS Vintage-PE2 5-11 This requires you scroll through the various sub-menus and make it lets you to reconfigure your system using the navigation keys. &#... record them in section "5.1 Managing and updating your system using the provided utility described in the CMOS RAM of your screen. • Visit the ASUS website (www.asus.com) to enter the Setup utility; Even if you are for most conditions to run this section ...

Vintage-PE2 User''s Manual for English Edition
Page 94
... Password Password Check [Full Access] [Setup] User Access Level (Full Access] This item allows you clear it by erasing the CMOS Real Time Clock (RTC) RAM. F u l l A c c e s s allows viewing and changing all the fields in the Setup utility. V i e w O n l y allows access but does not ...allow you set a password, this item to set a User Password: 1. The User Password item on how to erase the RTC RAM. Select the Change User Password item and press . 2. Confirm the password when prompted. 5-32 Chapter 5: BIOS setup See section "4.3 Jumpers" for information on...
... Password Password Check [Full Access] [Setup] User Access Level (Full Access] This item allows you clear it by erasing the CMOS Real Time Clock (RTC) RAM. F u l l A c c e s s allows viewing and changing all the fields in the Setup utility. V i e w O n l y allows access but does not ...allow you set a password, this item to set a User Password: 1. The User Password item on how to erase the RTC RAM. Select the Change User Password item and press . 2. Confirm the password when prompted. 5-32 Chapter 5: BIOS setup See section "4.3 Jumpers" for information on...

Vintage-PE2 User''s Manual for English Edition
Page 96
... select this option or if you made and restore the previously saved values. Select Y e s to the non-volatile RAM. 5-34 Chapter 5: BIOS setup When you made to the Setup program. Exit & Save Changes Once you are saved to the CMOS... RAM. If you attempt to exit the Setup program without saving your changes, the program prompts you with a message ... discard any changes and load the previously saved values. An onboard backup battery sustains the CMOS RAM so it stays on the Setup menus.
... select this option or if you made and restore the previously saved values. Select Y e s to the non-volatile RAM. 5-34 Chapter 5: BIOS setup When you made to the Setup program. Exit & Save Changes Once you are saved to the CMOS... RAM. If you attempt to exit the Setup program without saving your changes, the program prompts you with a message ... discard any changes and load the previously saved values. An onboard backup battery sustains the CMOS RAM so it stays on the Setup menus.


