
User Manual
Page 2
... represented by the digit before and after the period of the manual revision number. Product Name: ASUS VX97 Manual Revision: 1.02 Release Date: May 1997 2 ASUS VX97 User's Manual Copyright © 1997 ASUSTeK COMPUTER INC. IN NO EVENT SHALL ASUS, ITS DIRECTORS, OFFICERS, EMPLOYEES OR AGENTS BE LIABLE FOR ANY INDIRECT, SPECIAL, INCIDENTAL, OR CONSEQUENTIAL...
... represented by the digit before and after the period of the manual revision number. Product Name: ASUS VX97 Manual Revision: 1.02 Release Date: May 1997 2 ASUS VX97 User's Manual Copyright © 1997 ASUSTeK COMPUTER INC. IN NO EVENT SHALL ASUS, ITS DIRECTORS, OFFICERS, EMPLOYEES OR AGENTS BE LIABLE FOR ANY INDIRECT, SPECIAL, INCIDENTAL, OR CONSEQUENTIAL...

User Manual
Page 3
...-474-0555 Email: tsd-usa@asus.com.tw ASUS COMPUTER GmbH Marketing Info: Address: Harkort Str. 25, 40880 Ratingen, BRD, Germany Telephone: 49-2102-445011 Fax: 49-2102-442066 Email: info-ger@asus.com.tw Technical Support: BBS: 49-2102-448690 Email: tsd-ger@asus.com.tw ASUS VX97 User's Manual 3 ASUS CONTACT INFORMATION ASUSTeK COMPUTER INC.
...-474-0555 Email: tsd-usa@asus.com.tw ASUS COMPUTER GmbH Marketing Info: Address: Harkort Str. 25, 40880 Ratingen, BRD, Germany Telephone: 49-2102-445011 Fax: 49-2102-442066 Email: info-ger@asus.com.tw Technical Support: BBS: 49-2102-448690 Email: tsd-ger@asus.com.tw ASUS VX97 User's Manual 3 ASUS CONTACT INFORMATION ASUSTeK COMPUTER INC.

User Manual
Page 4
...DRAM Memory Installation Procedures 17 3. INTRODUCTION 7 How this manual is organized 7 Item Checklist 7 II. FEATURES 8 Features of the VX97 Motherboard 8 Parts of the VX97 Motherboard 10 Installation Steps 12 1. BIOS Setup 31 Load Defaults 32 Standard CMOS Setup 32 Details of Standard CMOS Setup 33 BIOS ... Setup 42 PNP and PCI Setup 44 Details of PNP and PCI Setup 44 Load BIOS Defaults 46 4 ASUS VX97 User's Manual External Connectors 21 Power Connection Procedures 27 IV. Jumpers 12 Jumper Settings 13 Compatible Cyrix CPU Identification 14 2. CONTENTS I....
...DRAM Memory Installation Procedures 17 3. INTRODUCTION 7 How this manual is organized 7 Item Checklist 7 II. FEATURES 8 Features of the VX97 Motherboard 8 Parts of the VX97 Motherboard 10 Installation Steps 12 1. BIOS Setup 31 Load Defaults 32 Standard CMOS Setup 32 Details of Standard CMOS Setup 33 BIOS ... Setup 42 PNP and PCI Setup 44 Details of PNP and PCI Setup 44 Load BIOS Defaults 46 4 ASUS VX97 User's Manual External Connectors 21 Power Connection Procedures 27 IV. Jumpers 12 Jumper Settings 13 Compatible Cyrix CPU Identification 14 2. CONTENTS I....
User Manual
Page 5
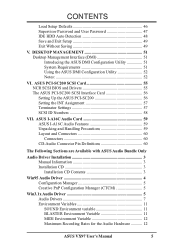
... and Handling Precautions 59 Layout and Connectors 60 Connectors 60 CD-Audio Connector Pin Definitions 60 The Following Sections are Available with ASUS Audio Bundle Only Audio Driver Installation 3 Manual Information 3 Installation CD 3 Installation CD Contents 3 Win95 Audio Driver 4 Configuration Manager...11 SOUND Environment variable 11 BLASTER Environment Variable 11 MIDI Environment Variable 12 Maximum Recording Rates for the Audio Hardware 12 ASUS VX97 User's Manual 5 CONTENTS Load Setup Defaults 46 Supervisor Password and User Password 47 IDE HDD Auto Detection 48 Save ...
... and Handling Precautions 59 Layout and Connectors 60 Connectors 60 CD-Audio Connector Pin Definitions 60 The Following Sections are Available with ASUS Audio Bundle Only Audio Driver Installation 3 Manual Information 3 Installation CD 3 Installation CD Contents 3 Win95 Audio Driver 4 Configuration Manager...11 SOUND Environment variable 11 BLASTER Environment Variable 11 MIDI Environment Variable 12 Maximum Recording Rates for the Audio Hardware 12 ASUS VX97 User's Manual 5 CONTENTS Load Setup Defaults 46 Supervisor Password and User Password 47 IDE HDD Auto Detection 48 Save ...

User Manual
Page 6
... to an outlet on , the user is no guarantee that interference will not occur in the Radio Interference Regulations of the Canadian Department of Communications. 6 ASUS VX97 User's Manual This equipment generates, uses and can be determined by turning the equipment off and on a circuit different from digital apparatus set out in...
... to an outlet on , the user is no guarantee that interference will not occur in the Radio Interference Regulations of the Canadian Department of Communications. 6 ASUS VX97 User's Manual This equipment generates, uses and can be determined by turning the equipment off and on a circuit different from digital apparatus set out in...

User Manual
Page 7
... information and checklist Information and specifications concerning this manual is organized This manual is complete. BIOS Setup: V. I -A16C: VIII. ASUS I . If you discover damaged or missing items, please contact your retailer. √ The ASUS VX97 motherboard √ 2 serial port ribbon cables attached to a mounting bracket √ 1 parallel ribbon cable with mounting bracket √...
... information and checklist Information and specifications concerning this manual is organized This manual is complete. BIOS Setup: V. I -A16C: VIII. ASUS I . If you discover damaged or missing items, please contact your retailer. √ The ASUS VX97 motherboard √ 2 serial port ribbon cables attached to a mounting bracket √ 1 parallel ribbon cable with mounting bracket √...

User Manual
Page 8
... with I /O: Provides two high-speed UART compatible serial ports and one parallel port with two connectors that supports optional ASUS SCSI controller cards. 8 ASUS VX97 User's Manual Two floppy drives of the VX97 Motherboard The ASUS VX97 is also supported. • PCI Bus Master IDE Controller: Comes with an onboard PCI Bus Master IDE controller with...
... with I /O: Provides two high-speed UART compatible serial ports and one parallel port with two connectors that supports optional ASUS SCSI controller cards. 8 ASUS VX97 User's Manual Two floppy drives of the VX97 Motherboard The ASUS VX97 is also supported. • PCI Bus Master IDE Controller: Comes with an onboard PCI Bus Master IDE controller with...
User Manual
Page 9
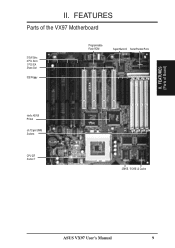
II. FEATURES Parts of Board) II. FEATURES (Parts of the VX97 Motherboard 3 ISA Slots 3 PCI Slots 1 PCI/ISA Share Slot IDE/Floppy Programmable Flash ROM Super Multi-I/O Serial/Parallel Ports Intel's 430VX PCIset (4) 72-pin SIMM Sockets CPU ZIF Socket 7 256KB / 512KB L2 Cache ASUS VX97 User's Manual 9
II. FEATURES Parts of Board) II. FEATURES (Parts of the VX97 Motherboard 3 ISA Slots 3 PCI Slots 1 PCI/ISA Share Slot IDE/Floppy Programmable Flash ROM Super Multi-I/O Serial/Parallel Ports Intel's 430VX PCIset (4) 72-pin SIMM Sockets CPU ZIF Socket 7 256KB / 512KB L2 Cache ASUS VX97 User's Manual 9

User Manual
Page 10
... 3 PCI Slot 4 FS0 FS1 FS2 ISA Slot 1 ISA Slot 2 ISA Slot 3 ISA Slot 4 III. Panel Connections 256/512KB OnBoard L2 Cache 10 ASUS VX97 User's Manual INSTALLATION (Map of the VX97 Motherboard Keyboard BIOS Universal Serial Bus (Reserved) PS/2 Mouse Keyboard Flash ROM for BIOS Block Program (Dis/En) Serial Ports COM 1 COM...
... 3 PCI Slot 4 FS0 FS1 FS2 ISA Slot 1 ISA Slot 2 ISA Slot 3 ISA Slot 4 III. Panel Connections 256/512KB OnBoard L2 Cache 10 ASUS VX97 User's Manual INSTALLATION (Map of the VX97 Motherboard Keyboard BIOS Universal Serial Bus (Reserved) PS/2 Mouse Keyboard Flash ROM for BIOS Block Program (Dis/En) Serial Ports COM 1 COM...
User Manual
Page 11
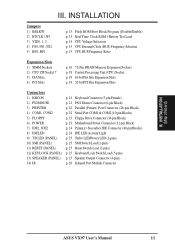
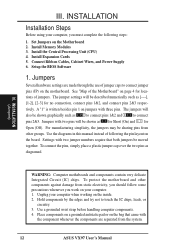
INSTALLATION (Map of Board) ASUS VX97 User's Manual 11 III. INSTALLATION Jumpers 1) BBLKW 2) RTCLR / JP1 3) VID0, 1, 2 4) FS0, FS1, FS2 5) BF0, BF1 p. 13 Flash ROM Boot Block Program (Disable/Enable) p. 13 Real ...
INSTALLATION (Map of Board) ASUS VX97 User's Manual 11 III. INSTALLATION Jumpers 1) BBLKW 2) RTCLR / JP1 3) VID0, 1, 2 4) FS0, FS1, FS2 5) BF0, BF1 p. 13 Flash ROM Boot Block Program (Disable/Enable) p. 13 Real ...
User Manual
Page 12
..., or circuitry. 3. Unplug your computer, you work on the motherboard. The jumpers will be sharing pins from other components against damage from the system. 12 ASUS VX97 User's Manual III. Jumpers Several hardware settings are separated from static electricity, you should follow some precautions whenever you must complete the following the pin...
..., or circuitry. 3. Unplug your computer, you work on the motherboard. The jumpers will be sharing pins from other components against damage from the system. 12 ASUS VX97 User's Manual III. Jumpers Several hardware settings are separated from static electricity, you should follow some precautions whenever you must complete the following the pin...

User Manual
Page 13
... the power cord to your computer, (4) Hold down during bootup and enter BIOS setup to Clear JP1 Operation (Default) RTC RAM Test Mode Battery Test ASUS VX97 User's Manual 13 Flash ROM Boot Block Programming (BBLKW) This sets the operation mode of the boot block area of the Programmable Flash ROM to...
... the power cord to your computer, (4) Hold down during bootup and enter BIOS setup to Clear JP1 Operation (Default) RTC RAM Test Mode Battery Test ASUS VX97 User's Manual 13 Flash ROM Boot Block Programming (BBLKW) This sets the operation mode of the boot block area of the Programmable Flash ROM to...
User Manual
Page 14
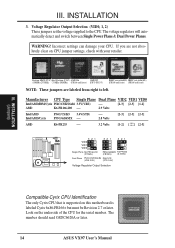
... CPU. Look on this motherboard is supported on the underside of the CPU for the serial number. The number should read G8DC6620A or later. 14 ASUS VX97 User's Manual Pentium MMX (P55C) Intel Pentium (P54C) AMD-K6 AMD-K5 (150MHz-233MHz) (75MHz-200MHz) (PR166 and faster) (PR75-PR133) IBM/Cyrix 6x86(MX...
... CPU. Look on this motherboard is supported on the underside of the CPU for the serial number. The number should read G8DC6620A or later. 14 ASUS VX97 User's Manual Pentium MMX (P55C) Intel Pentium (P54C) AMD-K6 AMD-K5 (150MHz-233MHz) (75MHz-200MHz) (PR166 and faster) (PR75-PR133) IBM/Cyrix 6x86(MX...

User Manual
Page 15
... 66MHz 60MHz 50MHz (BUS Freq.) FS2 FS1 FS0 [2-3] [1-2] [2-3] [2-3] [1-2] [2-3] [2-3] [1-2] [2-3] [2-3] [2-3] [1-2] [2-3] [1-2] [2-3] [2-3] [2-3] [1-2] [2-3] [1-2] [2-3] [2-3] [2-3] [1-2] [2-3] [2-3] [2-3] (Freq. Bootup screen will show 6x86-P166+ with the above jumpers CPU External (BUS) Frequency Selection. III. ASUS VX97 User's Manual 15 INSTALLATION 4. INSTALLATION (Jumpers) Complete Names: Intel Pentium P54C, P55C-MMX AMD K5, K6 IBM/Cyrix 6x86, 6x86MX P54C/K5 1.5x(3/2) P55C/K6...
... 66MHz 60MHz 50MHz (BUS Freq.) FS2 FS1 FS0 [2-3] [1-2] [2-3] [2-3] [1-2] [2-3] [2-3] [1-2] [2-3] [2-3] [2-3] [1-2] [2-3] [1-2] [2-3] [2-3] [2-3] [1-2] [2-3] [1-2] [2-3] [2-3] [2-3] [1-2] [2-3] [2-3] [2-3] (Freq. Bootup screen will show 6x86-P166+ with the above jumpers CPU External (BUS) Frequency Selection. III. ASUS VX97 User's Manual 15 INSTALLATION 4. INSTALLATION (Jumpers) Complete Names: Intel Pentium P54C, P55C-MMX AMD K5, K6 IBM/Cyrix 6x86, 6x86MX P54C/K5 1.5x(3/2) P55C/K6...

User Manual
Page 16
... any or all of the banks in BIOS Chipset Setup "Auto Configuration." III. Modules with more than 24 chips per module. INSTALLATION (System Memory) 16 ASUS VX97 User's Manual III. INSTALLATION 2. SIMMs must be installed in pairs so that each bank contains two of 4MB, 8MB, 16MB, or 32MB to form a memory...
... any or all of the banks in BIOS Chipset Setup "Auto Configuration." III. Modules with more than 24 chips per module. INSTALLATION (System Memory) 16 ASUS VX97 User's Manual III. INSTALLATION 2. SIMMs must be installed in pairs so that each bank contains two of 4MB, 8MB, 16MB, or 32MB to form a memory...

User Manual
Page 17
... Clips" outwards and rock the module out of the SIMM memory modules. 1234 DRAM Memory Module Example 72 Pin SIMM Sockets Bank 0 Bank 1 Notched End 2. ASUS VX97 User's Manual 17 INSTALLATION (System Memory) III. With your finger tips, rock the memory module into place. The SIMM memory modules will only fit in...
... Clips" outwards and rock the module out of the SIMM memory modules. 1234 DRAM Memory Module Example 72 Pin SIMM Sockets Bank 0 Bank 1 Notched End 2. ASUS VX97 User's Manual 17 INSTALLATION (System Memory) III. With your finger tips, rock the memory module into place. The SIMM memory modules will only fit in...

User Manual
Page 18
... Frequency Selection" depending on your guide. With the added weight of the CPU with Pentium Processor Lever Lock Blank Installed CPU Example White Dot 18 ASUS VX97 User's Manual III. The CPU that came with the motherboard should have a CPU fan that there is backwards compatible with the correct orientation as your...
... Frequency Selection" depending on your guide. With the added weight of the CPU with Pentium Processor Lever Lock Blank Installed CPU Example White Dot 18 ASUS VX97 User's Manual III. The CPU that came with the motherboard should have a CPU fan that there is backwards compatible with the correct orientation as your...

User Manual
Page 19
... components. Keep the bracket for Expansion Cards Some expansion cards need to operate. Secure the card on the slot you removed in PNPAND PCI SETUP) 9. ASUS VX97 User's Manual 19 Expansion Card Installation Procedure: 1. Setup the BIOS if necessary (such as "IRQ xx Used By ISA: Yes" in step 4. 7. Assigning IRQs for...
... components. Keep the bracket for Expansion Cards Some expansion cards need to operate. Secure the card on the slot you removed in PNPAND PCI SETUP) 9. ASUS VX97 User's Manual 19 Expansion Card Installation Procedure: 1. Setup the BIOS if necessary (such as "IRQ xx Used By ISA: Yes" in step 4. 7. Assigning IRQs for...

User Manual
Page 20
... from those two devices are in the ISA expansion bus first, and any available slot on your used by Legacy cards. You may occur. 20 ASUS VX97 User's Manual Make sure that does not work with the Plug and Play (PNP) specification which gives you can select a DMA channel in "My Computer...
... from those two devices are in the ISA expansion bus first, and any available slot on your used by Legacy cards. You may occur. 20 ASUS VX97 User's Manual Make sure that does not work with the Plug and Play (PNP) specification which gives you can select a DMA channel in "My Computer...

User Manual
Page 21
.... If not detected, expansion cards can use IRQ12. INSTALLATION 5. These are used for connectors or power sources. PS/2 Mouse Module Connector ASUS VX97 User's Manual 21 The four corners of the ASUS Motherboard" on page 4. PS/2 Mouse Connector (6-pin block) If you must be known as shown here. 2. The system will cause damage...
.... If not detected, expansion cards can use IRQ12. INSTALLATION 5. These are used for connectors or power sources. PS/2 Mouse Module Connector ASUS VX97 User's Manual 21 The four corners of the ASUS Motherboard" on page 4. PS/2 Mouse Connector (6-pin block) If you must be known as shown here. 2. The system will cause damage...


