
User Guide
Page 3
......iv Safety information v Care & Cleaning vi Takeback Services vii Chapter 1: Product introduction 1.1 Welcome 1-1 1.2 Package contents 1-1 1.3 Monitor introduction 1-2 1.3.1 Front view 1-2 1.3.2 Back view 1-3 1.3.3 QuickFit Function 1-3 Chapter 2: Setup 2.1 Assembling the monitor arm/base 2-1 2.2 Adjusting the monitor 2-1 2.3 Connecting the cables 2-2 2.4 Turning on the monitor 2-2 Chapter 3: General instructions 3.1 OSD (On-Screen Display) menu 3-1 3.1.1 How to reconfigure 3-1 3.1.2 OSD function introduction...
......iv Safety information v Care & Cleaning vi Takeback Services vii Chapter 1: Product introduction 1.1 Welcome 1-1 1.2 Package contents 1-1 1.3 Monitor introduction 1-2 1.3.1 Front view 1-2 1.3.2 Back view 1-3 1.3.3 QuickFit Function 1-3 Chapter 2: Setup 2.1 Assembling the monitor arm/base 2-1 2.2 Adjusting the monitor 2-1 2.3 Connecting the cables 2-2 2.4 Turning on the monitor 2-2 Chapter 3: General instructions 3.1 OSD (On-Screen Display) menu 3-1 3.1.1 How to reconfigure 3-1 3.1.2 OSD function introduction...
User Guide
Page 4
.... Causing Equipment Regulations. Changes or modifications to this product meets the Energy Star® guidelines for a Class B digital device, pursuant to Part 15 of the monitor to the graphics card is encouraged to try to assure compliance with manufacturer's instructions, may cause harmful interference to the following measures: • Reorient or...
.... Causing Equipment Regulations. Changes or modifications to this product meets the Energy Star® guidelines for a Class B digital device, pursuant to Part 15 of the monitor to the graphics card is encouraged to try to assure compliance with manufacturer's instructions, may cause harmful interference to the following measures: • Reorient or...
User Guide
Page 5
...unit during a lightning storm or if it by yourself. If you detect any damage, contact your dealer immediately. • Slots and openings on the monitor cabinet. • To ensure satisfactory operation, use it may become wet. Your device uses one of the following power supplies: - The dangerous high ...: ADP33AW B SERIES (For Taiwan, US), ADP33AW C SERIES (For EU), ADP33AW A SERIES (For China), ADP-40KD BB - Never place this monitor, do not try to open the monitor cabinet. Overloading can result in any kind into the slots on the back or top of the cabinet are provided for other...
...unit during a lightning storm or if it by yourself. If you detect any damage, contact your dealer immediately. • Slots and openings on the monitor cabinet. • To ensure satisfactory operation, use it may become wet. Your device uses one of the following power supplies: - The dangerous high ...: ADP33AW B SERIES (For Taiwan, US), ADP33AW C SERIES (For EU), ADP33AW A SERIES (For China), ADP-40KD BB - Never place this monitor, do not try to open the monitor cabinet. Overloading can result in any kind into the slots on the back or top of the cabinet are provided for other...

User Guide
Page 6
.... • When the same image is better to disconnect the cables and power cord. Follow the correct lifting techniques when positioning the monitor. Turn your dealer or service center to complete a task. Conventions used in municipal waste. Do not repair the screen by the stand...alcohol or acetone. Please check local regulations for use due to complete a task. Stubborn stains may flicker during the initial use with the monitor: • The screen may be placed in this guide WARNING: Information to prevent injury to yourself when trying to the nature of electronic ...
.... • When the same image is better to disconnect the cables and power cord. Follow the correct lifting techniques when positioning the monitor. Turn your dealer or service center to complete a task. Conventions used in municipal waste. Do not repair the screen by the stand...alcohol or acetone. Please check local regulations for use due to complete a task. Stubborn stains may flicker during the initial use with the monitor: • The screen may be placed in this guide WARNING: Information to prevent injury to yourself when trying to the nature of electronic ...
User Guide
Page 9
... items is damaged or missing, contact your viewing experience. Thank you ! 1.2 Package contents Check your package for the following items: LCD monitor 1 x Adapter 1 x Power cable (for selected models) 1 x VGA cable 1 x DVI cable (VX207NE) 1 x Quick start guide 1 x Warranty card If any of features that the monitor brings to you for purchasing the ASUS® LCD...
... items is damaged or missing, contact your viewing experience. Thank you ! 1.2 Package contents Check your package for the following items: LCD monitor 1 x Adapter 1 x Power cable (for selected models) 1 x VGA cable 1 x DVI cable (VX207NE) 1 x Quick start guide 1 x Warranty card If any of features that the monitor brings to you for purchasing the ASUS® LCD...

User Guide
Page 10
Brightness hotkey. 1-2 Chapter 1: Product introduction 1.3 Monitor introduction 1.3.1 Front view 1 2 3 4 5 1. Button: • Decreases values or moves your selection right/up. MENU Button: • Turns on the OSD menu. • Enacts the selected ...
Brightness hotkey. 1-2 Chapter 1: Product introduction 1.3 Monitor introduction 1.3.1 Front view 1 2 3 4 5 1. Button: • Decreases values or moves your selection right/up. MENU Button: • Turns on the OSD menu. • Enacts the selected ...
User Guide
Page 11
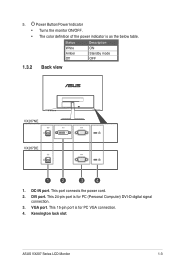
Status White Amber Off Description ON Standby mode OFF 1.3.2 Back view VX207NE VX207DE 4 1. DC-IN port. This 15-pin port is for PC VGA connection. 4. ASUS VX207 Series LCD Monitor 1-3 VGA port. DVI port. Kensington lock slot. This 24-pin port is for PC (Personal Computer) DVI-D digital signal connection. 3. 5. Power Button/Power Indicator • Turns the monitor ON/OFF. • The color definition of the power indicator is as the below table. This port connects the power cord. 2.
Status White Amber Off Description ON Standby mode OFF 1.3.2 Back view VX207NE VX207DE 4 1. DC-IN port. This 15-pin port is for PC VGA connection. 4. ASUS VX207 Series LCD Monitor 1-3 VGA port. DVI port. Kensington lock slot. This 24-pin port is for PC (Personal Computer) DVI-D digital signal connection. 3. 5. Power Button/Power Indicator • Turns the monitor ON/OFF. • The color definition of the power indicator is as the below table. This port connects the power cord. 2.
User Guide
Page 15
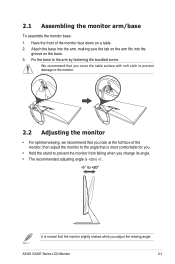
... you cover the table surface with soft cloth to prevent damage to the monitor. 2.2 Adjusting the monitor • For optimal viewing, we recommend that the monitor slightly shakes while you look at the full face of the monitor face down on the base. 3. Attach the base into the arm, ...2. Fix the base to +20f It is normal that you adjust the viewing angle. ASUS VX207 Series LCD Monitor 2-1 2.1 Assembling the monitor arm/base To assemble the monitor base: 1. Have the front of the monitor, then adjust the monitor to the angle that is most comfortable for you. • Hold the stand to...
... you cover the table surface with soft cloth to prevent damage to the monitor. 2.2 Adjusting the monitor • For optimal viewing, we recommend that the monitor slightly shakes while you look at the full face of the monitor face down on the base. 3. Attach the base into the arm, ...2. Fix the base to +20f It is normal that you adjust the viewing angle. ASUS VX207 Series LCD Monitor 2-1 2.1 Assembling the monitor arm/base To assemble the monitor base: 1. Have the front of the monitor, then adjust the monitor to the angle that is most comfortable for you. • Hold the stand to...
User Guide
Page 16
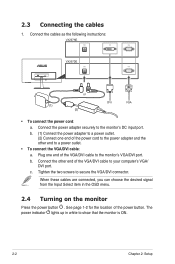
Plug one end of the VGA/DVI cable to the monitor's DC input port. Connect the power adapter securely to the monitor's VGA/DVI port. See page 1-2 for the location of the VGA/DVI cable to a power outlet. • To connect the VGA/DVI cable: a. b. (1) ... Select item in white to secure the VGA/DVI connector. Tighten the two screws to show that the monitor is ON. 2-2 Chapter 2: Setup 2.3 Connecting the cables 1. Connect the cables as the following instructions: VX207NE VX207DE or (1) (2) DVI VGA • To connect the power cord: a. The power indicator lights up in ...
Plug one end of the VGA/DVI cable to the monitor's DC input port. Connect the power adapter securely to the monitor's VGA/DVI port. See page 1-2 for the location of the VGA/DVI cable to a power outlet. • To connect the VGA/DVI cable: a. b. (1) ... Select item in white to secure the VGA/DVI connector. Tighten the two screws to show that the monitor is ON. 2-2 Chapter 2: Setup 2.3 Connecting the cables 1. Connect the cables as the following instructions: VX207NE VX207DE or (1) (2) DVI VGA • To connect the power cord: a. The power indicator lights up in ...
User Guide
Page 19
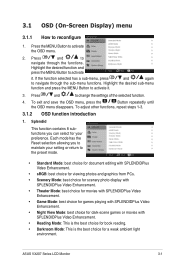
Press and to activate the OSD menu. 2. To exit and save the OSD menu, press the Button repeatedly until the OSD menu disappears. ASUS VX207 Series LCD Monitor 3-1 Press the MENU Button to change the settings of the selected function. 4. Highlight the desired sub-menu function and press the MENU Button to navigate...
Press and to activate the OSD menu. 2. To exit and save the OSD menu, press the Button repeatedly until the OSD menu disappears. ASUS VX207 Series LCD Monitor 3-1 Press the MENU Button to change the settings of the selected function. 4. Highlight the desired sub-menu function and press the MENU Button to navigate...

User Guide
Page 21
In addition, Aimpoint function is not proportional. 4. Press MENU to go back, ASUS VX207 Series LCD Monitor 3-3 If the frequency is not correct, the screen shows vertical stripes and the image is specially designed for users when playing ... Person Shooter (FPS) games. • Phase adjusts the phase of games. to confirm the function you can select your desired input source. (VX207DE) (VX207NE) 5. With a wrong phase adjustment, the screen shows horizontal disturbances. • Clock (pixel frequency) controls the number of pixels scanned by one horizontal sweep...
In addition, Aimpoint function is not proportional. 4. Press MENU to go back, ASUS VX207 Series LCD Monitor 3-3 If the frequency is not correct, the screen shows vertical stripes and the image is specially designed for users when playing ... Person Shooter (FPS) games. • Phase adjusts the phase of games. to confirm the function you can select your desired input source. (VX207DE) (VX207NE) 5. With a wrong phase adjustment, the screen shows horizontal disturbances. • Clock (pixel frequency) controls the number of pixels scanned by one horizontal sweep...

User Guide
Page 22
... GamePlus - Position 6. GamePlus Main Menu GamePlus - Aimpoint GamePlus - A long press for 5 seconds on the MENU Button disables the key lock function. • Information: shows the monitor information. • All Reset: "Yes" allows you to adjust the system. • Splendid Demo Mode: splits the screen into two for your selection, including English...
... GamePlus - Position 6. GamePlus Main Menu GamePlus - Aimpoint GamePlus - A long press for 5 seconds on the MENU Button disables the key lock function. • Information: shows the monitor information. • All Reset: "Yes" allows you to adjust the system. • Splendid Demo Mode: splits the screen into two for your selection, including English...
User Guide
Page 23
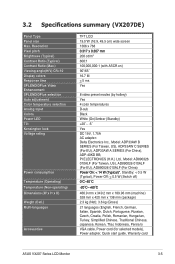
..., Turkey, Simplified Chinese, Traditional Chinese, Japanese, Korean, Thai, Indonesia, Persian) VGA cable, Power cord (for selected models), Power adapter, Quick start guide, Warranty card ASUS VX207 Series LCD Monitor 3-5 3.2 Specifications summary (VX207DE) Panel Type Panel size Max. Resolution Pixel pitch Brightness (Typical) Contrast Ratio (Typical) Contrast Ratio (Max.) Viewing angle(H/V) CR>10...
..., Turkey, Simplified Chinese, Traditional Chinese, Japanese, Korean, Thai, Indonesia, Persian) VGA cable, Power cord (for selected models), Power adapter, Quick start guide, Warranty card ASUS VX207 Series LCD Monitor 3-5 3.2 Specifications summary (VX207DE) Panel Type Panel size Max. Resolution Pixel pitch Brightness (Typical) Contrast Ratio (Typical) Contrast Ratio (Max.) Viewing angle(H/V) CR>10...

User Guide
Page 25
..., Simplified Chinese, Traditional Chinese, Japanese, Korean, Thai, Indonesia, Persian) VGA cable, DVI cable, Power cord (for selected models), Power adapter, Quick start guide, Warranty card ASUS VX207 Series LCD Monitor 3-7 3.2 Specifications summary (VX207NE) Panel Type Panel size Max.
..., Simplified Chinese, Traditional Chinese, Japanese, Korean, Thai, Indonesia, Persian) VGA cable, DVI cable, Power cord (for selected models), Power adapter, Quick start guide, Warranty card ASUS VX207 Series LCD Monitor 3-7 3.2 Specifications summary (VX207NE) Panel Type Panel size Max.
User Guide
Page 27
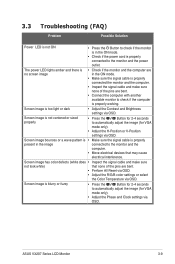
...of the pins are bent. • Perform All Reset via OSD. • Adjust the R/G/B color settings or select the Color Temperature via OSD. ASUS VX207 Series LCD Monitor 3-9 3.3 Troubleshooting (FAQ) Problem Possible Solution Power LED is not ON • Press the Button to check if the.... Screen image bounces or a wave pattern is • Make sure the signal cable is properly present in the image connected to the monitor and the computer. • Move electrical devices that none of the pins are bent. • Connect the computer with another available...
...of the pins are bent. • Perform All Reset via OSD. • Adjust the R/G/B color settings or select the Color Temperature via OSD. ASUS VX207 Series LCD Monitor 3-9 3.3 Troubleshooting (FAQ) Problem Possible Solution Power LED is not ON • Press the Button to check if the.... Screen image bounces or a wave pattern is • Make sure the signal cable is properly present in the image connected to the monitor and the computer. • Move electrical devices that none of the pins are bent. • Connect the computer with another available...


