User Manual
Page 3
... view 1-2 1.3.2 Back view 1-7 Chapter 2: Setup 2.1 Assembling the monitor base 2-1 2.2 Adjusting the monitor 2-1 2.3 Detaching the arm/base (for VESA wall mount 2-2 2.4 Connecting the cables 2-3 2.5 Turning on the monitor 2-3 Chapter 3: General instruction 3.1 OSD (On-Screen Display) menu 3-1 3.1.1 How to reconfigure 3-1 3.1.2 OSD Function Introduction 3-1 3.2 ASUS EzLink Display (VW223B only 3-4 3.2.1 System requirements 3-4 3.2.2 Installing ASUS EzLink Display 3-5 3.2.3 Using ASUS EzLink Display 3-6 3.3 Specifications summary 3-7 3.4 Troubleshooting (FAQ 3-9 3.5 Supported...
... view 1-2 1.3.2 Back view 1-7 Chapter 2: Setup 2.1 Assembling the monitor base 2-1 2.2 Adjusting the monitor 2-1 2.3 Detaching the arm/base (for VESA wall mount 2-2 2.4 Connecting the cables 2-3 2.5 Turning on the monitor 2-3 Chapter 3: General instruction 3.1 OSD (On-Screen Display) menu 3-1 3.1.1 How to reconfigure 3-1 3.1.2 OSD Function Introduction 3-1 3.2 ASUS EzLink Display (VW223B only 3-4 3.2.1 System requirements 3-4 3.2.2 Installing ASUS EzLink Display 3-5 3.2.3 Using ASUS EzLink Display 3-6 3.3 Specifications summary 3-7 3.4 Troubleshooting (FAQ 3-9 3.5 Supported...

User Manual
Page 4
...digital apparatus set out in accordance with Canadian ICES-003. This class B digital apparatus complies with manufacturer's instructions, may not cause harmful interference, and • This device must accept any interference received including interference that interference will not occur in a residential installation. Changes ... Part 15 of the FCC Rules. This equipment generates, uses and can be determined by turning the equipment off and on, the user is encouraged to try to correct the interference by the party responsible for connection of the monitor to the graphics card is...
...digital apparatus set out in accordance with Canadian ICES-003. This class B digital apparatus complies with manufacturer's instructions, may not cause harmful interference, and • This device must accept any interference received including interference that interference will not occur in a residential installation. Changes ... Part 15 of the FCC Rules. This equipment generates, uses and can be determined by turning the equipment off and on, the user is encouraged to try to correct the interference by the party responsible for connection of the monitor to the graphics card is...
User Manual
Page 6
... type of power supply to fix it by yourself. vi Overloading can result in serious physical injury. • If the power supply is provided. • The monitor should not be used for a long period of electronic products. If you encounter technical problems with the monitor, contact a qualified service technician or your retailer. This symbol of power source indicated on the monitor cabinet. •...
... type of power supply to fix it by yourself. vi Overloading can result in serious physical injury. • If the power supply is provided. • The monitor should not be used for a long period of electronic products. If you encounter technical problems with the monitor, contact a qualified service technician or your retailer. This symbol of power source indicated on the monitor cabinet. •...

User Manual
Page 7
... it may find slightly uneven brightness on the screen depending on again to fix it. The screen will recover slowly or you can turn it is displayed for hours, an afterimage of the monitor. Do not repair the screen by the stand or the cord. • Cleaning. Care & Cleaning • Before you lift or reposition your monitor off the Power Switch for use with mild cleaner. •...
... it may find slightly uneven brightness on the screen depending on again to fix it. The screen will recover slowly or you can turn it is displayed for hours, an afterimage of the monitor. Do not repair the screen by the stand or the cord. • Cleaning. Care & Cleaning • Before you lift or reposition your monitor off the Power Switch for use with mild cleaner. •...

User Manual
Page 9
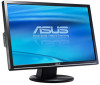
The latest widescreen LCD monitor from ASUS provides a crisper, broader, and brighter display, plus a host of features that the VW223 Series brings you for the following items: • LCD monitor • Monitor base • Quick start guide • Power cord x1 • VGA cable x1 • Support CD (For VW223B only) • USB cable x1 (For VW223B only) • DVI cable x1 (For VW223N / VW223T only) • Audio cable x1 (For VW223S / VW223T only) If any...
The latest widescreen LCD monitor from ASUS provides a crisper, broader, and brighter display, plus a host of features that the VW223 Series brings you for the following items: • LCD monitor • Monitor base • Quick start guide • Power cord x1 • VGA cable x1 • Support CD (For VW223B only) • USB cable x1 (For VW223B only) • DVI cable x1 (For VW223N / VW223T only) • Audio cable x1 (For VW223S / VW223T only) If any...
User Manual
Page 10
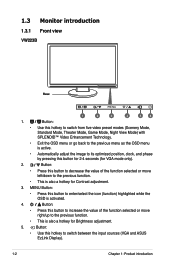
... optimized position, clock, and phase by pressing this hotkey to switch from five video preset modes (Scenery Mode, Standard Mode, Theater Mode, Game Mode, Night View Mode) with SPLENDID™ Video Enhancement Technology. • Exit the OSD menu or go back to the previous menu as the OSD menu is active. • Automatically adjust the image to the previous function. • This is activated. 4. 1.3 Monitor introduction 1.3.1 Front view VW223B Base 1 2 3 4 5 6 1. Button: • Press this button...
... optimized position, clock, and phase by pressing this hotkey to switch from five video preset modes (Scenery Mode, Standard Mode, Theater Mode, Game Mode, Night View Mode) with SPLENDID™ Video Enhancement Technology. • Exit the OSD menu or go back to the previous menu as the OSD menu is active. • Automatically adjust the image to the previous function. • This is activated. 4. 1.3 Monitor introduction 1.3.1 Front view VW223B Base 1 2 3 4 5 6 1. Button: • Press this button...

User Manual
Page 11
.... ASUS VW223 Series LCD Monitor 1-3 6. Button: • Automatically adjust the image to its optimized position, clock, and phase by pressing this button to decrease the value of the power indicator is as the OSD menu is activated. 4. Button: • Press this button for Volume adjustment. 3. MENU Button: • Press this hotkey to switch from five video preset modes (Scenery Mode, Standard Mode, Theater Mode, Game Mode, Night View Mode) with SPLENDID™ Video Enhancement Technology. • Exit the OSD menu or...
.... ASUS VW223 Series LCD Monitor 1-3 6. Button: • Automatically adjust the image to its optimized position, clock, and phase by pressing this button to decrease the value of the power indicator is as the OSD menu is activated. 4. Button: • Press this button for Volume adjustment. 3. MENU Button: • Press this hotkey to switch from five video preset modes (Scenery Mode, Standard Mode, Theater Mode, Game Mode, Night View Mode) with SPLENDID™ Video Enhancement Technology. • Exit the OSD menu or...

User Manual
Page 12
...; Use this hotkey to switch from five video preset modes (Scenery Mode, Standard Mode, Theater Mode, Game Mode, Night View Mode) with SPLENDID™ Video Enhancement Technology. • Exit the OSD menu or go back to turn the monitor on/off • The color definition of the power indicator is as the OSD menu is also a hotkey for 2-4 seconds. 6. Button: • Press this button to the previous menu as VW223B. 1-4 Chapter 1: Product introduction Power Button / Power...
...; Use this hotkey to switch from five video preset modes (Scenery Mode, Standard Mode, Theater Mode, Game Mode, Night View Mode) with SPLENDID™ Video Enhancement Technology. • Exit the OSD menu or go back to turn the monitor on/off • The color definition of the power indicator is as the OSD menu is also a hotkey for 2-4 seconds. 6. Button: • Press this button to the previous menu as VW223B. 1-4 Chapter 1: Product introduction Power Button / Power...

User Manual
Page 13
... Brightness adjustment. 5. ASUS VW223 Series LCD Monitor 1-5 Button: • Press this button to increase the value of the function selected or move right/up to turn the monitor on/off • The color definition of the power indicator is as the OSD menu is activated. 4. Button: • Press this button to decrease the value of the function selected or move left/down to switch between the input sources (VGA and DVI). 6. Power Button / Power...
... Brightness adjustment. 5. ASUS VW223 Series LCD Monitor 1-5 Button: • Press this button to increase the value of the function selected or move right/up to turn the monitor on/off • The color definition of the power indicator is as the OSD menu is activated. 4. Button: • Press this button to decrease the value of the function selected or move left/down to switch between the input sources (VGA and DVI). 6. Power Button / Power...

User Manual
Page 14
... while the OSD is also a hotkey for Brightness adjustment. 5. Power Button / Power Indicator: • Press this hotkey to switch from five video preset modes (Scenery Mode, Standard Mode, Theater Mode, Game Mode, Night View Mode) with SPLENDID™ Video Enhancement Technology. • Exit the OSD menu or go back to the previous menu as VW223B. 1-6 Chapter 1: Product introduction Button: • Press this button for 2-4 seconds (for Volume adjustment. 3. Button: • Use this hotkey to its optimized position, clock...
... while the OSD is also a hotkey for Brightness adjustment. 5. Power Button / Power Indicator: • Press this hotkey to switch from five video preset modes (Scenery Mode, Standard Mode, Theater Mode, Game Mode, Night View Mode) with SPLENDID™ Video Enhancement Technology. • Exit the OSD menu or go back to the previous menu as VW223B. 1-6 Chapter 1: Product introduction Button: • Press this button for 2-4 seconds (for Volume adjustment. 3. Button: • Use this hotkey to its optimized position, clock...
User Manual
Page 15
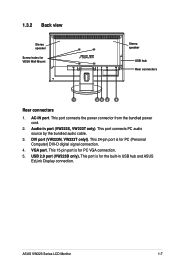
...PC VGA connection. 5. Audio-in USB hub and ASUS EzLink Display connection. This 24-pin port is for PC (Personal Computer) DVI-D digital signal connection. 4. This port connects the power connector from the bundled power cord. 2. ASUS VW223 Series LCD Monitor 1-7 This port is for VESA Wall Mount Stereo speaker USB hub Rear connectors 1 23 4 5 Rear connectors 1. This port connects PC audio source by the bundled audio cable. 3. 1.3.2 Back view Stereo speaker Screw holes for the built-in port (VW223S, VW223T only). DVI port (VW223N, VW223T onlyl). USB 2.0 port (VW223B only...
...PC VGA connection. 5. Audio-in USB hub and ASUS EzLink Display connection. This 24-pin port is for PC (Personal Computer) DVI-D digital signal connection. 4. This port connects the power connector from the bundled power cord. 2. ASUS VW223 Series LCD Monitor 1-7 This port is for VESA Wall Mount Stereo speaker USB hub Rear connectors 1 23 4 5 Rear connectors 1. This port connects PC audio source by the bundled audio cable. 3. 1.3.2 Back view Stereo speaker Screw holes for the built-in port (VW223S, VW223T only). DVI port (VW223N, VW223T onlyl). USB 2.0 port (VW223B only...
User Manual
Page 18
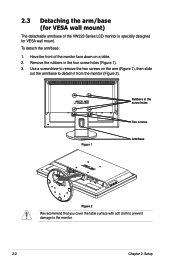
... damage to detach it from the monitor (Figure 2). Have the front of the VW223 Series LCD monitor is specially designed for VESA wall mount. To detach the arm/base: 1. 2.3 Detaching the arm/base (for VESA wall mount) The detachable arm/base of the monitor face down on the arm (Figure 1), then slide out the arm/base to the monitor. 2-2 Chapter 2: Setup Use a screwdriver to remove the two screws on a table. 2.
... damage to detach it from the monitor (Figure 2). Have the front of the VW223 Series LCD monitor is specially designed for VESA wall mount. To detach the arm/base: 1. 2.3 Detaching the arm/base (for VESA wall mount) The detachable arm/base of the monitor face down on the arm (Figure 1), then slide out the arm/base to the monitor. 2-2 Chapter 2: Setup Use a screwdriver to remove the two screws on a table. 2.
User Manual
Page 19
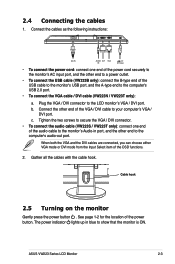
... the VGA and the DVI cables are connected, you can choose either VGA mode or DVI mode from the Input Select item of the power button. ASUS VW223 Series LCD Monitor 2-3 Connect the other end of the USB cable to the monitor's USB port, and the A-type end to the computer's audio-out port. Gather all the cables with the cable hook. c. The power indicator lights up in port, and the other end to a power outlet. • To connect the USB cable (VW223B only): connect...
... the VGA and the DVI cables are connected, you can choose either VGA mode or DVI mode from the Input Select item of the power button. ASUS VW223 Series LCD Monitor 2-3 Connect the other end of the USB cable to the monitor's USB port, and the A-type end to the computer's audio-out port. Gather all the cables with the cable hook. c. The power indicator lights up in port, and the other end to a power outlet. • To connect the USB cable (VW223B only): connect...

User Manual
Page 21
... maintain your preference. 3.1 OSD (On-Screen Display) menu 3.1.1 How to change the settings of the selected function. 4. Press and to activate the OSD menu. 2. Highlight and activate the desired sub-menu function by pressing the MENU button. ASUS VW223 Series LCD Monitor 3-1 Press the MENU button to navigate through the sub-menu functions. Highlight and activate the desired function by pressing the MENU button. 3. Each mode has the Reset selection, allowing you...
... maintain your preference. 3.1 OSD (On-Screen Display) menu 3.1.1 How to change the settings of the selected function. 4. Press and to activate the OSD menu. 2. Highlight and activate the desired sub-menu function by pressing the MENU button. ASUS VW223 Series LCD Monitor 3-1 Press the MENU button to navigate through the sub-menu functions. Highlight and activate the desired function by pressing the MENU button. 3. Each mode has the Reset selection, allowing you...

User Manual
Page 22
... phase adjustment, the screen shows horizontal disturbances. • Clock (pixel frequency) controls the number of the pixel clock signal. If the frequency is not correct, the screen shows vertical stripes and the image is from 0 to 100. In the User mode, colors of the image. Color Select the image color you like from 0 to 100. • Phase adjusts the phase of pixels scanned by adjusting (Phase) and (Clock) separately. Image You can adjust brightness, contrast, sharpness, saturation, position (VGA...
... phase adjustment, the screen shows horizontal disturbances. • Clock (pixel frequency) controls the number of the pixel clock signal. If the frequency is not correct, the screen shows vertical stripes and the image is from 0 to 100. In the User mode, colors of the image. Color Select the image color you like from 0 to 100. • Phase adjusts the phase of pixels scanned by adjusting (Phase) and (Clock) separately. Image You can adjust brightness, contrast, sharpness, saturation, position (VGA...
User Manual
Page 23
...; Information: shows the monitor information. • Reset: "Yes" allows you to restore the default setting. Input Select In this function (for those models with speakers.). • OSD Setup: *Adjusts the horizontal postition (H-Position)/ the vertical position (V-Position) of the OSD from 0 to 100. *Adjusts the OSD timeout from 0 to 120. *Enables or disables the DDC/CI function. • Language: there are ten languages for some models), or EzLink (VW223B only) input source. 5. ASUS VW223 Series LCD Monitor 3-3 is from...
...; Information: shows the monitor information. • Reset: "Yes" allows you to restore the default setting. Input Select In this function (for those models with speakers.). • OSD Setup: *Adjusts the horizontal postition (H-Position)/ the vertical position (V-Position) of the OSD from 0 to 100. *Adjusts the OSD timeout from 0 to 120. *Enables or disables the DDC/CI function. • Language: there are ten languages for some models), or EzLink (VW223B only) input source. 5. ASUS VW223 Series LCD Monitor 3-3 is from...
User Manual
Page 24
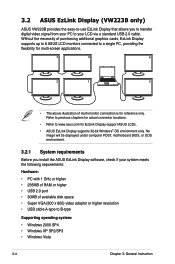
... RAM or higher • USB 2.0 port • 30MB of multi-monitor connection is for EzLink Display-support ASUS LCDs. • ASUS EzLink Display supports 32-bit Windows® OS environment only. 3.2 ASUS EzLink Display (VW223B only) ASUS VW223B provides the easy-to-use EzLink Display that allows you install the ASUS EzLink Display software, check if your LCD via a standard USB 2.0 cable. Refer to previous chapters for actual connector locations. • Refer to www.asus.com for reference only.
... RAM or higher • USB 2.0 port • 30MB of multi-monitor connection is for EzLink Display-support ASUS LCDs. • ASUS EzLink Display supports 32-bit Windows® OS environment only. 3.2 ASUS EzLink Display (VW223B only) ASUS VW223B provides the easy-to-use EzLink Display that allows you install the ASUS EzLink Display software, check if your LCD via a standard USB 2.0 cable. Refer to previous chapters for actual connector locations. • Refer to www.asus.com for reference only.
User Manual
Page 26
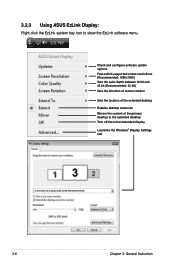
ASUS EzLink Display (USB_XXXX-XXXXXXXXXXXX) 3-6 Chapter 3: General Instruction Check and configure software update options Fast-switch supported screen resolutions (Recommended: 1680x1050) Sets the color depth between 16 bit and 32 bit (Recommended: 32 bit) Sets the direction of screen rotation Sets the location of the extended desktop Enables desktop extension Mirrors the content of the primary desktop to show the EzLink software menu. 3.2.3 Using ASUS EzLink Display: Right-click the EzLink...
ASUS EzLink Display (USB_XXXX-XXXXXXXXXXXX) 3-6 Chapter 3: General Instruction Check and configure software update options Fast-switch supported screen resolutions (Recommended: 1680x1050) Sets the color depth between 16 bit and 32 bit (Recommended: 32 bit) Sets the direction of screen rotation Sets the location of the extended desktop Enables desktop extension Mirrors the content of the primary desktop to show the EzLink software menu. 3.2.3 Using ASUS EzLink Display: Right-click the EzLink...
User Manual
Page 27
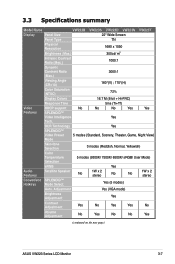
...; Video Preset 5 modes (Standard, Scenery, Theater, Game, Night View) Mode Skin-tone Selection 3 modes (Reddish, Normal, Yellowish) Color Temperature 5 modes (9300K/ 7500K/ 6500K/ sRGB/ User Mode) Selection sRGB Yes Audio Features Satellite Speaker No 1W x 2 stereo No No 1W x 2 stereo Convenient SPLENDID™ Hotkeys Mode Select. 3.3 Specifications summary Model Name VW223B VW223S VW223D VW223N VW223T Display Panel Size 22" Wide Screen Panel Type TN Physical Resolution Brightness (Max.) 1680 x 1050 300cd/ m2 Intrisinc Contrast...
...; Video Preset 5 modes (Standard, Scenery, Theater, Game, Night View) Mode Skin-tone Selection 3 modes (Reddish, Normal, Yellowish) Color Temperature 5 modes (9300K/ 7500K/ 6500K/ sRGB/ User Mode) Selection sRGB Yes Audio Features Satellite Speaker No 1W x 2 stereo No No 1W x 2 stereo Convenient SPLENDID™ Hotkeys Mode Select. 3.3 Specifications summary Model Name VW223B VW223S VW223D VW223N VW223T Display Panel Size 22" Wide Screen Panel Type TN Physical Resolution Brightness (Max.) 1680 x 1050 300cd/ m2 Intrisinc Contrast...
User Manual
Page 29
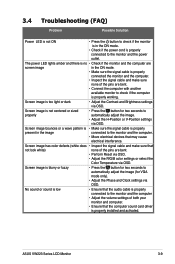
... interference. ASUS VW223 Series LCD Monitor 3-9 The power LED lights amber and there is no • Check if the monitor and the computer are screen image in the ON mode. • Make sure the signal cable is properly connected the monitor and the computer. • Inspect the signal cable and make sure that the computer sound card driver is properly installed and activated. Screen image is not centered or sized • Press the button for VGA mode only). • Adjust the...
... interference. ASUS VW223 Series LCD Monitor 3-9 The power LED lights amber and there is no • Check if the monitor and the computer are screen image in the ON mode. • Make sure the signal cable is properly connected the monitor and the computer. • Inspect the signal cable and make sure that the computer sound card driver is properly installed and activated. Screen image is not centered or sized • Press the button for VGA mode only). • Adjust the...


