Asus MM17DE Support and Manuals
Get Help and Manuals for this Asus item
Popular Asus MM17DE Manual Pages
User Manual - Page 1
... NOTES 3 TAKE CARE OF THE MONITOR 3
BEFORE YOU OPERATE THE MONITOR 4 FEATURES 4 PACKING LIST 4 INSTALLATION INSTRUCTIONS 5 ADJUSTING THE VIEWING ANGLE 7
OPERATING INSTRUCTIONS 8 GENERAL INSTRUCTIONS 8 HOW TO RECONFIGURE 9 OSD MENU TABLE 10 PLUG AND PLAY 12
TROUBLESHOOTING (FAQ 13 ERROR MESSAGE & POSSIBLE SOLUTION 14
APPENDIX 15 SPECIFICATIONS 15 PRESET TIMING TABLE 16 CONNECTOR...
User Manual - Page 2
... present inside the monitor. Do not open the cabinet. The manufacturer is connected. 4. Increase the separation between the equipment and receiver. 3.
Refer servicing to rain or moisture. FCC Class B Radio Frequency Interference Statement WARNING: (FOR FCC CERTIFIED MODELS) NOTE: This equipment has been tested and found to comply with the instructions, may cause harmful...
User Manual - Page 3
... an electrician install the correct outlet, or use an adapter to service the monitor by the manufacturer or sold with the monitor. Do not place the monitor near water, e.g.
Never spill liquids on a wall or shelf, use a mounting kit approved by the manufacturer and follow the kit instructions. l Do not place the monitor on the monitor cabinet.
l Do...
User Manual - Page 4

... LCD screen has effective pixels of your dealer or service center to make sure the flicker disappears.
• You may be removed with a cloth lightly dampened with a soft cloth. The screen may find slightly uneven brightness on the screen depending on again to replace parts. TAKE CARE OF THE MONITOR
• Do not install the monitor in...
User Manual - Page 5

... Start Guide 3. LCD Monitor 2. Audio Cable (for MM17T only)
PACKAGE LIST
The product package should include the following items: 1. VGA Cable 6. Power Cord 5. BEFORE YOU OPERATE THE MONITOR
FEATURES
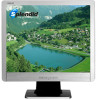
• 43.2cm(17") TFT Color LCD Monitor. • Recommended Resolutions: SXGA 1280 X 1024 @60Hz. • 8ms (Tr+Tf) Quick Response Time. • SPLENDID™ Video Enhancement Technology...
User Manual - Page 6
... H05VV-F 3G 0.75mm2 or H05VVH2-F2 3G 0.75mm2) shall be used with your LCD monitor's power input socket, and then plug the
other end into your LCD monitor. A certified power supply cord not lighter than ordinary polyvinyl chloride flexible cord according to be considered. INSTALLATION INSTRUCTIONS
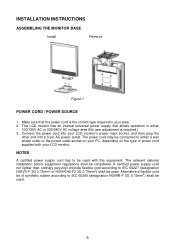
ASSEMBLING THE MONITOR BASE
Install
Remove
Figure 1
POWER CORD / POWER SOURCE 1.
User Manual - Page 7
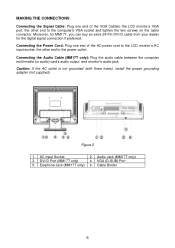
...LCD monitor's AC input socket, the other end to the power outlet. Figure 2
1. Audio Jack (MM17T only) 4. VGA (D-SUB) Port 6.
Caution: If the AC outlet is not grounded (with three holes), install... the audio cable between the computer multi-media (or audio) card's audio output and monitor's audio jack. Cable Binder
6 DVI-D Port (MM17T only) 5.
MAKING THE CONNECTIONS
Connecting the ...
User Manual - Page 8
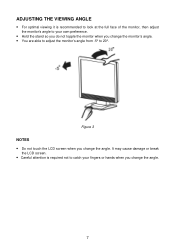
Figure 3 NOTES • Do not touch the LCD screen when you change the monitor's angle. • You are able to adjust the monitor's angle from -5° to 20°. ADJUSTING THE ...topple the monitor when you change the angle. It may cause damage or break
the LCD screen. • Careful attention is recommended to look at the full face of the monitor, then adjust the monitor's angle to...
User Manual - Page 9
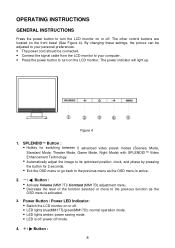
...Mode, Night Mode) with SPLENDID™ Video Enhancement Technology. • Automatically ...settings, the picture can be adjusted to your personal preferences. • The power cord should be connected. • Connect the signal cable from the LCD monitor to your computer. • Press the power button to turn the LCD monitor on the LCD monitor. OPERATING INSTRUCTIONS
GENERAL INSTRUCTIONS...
User Manual - Page 10

... exit and save, select the exit function. • Activate Brightness adjustment menu. • Increase the level of the selected function. 4. Press or to change the settings of the function selected or move to the next function as the OSD menu is highlighted,
press the MENU-button to navigate through the functions...
User Manual - Page 12
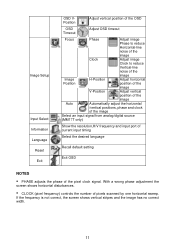
...the screen shows vertical stripes and the image has no correct width.
11 Image Setup
Input Select Information Language
Reset Exit
OSD VPosition
Adjust vertical position of the OSD
...from analog/digital source
(MM17T only)
Show the resolution,H/V frequency and input port of current input timing
Select the desired language
Recall default setting
Exit OSD
NOTES
• PHASE adjusts the phase...
User Manual - Page 13
..., depending on type connector body, rated 10A, 250V, having standard CEE-22 female configuration. This monitor meets the Green monitor standards as set consisting of DDC used, communicate additional information about its display capabilities. It allows the monitor to power outlet of personal computer: Please use VDE 0602, 0625, 0821 approval power cord in...
User Manual - Page 14
...; Button for 2
seconds to check if the computer
is properly
connected the monitor and the power
outlet. l Press the SPLENDID™ Button for 2
seconds to check if the
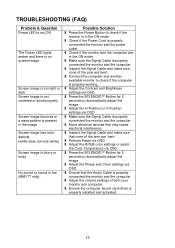
monitor is low (MM17T only). TROUBLESHOOTING (FAQ)
Problem & Question Power LED is not ON
The Power LED lights amber and there is no screen image
Screen image...
User Manual - Page 15
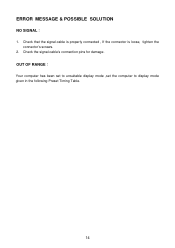
Check that the signal-cable is properly connected , If the connector is loose, tighten the
connector's screws. 2. Check the signal-cable's connection pins for damage. OUT OF RANGE︰ Your computer has been set to unsuitable display mode ,set the computer to display mode given in the following Preset Timing Table.
14 ERROR MESSAGE & POSSIBLE SOLUTION
NO SIGNAL︰ 1.
User Manual - Page 16
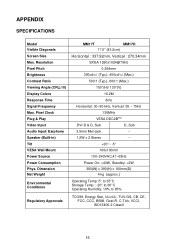
...MM17D
17.0" (43.2cm)
Horizontal : 337.92mm, Vertical : 270.34mm
SXGA 1280x1024@75Hz
0.264mm 300cd/㎡ (Typ.), 400cd/㎡ (Max.)
500:1 (Typ.), 600:1 (Max.) 150°(H)/ 130°(V)
16.2M
8ms...Mount Power Source Power Consumption Phys. APPENDIX
SPECIFICATIONS
Model Visible Diagonals Screen Size Max. Resolution Pixel Pitch Brightness Contrast Ratio Viewing Angle (CR≧10)...
Asus MM17DE Reviews
We have not received any reviews for Asus yet.