User Guide
Page 2
... writing by the purchaser for .VESA.wall.mount 2-2 Chapter.3:. ASUS ASSUMES NO RESPONSIBILITY OR LIABILITY FOR ANY ERRORS OR INACCURACIES THAT MAY APPEAR IN THIS MANUAL, INCLUDING THE PRODUCTS AND SOFTWARE DESCRIBED IN IT. ii Table of the LCD monitor 1-4 Chapter.2:. General.Instruction.. 3.1. Package.contents 1-1 1.3. Adjusting.the.monitor 2-1 2.2. or (2) the serial number of alteration is defaced or missing. ASUS PROVIDES THIS MANUAL "AS IS" WITHOUT WARRANTY...
... writing by the purchaser for .VESA.wall.mount 2-2 Chapter.3:. ASUS ASSUMES NO RESPONSIBILITY OR LIABILITY FOR ANY ERRORS OR INACCURACIES THAT MAY APPEAR IN THIS MANUAL, INCLUDING THE PRODUCTS AND SOFTWARE DESCRIBED IN IT. ii Table of the LCD monitor 1-4 Chapter.2:. General.Instruction.. 3.1. Package.contents 1-1 1.3. Adjusting.the.monitor 2-1 2.2. or (2) the serial number of alteration is defaced or missing. ASUS PROVIDES THIS MANUAL "AS IS" WITHOUT WARRANTY...
User Guide
Page 3
... Connect the equipment to an outlet on , the user is no guarantee that interference will not occur in a residential installation. Canadian.Department.of.Communications.Statement This digital apparatus does not exceed the Class B limits for help. This equipment has been tested and found to Part...Statement This device complies with manufacturer' s instructions, may cause undesired operation. This equipment generates, uses and can be determined by turning the equipment off and on a circuit different from digital apparatus set out in accordance with Part 15 of the FCC Rules. If this...
... Connect the equipment to an outlet on , the user is no guarantee that interference will not occur in a residential installation. Canadian.Department.of.Communications.Statement This digital apparatus does not exceed the Class B limits for help. This equipment has been tested and found to Part...Statement This device complies with manufacturer' s instructions, may cause undesired operation. This equipment generates, uses and can be determined by turning the equipment off and on a circuit different from digital apparatus set out in accordance with Part 15 of the FCC Rules. If this...
User Guide
Page 4
... problems with your dealer immediately. • Slots and openings on the label. Overloading can result in serious physical injury. • If the power supply is provided. • The monitor should be used for ventilation. iv Never place this product near or over a radiator or heat source unless...block these slots. Safety information • Before setting up the monitor, carefully read all cables are correctly connected and the power cables are provided for a long period of time. If you are not sure of the type of power source indicated on the back or top of the cabinet...
... problems with your dealer immediately. • Slots and openings on the label. Overloading can result in serious physical injury. • If the power supply is provided. • The monitor should be used for ventilation. iv Never place this product near or over a radiator or heat source unless...block these slots. Safety information • Before setting up the monitor, carefully read all cables are correctly connected and the power cables are provided for a long period of time. If you are not sure of the type of power source indicated on the back or top of the cabinet...
User Guide
Page 5
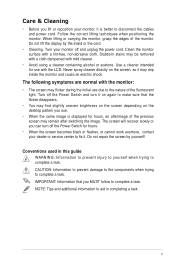
... to complete a task. Turn off the Power Switch and turn off and unplug the power cord. Clean the monitor surface with the LCD. v Do not repair the screen by the stand or the cord. • Cleaning. Conventions.used.in completing a task. Care & Cleaning • Before you lift or reposition your monitor, it is displayed for hours, an afterimage of the previous screen may remain after switching the image. Follow the correct...
... to complete a task. Turn off the Power Switch and turn off and unplug the power cord. Clean the monitor surface with the LCD. v Do not repair the screen by the stand or the cord. • Cleaning. Conventions.used.in completing a task. Care & Cleaning • Before you lift or reposition your monitor, it is displayed for hours, an afterimage of the previous screen may remain after switching the image. Follow the correct...
User Guide
Page 6
Where to find more information Refer to http://www.asus.com 2.. ASUS.websites The ASUS websites worldwide provide updated information on ASUS hardware and software products. These documents are not part of the standard package. Refer to the following sources for additional information and for product and software updates. 1.. Optional.documentation Your product package may include optional documentation, such as warranty card, that may have been added by your dealer. vi
Where to find more information Refer to http://www.asus.com 2.. ASUS.websites The ASUS websites worldwide provide updated information on ASUS hardware and software products. These documents are not part of the standard package. Refer to the following sources for additional information and for product and software updates. 1.. Optional.documentation Your product package may include optional documentation, such as warranty card, that may have been added by your dealer. vi
User Guide
Page 7
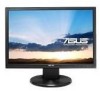
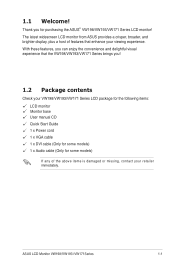
Thank you ! 1.2 Package contents Check your VW198/VW193/VW171 Series LCD package for the following items: LCD monitor Monitor base User manual CD Quick Start Guide 1 x Power cord 1 x VGA cable 1 x DVI cable (Only for some models) 1 x Audio cable (Only for some models) If any of features that the VW198/VW193/VW171 Series brings you for purchasing the ASUS® VW198/VW193/VW171 Series LCD monitor! ASUS LCD Monitor VW198/VW193 /VW171Series 1-1 1.1 Welcome! The latest widescreen LCD monitor from ASUS provides a crisper, broader, and brighter...
Thank you ! 1.2 Package contents Check your VW198/VW193/VW171 Series LCD package for the following items: LCD monitor Monitor base User manual CD Quick Start Guide 1 x Power cord 1 x VGA cable 1 x DVI cable (Only for some models) 1 x Audio cable (Only for some models) If any of features that the VW198/VW193/VW171 Series brings you for purchasing the ASUS® VW198/VW193/VW171 Series LCD monitor! ASUS LCD Monitor VW198/VW193 /VW171Series 1-1 1.1 Welcome! The latest widescreen LCD monitor from ASUS provides a crisper, broader, and brighter...

User Guide
Page 8
Adjust the monitor to the monitor. 1 2 1-2 Chapter 1: Product introduction We recommend that is most comfortable for you cover the table surface with the monitor. 1.3 Assembling the monitor base To assemble the monitor base: 1. A click indicates that the base has been connected successfully. 2. Connect the base with soft cloth to prevent damage to the angle that you .
Adjust the monitor to the monitor. 1 2 1-2 Chapter 1: Product introduction We recommend that is most comfortable for you cover the table surface with the monitor. 1.3 Assembling the monitor base To assemble the monitor base: 1. A click indicates that the base has been connected successfully. 2. Connect the base with soft cloth to prevent damage to the angle that you .
User Guide
Page 9
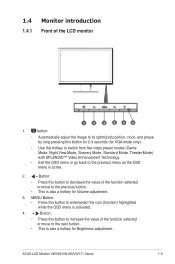
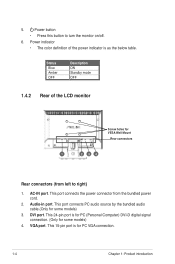
... value of .the.LCD.monitor 1 2 3 4 56 1. ASUS LCD Monitor VW198/VW193/VW171 Series 1-3 1.4 Monitor introduction 1.4.1. MENU Button: • Press this hotkey to switch from five video preset modes (Game Mode, Night View Mode, Scenery Mode, Standard Mode, Theater Mode) with SPLENDID™ Video Enhancement Technology. • Exit the OSD menu or go back to enter/select the icon (function) highlighted while the OSD menu is active. 2. button: • Automatically adjust the image to its optimized position, clock, and...
... value of .the.LCD.monitor 1 2 3 4 56 1. ASUS LCD Monitor VW198/VW193/VW171 Series 1-3 1.4 Monitor introduction 1.4.1. MENU Button: • Press this hotkey to switch from five video preset modes (Game Mode, Night View Mode, Scenery Mode, Standard Mode, Theater Mode) with SPLENDID™ Video Enhancement Technology. • Exit the OSD menu or go back to enter/select the icon (function) highlighted while the OSD menu is active. 2. button: • Automatically adjust the image to its optimized position, clock, and...
User Guide
Page 10
... color definition of .the.LCD.monitor. Status Blue Amber OFF Description ON Standby mode OFF 1.4.2. AC-IN.port. This port connects PC audio source by the bundled audio cable.(Only for some models) 3. Audio-in.port. This port connects the power connector from .left.to turn the monitor on/off. 6. This 24-pin port is as the below table. Rear.of the power indicator is for PC (Personal Computer) DVI-D digital signal connection. (Only for some models) 4. VGA.port. VESA.Wall.Mount Rear.connectors...
... color definition of .the.LCD.monitor. Status Blue Amber OFF Description ON Standby mode OFF 1.4.2. AC-IN.port. This port connects PC audio source by the bundled audio cable.(Only for some models) 3. Audio-in.port. This port connects the power connector from .left.to turn the monitor on/off. 6. This 24-pin port is as the below table. Rear.of the power indicator is for PC (Personal Computer) DVI-D digital signal connection. (Only for some models) 4. VGA.port. VESA.Wall.Mount Rear.connectors...
User Guide
Page 11
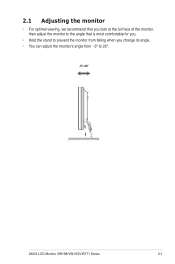
2.1 Adjusting the monitor • For optimal viewing, we recommend that you look at the full face of the monitor, then adjust the monitor to the angle that is most comfortable for you. • Hold the stand to prevent the monitor from falling when you change its angle. • You can adjust the monitor's angle from -5º to 20º. ..-5º~20º ASUS LCD Monitor VW198/VW193/VW171 Series 2-1
2.1 Adjusting the monitor • For optimal viewing, we recommend that you look at the full face of the monitor, then adjust the monitor to the angle that is most comfortable for you. • Hold the stand to prevent the monitor from falling when you change its angle. • You can adjust the monitor's angle from -5º to 20º. ..-5º~20º ASUS LCD Monitor VW198/VW193/VW171 Series 2-1
User Guide
Page 12
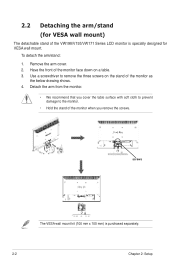
... the stand of the monitor when you remove the screws. Remove the arm cover. 2. Have the front of the monitor face down on the stand of the monitor as the below drawing shows. 4. screws The VESA wall mount kit (100 mm x 100 mm) is specially designed for VESA wall mount) The detachable stand of the VW198/V193/VW171 Series LCD monitor is purchased separately. 2-2 Chapter 2: Setup 2.2 Detaching the arm/stand (for VESA wall mount. To...
... the stand of the monitor when you remove the screws. Remove the arm cover. 2. Have the front of the monitor face down on the stand of the monitor as the below drawing shows. 4. screws The VESA wall mount kit (100 mm x 100 mm) is specially designed for VESA wall mount) The detachable stand of the VW198/V193/VW171 Series LCD monitor is purchased separately. 2-2 Chapter 2: Setup 2.2 Detaching the arm/stand (for VESA wall mount. To...
User Guide
Page 13
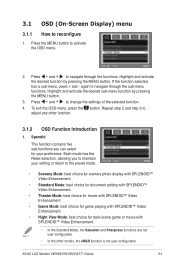
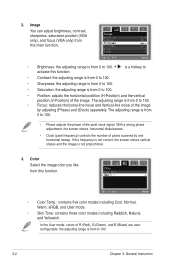
...; Night View Mode: best choice for your setting or return to change the settings of the selected function. 4. 3.1 OSD (On-Screen Display) menu 3.1.1 How to activate the OSD menu. 2. Press the MENU button to reconfigure 1. Highlight and activate the desired sub-menu function by pressing the MENU button. Repeat step 2 and step 3 to adjust any other modes, the sRGB function is not user-configurable. ASUS LCD Monitor VW198/VW193/VW171 Series 3-1 To exit the OSD menu...
...; Night View Mode: best choice for your setting or return to change the settings of the selected function. 4. 3.1 OSD (On-Screen Display) menu 3.1.1 How to activate the OSD menu. 2. Press the MENU button to reconfigure 1. Highlight and activate the desired sub-menu function by pressing the MENU button. Repeat step 2 and step 3 to adjust any other modes, the sRGB function is not user-configurable. ASUS LCD Monitor VW198/VW193/VW171 Series 3-1 To exit the OSD menu...
User Guide
Page 14
...; Brightness: the adjusting range is from 0 to 100. • Position: adjusts the horizontal postition (H-Position) and the vertical position (V-Position) of the image. The adjusting range is from 0 to 100. • Focus: reduces Horizonal-line noise and Vertical-line noise of the pixel clock signal. With a wrong phase adjustment, the screen shows horizontal disturbances. • Clock (pixel frequency) controls the number of R (Red), G (Green), and B (Bluee) are userconfigurable; The adjusting range is from this function. • Color Temp...
...; Brightness: the adjusting range is from 0 to 100. • Position: adjusts the horizontal postition (H-Position) and the vertical position (V-Position) of the image. The adjusting range is from 0 to 100. • Focus: reduces Horizonal-line noise and Vertical-line noise of the pixel clock signal. With a wrong phase adjustment, the screen shows horizontal disturbances. • Clock (pixel frequency) controls the number of R (Red), G (Green), and B (Bluee) are userconfigurable; The adjusting range is from this function. • Color Temp...
User Guide
Page 15
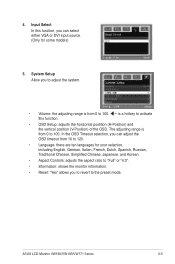
... either VGA or DVI input source. (Only for your selection, including English, German, Italian, French, Dutch, Spanish, Russian, Traditional Chinese, Simplified Chinese, Japanese, and Korean. • Aspect Controls: adjusts the aspect ratio to "Full" or "4:3". • Information: shows the monitor information. • Reset: "Yes" allows you can adjust the OSD timeout from 10 to the preset mode. ASUS LCD Monitor VW198/VW193/VW171 Series 3-3 In the OSD...
... either VGA or DVI input source. (Only for your selection, including English, German, Italian, French, Dutch, Spanish, Russian, Traditional Chinese, Simplified Chinese, Japanese, and Korean. • Aspect Controls: adjusts the aspect ratio to "Full" or "4:3". • Information: shows the monitor information. • Reset: "Yes" allows you can adjust the OSD timeout from 10 to the preset mode. ASUS LCD Monitor VW198/VW193/VW171 Series 3-3 In the OSD...
User Guide
Page 16
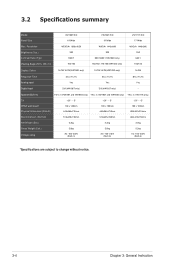
...~240V (Built-in) *Specifications are subject to change without notice. 3-4 Chapter 3: General Instruction Resolution Brightness (Typ.) Contrast Ratio (Typ.) Viewing Angle (H/V), CR≧10 VW198T/S/D 19"Wide WSXGA+ 1680x1050 300 1000:1 160/160 VW193T/S/D 19"Wide WXGA+ 1440x900 300 800:1/850:1(VW193D only) 160/160; 170/160(VW193D only) VW171T/S/D 17"Wide WXGA+ 1440x900 250 600:1 160/150 Display Colors 16.7M/16.2M...
...~240V (Built-in) *Specifications are subject to change without notice. 3-4 Chapter 3: General Instruction Resolution Brightness (Typ.) Contrast Ratio (Typ.) Viewing Angle (H/V), CR≧10 VW198T/S/D 19"Wide WSXGA+ 1680x1050 300 1000:1 160/160 VW193T/S/D 19"Wide WXGA+ 1440x900 300 800:1/850:1(VW193D only) 160/160; 170/160(VW193D only) VW171T/S/D 17"Wide WXGA+ 1440x900 250 600:1 160/150 Display Colors 16.7M/16.2M...

User Guide
Page 17
... automatically adjust the image. • Adjust the H-Position or V-Position settings via OSD. Screen image bounces or a wave pattern is • Make sure the signal cable is properly present in the ON mode. • Check if the power cord is properly connected to the monitor and the power outlet. ASUS LCD Monitor VW198/VW193/VW171 Series 3-5 No sound or sound is low • Ensure that the audio cable is properly connected to the monitor and the computer • Adjust the volume settings...
... automatically adjust the image. • Adjust the H-Position or V-Position settings via OSD. Screen image bounces or a wave pattern is • Make sure the signal cable is properly present in the ON mode. • Check if the power cord is properly connected to the monitor and the power outlet. ASUS LCD Monitor VW198/VW193/VW171 Series 3-5 No sound or sound is low • Ensure that the audio cable is properly connected to the monitor and the computer • Adjust the volume settings...

User Guide
Page 19
For optimal resolution, we recommend that you choose a mode listed in the above tables 3-7 Chapter 3: General Instruction 3.5 VW193/VW171 Supported operating modes Mode VGA SVGA XGA Mac SXGA WXGA+ IBM modes Mode DOS Resolution Frequency 640 x 480 640 x 480 640 x 480 800 x 600 800 x 600 800 x 600 800 x 600 1024 x... 134.6MHz 135.00MHz 106.5MHz 136.75MHz Pixel 25.175MHz 28.322MHz MAC modes Mode VGA SVGA Resolution Frequency 640 x 480 832 x 624 Horizontal Frequency 35KHz 49.725KHz Vertical Frequency 67Hz 75Hz Pixel 30.24MHz 57.2832MHz * Modes not listed in the above tables may not ...
For optimal resolution, we recommend that you choose a mode listed in the above tables 3-7 Chapter 3: General Instruction 3.5 VW193/VW171 Supported operating modes Mode VGA SVGA XGA Mac SXGA WXGA+ IBM modes Mode DOS Resolution Frequency 640 x 480 640 x 480 640 x 480 800 x 600 800 x 600 800 x 600 800 x 600 1024 x... 134.6MHz 135.00MHz 106.5MHz 136.75MHz Pixel 25.175MHz 28.322MHz MAC modes Mode VGA SVGA Resolution Frequency 640 x 480 832 x 624 Horizontal Frequency 35KHz 49.725KHz Vertical Frequency 67Hz 75Hz Pixel 30.24MHz 57.2832MHz * Modes not listed in the above tables may not ...


