Asus VW192G - 19" LCD Monitor Support and Manuals
Get Help and Manuals for this Asus item
Most Recent Asus VW192G Questions

Where I Can Get A Driver For Vw192g?
(Posted by poslann 13 years ago)
Asus VW192G Videos

??????? ? ???????? Asus VW192G
Duration: :36
Total Views: 55
Duration: :36
Total Views: 55
Popular Asus VW192G Manual Pages
User Guide - Page 2
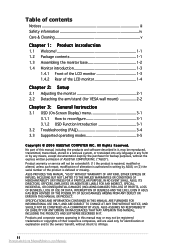
...introduction 1-3
1.4.1 Front of the LCD monitor 1-3 1.4.2 Rear of the LCD monitor 1-4
Chapter 2: Setup
2.1 Adjusting the monitor 2-1 2.2 Detaching the arm/stand (for VESA wall mount 2-2
Chapter 3: General Instruction
3.1 OSD (On-Screen Display) menu 3-1 3.1.1 How to infringe. Products and corporate names appearing in this manual, including the products and software described in writing by...
User Guide - Page 3
... occur in a residential installation. This class B digital apparatus complies with the limits for help. iii
Downloaded from ManualMonitor.com Manuals
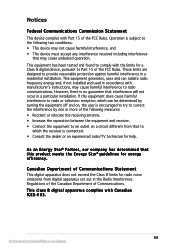
These limits are designed... from digital apparatus set out in accordance with Part 15 of Communications. Notices
Federal Communications Commission Statement
This device complies with manufacturer's instructions, may cause undesired...
User Guide - Page 4

... a lightning storm or if it will protect the monitor from ManualMonitor.com Manuals If you encounter technical problems with the monitor, contact a qualified service technician or your local power standard.
• Do...or top of the cabinet are not damaged. Safety information
• Before setting up the monitor, carefully read all cables are correctly connected and the power cables are ...
User Guide - Page 5
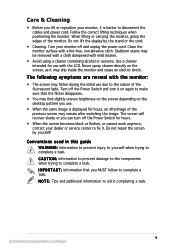
... it . Do not repair the screen by the stand or the cord.
• Cleaning. When lifting or carrying the monitor, grasp the edges of...monitor and cause an electric shock. v
Downloaded from ManualMonitor.com Manuals Use a cleaner intended for hours.
• When the screen becomes black or flashes, or cannot work anymore, contact your monitor off the Power Switch for use with the monitor...
User Guide - Page 7
... or missing, contact your viewing experience. 1.1 Welcome! The latest widescreen LCD monitor from ManualMonitor.com Manuals
1-1
Thank you !
1.2 Package contents
Check your VW192 Series LCD package for the following items: LCD monitor User manual 1 x Power cord 1 x VGA cable 1 x DVI cable (Only for VW192T) 1 x Audio cable (Only for purchasing the ASUS® VW192 Series LCD monitor!
User Guide - Page 8
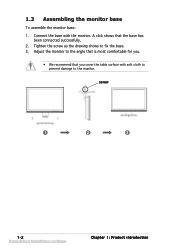
... cover the table surface with the monitor. Adjust the monitor to the angle that is most comfortable for you.
• We recommend that the base has
been connected successfully. 2. screw
1
2
3
1-2
Downloaded from ManualMonitor.com Manuals
Chapter 1: Product introduction Tighten the screw as the drawing shows to the monitor. Connect the base with soft cloth...
User Guide - Page 9
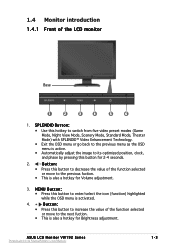
...u t t o n : • Press this button to its optimized position, clock, and phase by pressing this hotkey to switch from ManualMonitor.com Manuals
1-3 S P L E N D I D B u t t o n :
• Use this button for 2-4 seconds.
2. ASUS LCD Monitor VW192 Series
Downloaded from five video preset modes (Game Mode, Night View Mode, Scenery Mode, Standard Mode, Theater Mode) with SPLENDID™ Video...
User Guide - Page 10
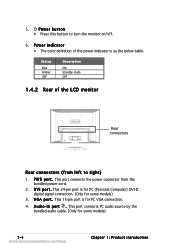
...; The color definition of the LCD monitor
Rear connectors
Rear connectors (from left to turn the monitor on/off.
6. D V I p o r t . A u d i o - 5. This 15-pin port is for some models)
3. This port connects PC ... is for PC (Personal Computer) DVI-D digital signal connection. (Only for some models)
1-4
Downloaded from the bundled power cord.
2. P W R p o r t . ...
User Guide - Page 11
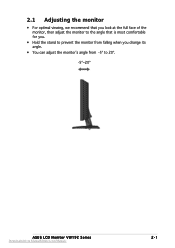
... full face of the monitor, then adjust the monitor to the angle that is most comfortable for you.
• Hold the stand to prevent the monitor from falling when you change its angle.
• You can adjust the monitor's angle from -5º to 20º.
-5º~20º
ASUS LCD Monitor VW192 Series
Downloaded from ManualMonitor.com Manuals
2-1
User Guide - Page 12
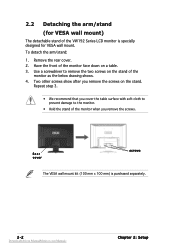
... arm/stand:
1. Remove the rear cover. 2. 2.2 Detaching the arm/stand
(for VESA wall mount)
The detachable stand of the VW192 Series LCD monitor is purchased separately.
2-2
Downloaded from ManualMonitor.com Manuals
Chapter 2: Setup Repeat step 3.
• We recommend that you remove the screws. Rear cover
screws
The VESA wall mount kit (100 mm x 100...
User Guide - Page 13
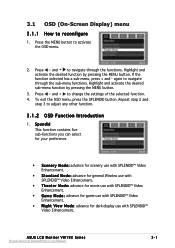
...navigate through the sub-menu functions. Repeat step 2 and
step 3 to change the settings of the selected function. 4. Highlight and activate the desired function by pressing the MENU...8482; Video Enhancement. Press the MENU button to reconfigure
1. ASUS LCD Monitor VW192 Series
Downloaded from ManualMonitor.com Manuals
3-1 Press and to navigate through the functions. Highlight and ...
User Guide - Page 14
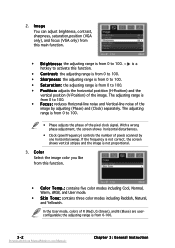
The adjusting range is from ManualMonitor.com Manuals
Chapter 3: General Instruction In the User mode, colors of pixels scanned by adjusting (Phase) and (Clock) separately. the adjusting range is from 0 to 100. I m a g e You can adjust brightness, contrast, sharpness, saturation,...
User Guide - Page 15

... timeout from 0 to 100.
ASUS LCD Monitor VW192 Series
Downloaded from 0 to
• OSD Setup: adjusts the horizontal postition (H-Position) and the vertical position (V-Position) of the OSD. The adjusting range is a hotkey to 100. In the OSD Timeout selection, you can select either VGA or DVI input source. (For the models with a DVI port...
User Guide - Page 16

3.2 Troubleshooting (FAQ)
Problem Power LED is not ON
...settings via OSD.
• Ensure that the audio cable is properly connected to the monitor and the computer
• Adjust the volume settings of both your monitor and computer.
• Ensure that the computer sound card driver is properly installed and activated.
3-4
Downloaded from ManualMonitor.com Manuals
Chapter 3: General Instruction
User Guide - Page 17

3.3 Supported operating modes
Standard Resolution
Horizontal Frequency
Vertical Frequency
Pixel Frequency
DOS VGA
SVGA
XGA
SXGA VESA VESA (Primary...00MHz 135.00MHz 108.00MHz 106.00MHz
* Modes not listed in the table above.
ASUS LCD Monitor VW192 Series
Downloaded from ManualMonitor.com Manuals
3-5 For optimal resolution, we recommend that you choose a mode listed in the table may not ...
Asus VW192G Reviews
We have not received any reviews for Asus yet.