LQG Series User Guide
Page 2
... part of this manual may or may be extended if: (1) the product is repaired, modified or altered, unless such repair, modification of alteration is defaced or missing. Table of contents Notices...iii Safety information iv Care & Cleaning vi 1.1 Welcome 1-1 1.2 Package contents 1-1 1.3 Assembling the Base 1-2 1.4 Connect cables 1-3 1.4.1 Rear of the LCD monitor 1-3 1.5 Monitor introduction 1-4 1.5.1 Using the Controls button 1-4 2.1 Adjusting the monitor 2-1 2.2 Outline dimension 2-2 2.3 Detaching the arm/stand (for VESA wall mount 2-3 3.1 OSD (On-Screen Display) menu...
... part of this manual may or may be extended if: (1) the product is repaired, modified or altered, unless such repair, modification of alteration is defaced or missing. Table of contents Notices...iii Safety information iv Care & Cleaning vi 1.1 Welcome 1-1 1.2 Package contents 1-1 1.3 Assembling the Base 1-2 1.4 Connect cables 1-3 1.4.1 Rear of the LCD monitor 1-3 1.5 Monitor introduction 1-4 1.5.1 Using the Controls button 1-4 2.1 Adjusting the monitor 2-1 2.2 Outline dimension 2-2 2.3 Detaching the arm/stand (for VESA wall mount 2-3 3.1 OSD (On-Screen Display) menu...
LQG Series User Guide
Page 4
... the equipment and receiver. • Connect the equipment to an outlet on , the user is encouraged to try to correct the...digital device, pursuant to which can radiate radio frequency energy and, if not installed and used in accordance with Canadian ICES-003. This class B digital apparatus complies with manufacturer's instructions, may cause undesired operation. However, there is connected...installation. This equipment generates, uses and can be determined by turning the equipment off and on a circuit different from digital apparatus set out in a particular installation...
... the equipment and receiver. • Connect the equipment to an outlet on , the user is encouraged to try to correct the...digital device, pursuant to which can radiate radio frequency energy and, if not installed and used in accordance with Canadian ICES-003. This class B digital apparatus complies with manufacturer's instructions, may cause undesired operation. However, there is connected...installation. This equipment generates, uses and can be determined by turning the equipment off and on a circuit different from digital apparatus set out in a particular installation...

LQG Series User Guide
Page 5
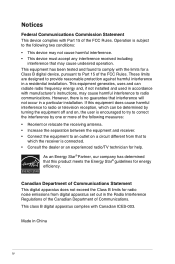
...power strips and extension cords. If you are not damaged. If you encounter technical problems with the package. • To prevent fire or shock hazard, never expose the monitor to rain or moisture. • Never try to fix it may result in serious physical injury. • If the power supply is broken, do not try to open the monitor...; Before setting up the monitor, carefully read all cables are correctly connected and the power cables are not sure of the type of power supply to your home, consult your dealer or local power company. • Use the appropriate power plug which complies...
...power strips and extension cords. If you are not damaged. If you encounter technical problems with the package. • To prevent fire or shock hazard, never expose the monitor to rain or moisture. • Never try to fix it may result in serious physical injury. • If the power supply is broken, do not try to open the monitor...; Before setting up the monitor, carefully read all cables are correctly connected and the power cables are not sure of the type of power supply to your home, consult your dealer or local power company. • Use the appropriate power plug which complies...
LQG Series User Guide
Page 7
... remain after switching the image. vii IMPORTANT: Information that the flicker disappears. • You may find slightly uneven brightness on the screen depending on the screen, as it is displayed for hours, an afterimage of the monitor. Follow the correct lifting techniques when positioning the monitor. Care & Cleaning • Before you lift or reposition your dealer or service center to fix it on...
... remain after switching the image. vii IMPORTANT: Information that the flicker disappears. • You may find slightly uneven brightness on the screen depending on the screen, as it is displayed for hours, an afterimage of the monitor. Follow the correct lifting techniques when positioning the monitor. Care & Cleaning • Before you lift or reposition your dealer or service center to fix it on...
LQG Series User Guide
Page 9
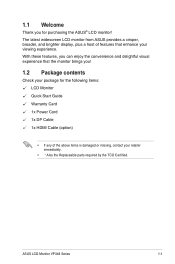
... following items: LCD Monitor Quick Start Guide Warranty Card 1x Power Cord 1x DP Cable 1x HDMI Cable (option) • If any of the above items is damaged or missing, contact your viewing experience. With these features, you can enjoy the convenience and delightful visual experience that enhance your retailer immediately. • * Also the Replaceable parts required by the TCO Certified. ASUS LCD Monitor VP348 Series 1-1 1.1 Welcome Thank...
... following items: LCD Monitor Quick Start Guide Warranty Card 1x Power Cord 1x DP Cable 1x HDMI Cable (option) • If any of the above items is damaged or missing, contact your viewing experience. With these features, you can enjoy the convenience and delightful visual experience that enhance your retailer immediately. • * Also the Replaceable parts required by the TCO Certified. ASUS LCD Monitor VP348 Series 1-1 1.1 Welcome Thank...
LQG Series User Guide
Page 11
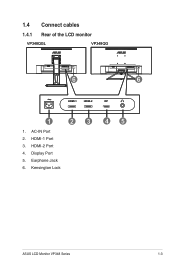
AC-IN Port 2. Display Port 5. HDMI-2 Port 4. HDMI-1 Port 3. Kensington Lock 45 ASUS LCD Monitor VP348 Series 1-3 1.4 Connect cables 1.4.1 Rear of the LCD monitor VP348QGL VP348QG 6 6 HDMI-1 HDMI-2 DP 1 23 1. Earphone Jack 6.
AC-IN Port 2. Display Port 5. HDMI-2 Port 4. HDMI-1 Port 3. Kensington Lock 45 ASUS LCD Monitor VP348 Series 1-3 1.4 Connect cables 1.4.1 Rear of the LCD monitor VP348QGL VP348QG 6 6 HDMI-1 HDMI-2 DP 1 23 1. Earphone Jack 6.
LQG Series User Guide
Page 12
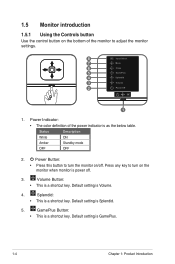
... key to adjust the monitor settings. 8 Input Select 7 Menu 6 Close 5 GamePlus 4 Splendid 3 Volume 2 Power Off 1 1. Default setting is a shortcut key. GamePlus Button: • This is Volume. 4. 1.5 Monitor introduction 1.5.1 Using the Controls button Use the control button on the bottom of the power indicator is as the below table. Default setting is a shortcut key. Splendid: • This is GamePlus. 1-4 Chapter 1: Product Introduction Power Indicator: • The color definition of the monitor to turn the monitor on/off...
... key to adjust the monitor settings. 8 Input Select 7 Menu 6 Close 5 GamePlus 4 Splendid 3 Volume 2 Power Off 1 1. Default setting is a shortcut key. GamePlus Button: • This is Volume. 4. 1.5 Monitor introduction 1.5.1 Using the Controls button Use the control button on the bottom of the power indicator is as the below table. Default setting is a shortcut key. Splendid: • This is GamePlus. 1-4 Chapter 1: Product Introduction Power Indicator: • The color definition of the monitor to turn the monitor on/off...
LQG Series User Guide
Page 17
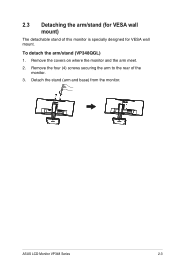
ASUS LCD Monitor VP348 Series 2-3 Detach the stand (arm and base) from the monitor. Remove the four (4) screws securing the arm to the rear of this monitor is specially designed for VESA wall mount) The detachable stand of the monitor. 3. Remove the covers on where the monitor and the arm meet. 2. 2.3 Detaching the arm/stand (for VESA wall mount. To detach the arm/stand (VP348QGL) 1.
ASUS LCD Monitor VP348 Series 2-3 Detach the stand (arm and base) from the monitor. Remove the four (4) screws securing the arm to the rear of this monitor is specially designed for VESA wall mount) The detachable stand of the monitor. 3. Remove the covers on where the monitor and the arm meet. 2. 2.3 Detaching the arm/stand (for VESA wall mount. To detach the arm/stand (VP348QGL) 1.
LQG Series User Guide
Page 18
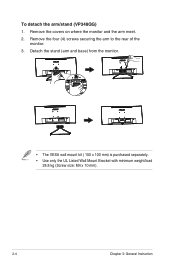
Remove the covers on where the monitor and the arm meet. 2. Detach the stand (arm and base) from the monitor. • The VESA wall mount kit ( 100 x 100 mm) is purchased separately. • Use only the UL Listed Wall Mount Bracket with minimum weight/load 28.8 kg (Screw size: M4 x 10 mm). 2-4 Chapter 3: General Instruction Remove the four (4) screws securing the arm to the rear of the monitor. 3. To detach the arm/stand (VP348QG) 1.
Remove the covers on where the monitor and the arm meet. 2. Detach the stand (arm and base) from the monitor. • The VESA wall mount kit ( 100 x 100 mm) is purchased separately. • Use only the UL Listed Wall Mount Bracket with minimum weight/load 28.8 kg (Screw size: M4 x 10 mm). 2-4 Chapter 3: General Instruction Remove the four (4) screws securing the arm to the rear of the monitor. 3. To detach the arm/stand (VP348QG) 1.
LQG Series User Guide
Page 20
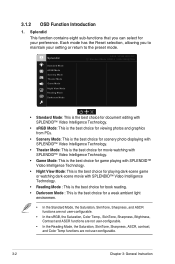
..., the Saturation, Color Temp., SkinTone, Sharpness, Brightness, Contrast and ASCR functions are not user-configurable. • In the Reading Mode, the Saturation, SkinTone, Sharpness, ASCR, contrast, and Color Temp functions are not user-configurable. 3-2 Chapter 3: General Instruction Splendid Standard Mode sRGB Mode Scenery Mode Theater Mode Game Mode Night View Mode Reading Mode Darkroom Mode ASUS VP348 HDR OFF Standard Mode HDMI-2 3440x1440@75Hz • Standard Mode: This is the best choice for...
..., the Saturation, Color Temp., SkinTone, Sharpness, Brightness, Contrast and ASCR functions are not user-configurable. • In the Reading Mode, the Saturation, SkinTone, Sharpness, ASCR, contrast, and Color Temp functions are not user-configurable. 3-2 Chapter 3: General Instruction Splendid Standard Mode sRGB Mode Scenery Mode Theater Mode Game Mode Night View Mode Reading Mode Darkroom Mode ASUS VP348 HDR OFF Standard Mode HDMI-2 3440x1440@75Hz • Standard Mode: This is the best choice for...
LQG Series User Guide
Page 21
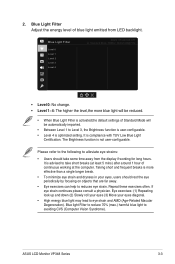
... breaks (at least 5 mins) after around 1 hour of Standard Mode will be reduced. • When Blue Light Filter is optimized setting. ASUS LCD Monitor VP348 Series 3-3 Repeat these exercises often. Blue light Filter to reduce 70% (max.) harmful blue light to take some time away from LED backlight. The Brightness function is compliance with TUV Low Blue Light Certification. Please refer to the following to alleviate eye strains...
... breaks (at least 5 mins) after around 1 hour of Standard Mode will be reduced. • When Blue Light Filter is optimized setting. ASUS LCD Monitor VP348 Series 3-3 Repeat these exercises often. Blue light Filter to reduce 70% (max.) harmful blue light to take some time away from LED backlight. The Brightness function is compliance with TUV Low Blue Light Certification. Please refer to the following to alleviate eye strains...
LQG Series User Guide
Page 22
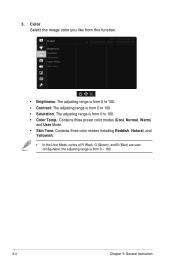
.... • Contrast: The adjusting range is from 0 to 100. • Saturation: The adjusting range is from 0 to 100. • Color Temp.: Contains three preset color modes (Cool, Normal, Warm) and User Mode. • Skin Tone: Contains three color modes including Reddish, Natural, and Yellowish. • In the User Mode, colors of R (Red), G (Green), and B (Blue) are userconfigurable; the adjusting range is from 0 ~ 100. 3-4 Chapter 3: General Instruction Color Brightness Contrast Saturation Color Temp. Color Select the image color you...
.... • Contrast: The adjusting range is from 0 to 100. • Saturation: The adjusting range is from 0 to 100. • Color Temp.: Contains three preset color modes (Cool, Normal, Warm) and User Mode. • Skin Tone: Contains three color modes including Reddish, Natural, and Yellowish. • In the User Mode, colors of R (Red), G (Green), and B (Blue) are userconfigurable; the adjusting range is from 0 ~ 100. 3-4 Chapter 3: General Instruction Color Brightness Contrast Saturation Color Temp. Color Select the image color you...
LQG Series User Guide
Page 23
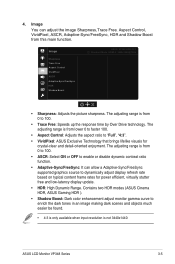
... input resolution is from lower 0 to faster 100. • Aspect Control: Adjusts the aspect ratio to dynamically adjust display refresh rate based on typical content frame rates for crystal-clear and detail-oriented enjoyment. 4. Image You can allow a Adaptive-Sync/FreeSync supported graphics source to "Full", "4:3". • VividPixel: ASUS Exclusive Technology that brings lifelike visuals for power efficient, virtually stutter free and low-latency display update. • HDR: High Dynamic Range...
... input resolution is from lower 0 to faster 100. • Aspect Control: Adjusts the aspect ratio to dynamically adjust display refresh rate based on typical content frame rates for crystal-clear and detail-oriented enjoyment. 4. Image You can allow a Adaptive-Sync/FreeSync supported graphics source to "Full", "4:3". • VividPixel: ASUS Exclusive Technology that brings lifelike visuals for power efficient, virtually stutter free and low-latency display update. • HDR: High Dynamic Range...
LQG Series User Guide
Page 24
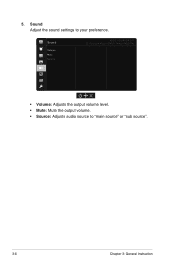
Sound Volume Mute Source ASUS VP348 HDR OFF Standard Mode HDMI-2 3440x1440@75Hz • Volume: Adjusts the output volume level. • Mute: Mute the output volume. • Source: Adjusts audio source to your preference. Sound Adjust the sound settings to "main source" or "sub source". 3-6 Chapter 3: General Instruction 5.
Sound Volume Mute Source ASUS VP348 HDR OFF Standard Mode HDMI-2 3440x1440@75Hz • Volume: Adjusts the output volume level. • Mute: Mute the output volume. • Source: Adjusts audio source to your preference. Sound Adjust the sound settings to "main source" or "sub source". 3-6 Chapter 3: General Instruction 5.
LQG Series User Guide
Page 25
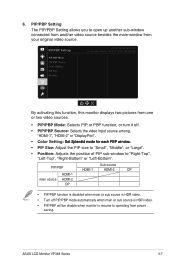
ASUS LCD Monitor VP348 Series 3-7 PIP/PBP Setting PIP/PBP Mode PIP/PBP Source Color Setting PIP Size Position ASUS VP348 HDR OFF Standard Mode HDMI-2 3440x1440@75Hz By activating this function, this monitor displays two pictures from power saving. PIP/PBP Sub source HDMI-1 HDMI-2 DP HDMI-1 main source HDMI-2 DP • PIP/PBP function is disabled when main or sub source is HDR video. • Turn off PIP/PBP mode automatically when main or sub source is HDR video. • PIP...
ASUS LCD Monitor VP348 Series 3-7 PIP/PBP Setting PIP/PBP Mode PIP/PBP Source Color Setting PIP Size Position ASUS VP348 HDR OFF Standard Mode HDMI-2 3440x1440@75Hz By activating this function, this monitor displays two pictures from power saving. PIP/PBP Sub source HDMI-1 HDMI-2 DP HDMI-1 main source HDMI-2 DP • PIP/PBP function is disabled when main or sub source is HDR video. • Turn off PIP/PBP mode automatically when main or sub source is HDR video. • PIP...

LQG Series User Guide
Page 27
... size on the screen. • Photo size: Provides photographers and other users to accurately view and edit their photos in real size on /off GamePlus function. System Setup Adjusts the system configuration. ASUS LCD Monitor VP348 Series 3-9 8. System Setup Splendid Demo Mode GamePlus QuickFit ECO Mode Shortcut OSD Setup Language Key Lock More ASUS VP348 HDR OFF Standard Mode HDMI-2 3440x1440@75Hz System Setup Back Information Power Indicator Power Key Lock All Reset ASUS VP348 HDR OFF Standard Mode HDMI...
... size on the screen. • Photo size: Provides photographers and other users to accurately view and edit their photos in real size on /off GamePlus function. System Setup Adjusts the system configuration. ASUS LCD Monitor VP348 Series 3-9 8. System Setup Splendid Demo Mode GamePlus QuickFit ECO Mode Shortcut OSD Setup Language Key Lock More ASUS VP348 HDR OFF Standard Mode HDMI-2 3440x1440@75Hz System Setup Back Information Power Indicator Power Key Lock All Reset ASUS VP348 HDR OFF Standard Mode HDMI...
LQG Series User Guide
Page 28
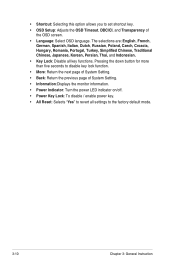
...: Selecting this option allows you to set shortcut key. • OSD Setup: Adjusts the OSD Timeout, DDC/CI, and Transparency of System Setting. • Information:Displays the monitor information. • Power Indicator: Turn the power LED indicator on/off. • Power Key Lock: To disable / enable power key. • All Reset: Selects "Yes" to revert all key functions. The selections are: English, French, German, Spanish, Italian, Dutch, Russian...
...: Selecting this option allows you to set shortcut key. • OSD Setup: Adjusts the OSD Timeout, DDC/CI, and Transparency of System Setting. • Information:Displays the monitor information. • Power Indicator: Turn the power LED indicator on/off. • Power Key Lock: To disable / enable power key. • All Reset: Selects "Yes" to revert all key functions. The selections are: English, French, German, Spanish, Italian, Dutch, Russian...
LQG Series User Guide
Page 29
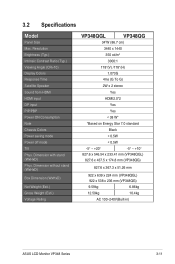
....6 x 437.5 x 174.8 mm (VP348QG) 827.6 x 367.3 x 51.26 mm 922 x 639 x 224 mm (VP348QGL) 922 x 538 x 236 mm (VP348QG) 9.59kg 6.86kg 12.59kg 10.4kg AC 100~240V(Built-in) ASUS LCD Monitor VP348 Series 3-11 Resolution Brightness (Typ.) Intrinsic Contrast Ratio (Typ.) Viewing Angle (CR>10) Display Colors Response Time Satellite Speaker Sound from HDMI HDMI input DP input PIP/PBP Power ON Consumption Note Chassis Colors Power saving mode Power off mode Tilt Phys.
....6 x 437.5 x 174.8 mm (VP348QG) 827.6 x 367.3 x 51.26 mm 922 x 639 x 224 mm (VP348QGL) 922 x 538 x 236 mm (VP348QG) 9.59kg 6.86kg 12.59kg 10.4kg AC 100~240V(Built-in) ASUS LCD Monitor VP348 Series 3-11 Resolution Brightness (Typ.) Intrinsic Contrast Ratio (Typ.) Viewing Angle (CR>10) Display Colors Response Time Satellite Speaker Sound from HDMI HDMI input DP input PIP/PBP Power ON Consumption Note Chassis Colors Power saving mode Power off mode Tilt Phys.
LQG Series User Guide
Page 30
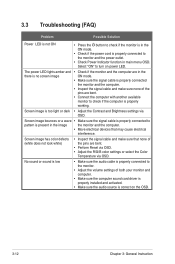
... turn on the OSD. 3-12 Chapter 3: General Instruction No sound or sound is low • Make sure the audio cable is properly connected to the monitor. • Adjust the volume settings of both your monitor and computer. • Make sure the computer sound card driver is properly installed and activated. • Make sure the audio source is properly connected to the monitor and the power outlet. • Check Power Indicator function in main menu OSD. The power LED lights amber and • Check...
... turn on the OSD. 3-12 Chapter 3: General Instruction No sound or sound is low • Make sure the audio cable is properly connected to the monitor. • Adjust the volume settings of both your monitor and computer. • Make sure the computer sound card driver is properly installed and activated. • Make sure the audio source is properly connected to the monitor and the power outlet. • Check Power Indicator function in main menu OSD. The power LED lights amber and • Check...
LQG Series User Guide
Page 31
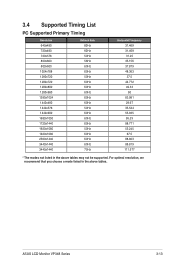
ASUS LCD Monitor VP348 Series 3-13 For optimal resolution, we recommend that you choose a mode listed in the above tables. 3.4 Supported Timing List PC Supported Primary Timing Resolution 640x480 720x480 720x576 800x600 800x600 1024x768 1280x720 1280x720 1280x800 1280x960 1280x1024 1440x480 1440x576 1440x900 1680x1050 1720x1440 1920x1080 1920x1080 2560x1440 3440x1440 3440x1440 Refresh Rate 60Hz 60Hz 50Hz 56Hz 60Hz 60Hz 50Hz 60Hz 60Hz 60Hz 60Hz 60Hz...
ASUS LCD Monitor VP348 Series 3-13 For optimal resolution, we recommend that you choose a mode listed in the above tables. 3.4 Supported Timing List PC Supported Primary Timing Resolution 640x480 720x480 720x576 800x600 800x600 1024x768 1280x720 1280x720 1280x800 1280x960 1280x1024 1440x480 1440x576 1440x900 1680x1050 1720x1440 1920x1080 1920x1080 2560x1440 3440x1440 3440x1440 Refresh Rate 60Hz 60Hz 50Hz 56Hz 60Hz 60Hz 50Hz 60Hz 60Hz 60Hz 60Hz 60Hz...


