VN279QLB Series User Guide for English Edition
Page 2
No part of this manual may or may be extended if: (1) the product is repaired, modified or alered, unless such repair, modification of alteration is defaced or missing. or (2) the serial number of ASUSTeK COMPUTER INC. ("ASUS"). SPECIFICATIONS AND INFORMATION CONTAINED IN THIS MANUAL ARE FURNISHED FOR INFORMATIONAL USE ONLY, AND ARE SUBJECT TO CHANGE AT ANY TIME WITHOUT NOTICE, AND SHOULD...
No part of this manual may or may be extended if: (1) the product is repaired, modified or alered, unless such repair, modification of alteration is defaced or missing. or (2) the serial number of ASUSTeK COMPUTER INC. ("ASUS"). SPECIFICATIONS AND INFORMATION CONTAINED IN THIS MANUAL ARE FURNISHED FOR INFORMATIONAL USE ONLY, AND ARE SUBJECT TO CHANGE AT ANY TIME WITHOUT NOTICE, AND SHOULD...
VN279QLB Series User Guide for English Edition
Page 3
... 3.1. Specifications.summary 3-5 3.3. Package.contents 1-1 1.3. Troubleshooting.(FAQ 3-7 3.4. Contents Notices...iv Safety.information v Care.&.Cleaning vi Takeback.Services vii Chapter.1:.....Product.introduction 1.1. Adjusting.the.monitor 2-2 2.3. Detaching.the.arm/base for.VESA.wall.mount 2-3 2.4. Supported.operating.modes 3-8 iii Assembling.the.monitor.arm/base 2-1 2.2. Connecting.the.cables 2-4 2.6. Welcome 1-1 1.2. OSD.(On-Screen.Display).menu 3-1 3.1.1 How to reconfigure 3-1 3.1.2 OSD function introduction 3-1 3.2. Using.the.connector.cover...
... 3.1. Specifications.summary 3-5 3.3. Package.contents 1-1 1.3. Troubleshooting.(FAQ 3-7 3.4. Contents Notices...iv Safety.information v Care.&.Cleaning vi Takeback.Services vii Chapter.1:.....Product.introduction 1.1. Adjusting.the.monitor 2-2 2.3. Detaching.the.arm/base for.VESA.wall.mount 2-3 2.4. Supported.operating.modes 3-8 iii Assembling.the.monitor.arm/base 2-1 2.2. Connecting.the.cables 2-4 2.6. Welcome 1-1 1.2. OSD.(On-Screen.Display).menu 3-1 3.1.1 How to reconfigure 3-1 3.1.2 OSD function introduction 3-1 3.2. Using.the.connector.cover...
VN279QLB Series User Guide for English Edition
Page 4
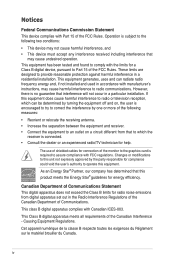
... the user's authority to this equipment. Notices Federal Communications Commission Statement This device complies with Canadian ICES-003. However, there is encouraged to try to Part 15 of Communications. Changes or modifications to operate this unit not expressly approved by turning the equipment off and on a circuit different from digital apparatus set out in a particular installation. As...
... the user's authority to this equipment. Notices Federal Communications Commission Statement This device complies with Canadian ICES-003. However, there is encouraged to try to Part 15 of Communications. Changes or modifications to operate this unit not expressly approved by turning the equipment off and on a circuit different from digital apparatus set out in a particular installation. As...

VN279QLB Series User Guide for English Edition
Page 5
... setting up the monitor, carefully read all cables are correctly connected and the power cables are provided for disposal of power source indicated on a stable surface. • Unplug the unit during a lightning storm or if it may result in serious physical injury. • If the power supply is provided. • The monitor should not be operated only from damage due to fix...
... setting up the monitor, carefully read all cables are correctly connected and the power cables are provided for disposal of power source indicated on a stable surface. • Unplug the unit during a lightning storm or if it may result in serious physical injury. • If the power supply is provided. • The monitor should not be operated only from damage due to fix...
VN279QLB Series User Guide for English Edition
Page 6
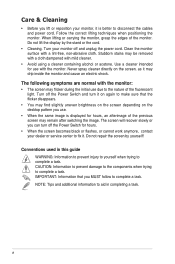
... not repair the screen by the stand or the cord. • Cleaning. IMPORTANT: Information that the flicker disappears. • You may find slightly uneven brightness on the screen depending on the desktop pattern you use with a lint-free, non-abrasive cloth. Clean the monitor surface with the monitor. Turn off and unplug the power cord. The screen will recover slowly or you can turn off the Power Switch for hours...
... not repair the screen by the stand or the cord. • Cleaning. IMPORTANT: Information that the flicker disappears. • You may find slightly uneven brightness on the screen depending on the desktop pattern you use with a lint-free, non-abrasive cloth. Clean the monitor surface with the monitor. Turn off and unplug the power cord. The screen will recover slowly or you can turn off the Power Switch for hours...
VN279QLB Series User Guide for English Edition
Page 9
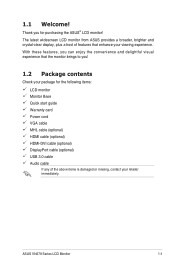
The latest widescreen LCD monitor from ASUS provides a broader, brighter and crystal-clear display, plus a host of features that the monitor brings to you for the following items: LCD monitor Monitor Base Quick start guide Warranty card Power cord VGA cable MHL cable (optional) HDMI cable (optional) HDMI-DVI cable (optional) DisplayPort cable (optional) USB 3.0 cable Audio cable If any of the above items is damaged or missing, contact your viewing experience. ASUS VN279 Series LCD Monitor 1-1 Thank you ! 1.2 Package contents Check your package for...
The latest widescreen LCD monitor from ASUS provides a broader, brighter and crystal-clear display, plus a host of features that the monitor brings to you for the following items: LCD monitor Monitor Base Quick start guide Warranty card Power cord VGA cable MHL cable (optional) HDMI cable (optional) HDMI-DVI cable (optional) DisplayPort cable (optional) USB 3.0 cable Audio cable If any of the above items is damaged or missing, contact your viewing experience. ASUS VN279 Series LCD Monitor 1-1 Thank you ! 1.2 Package contents Check your package for...

VN279QLB Series User Guide for English Edition
Page 10
Button: • Use this hotkey to switch from six video preset modes (Scenery, Standard, Theater, Game, Night View, and sRGB Mode) with SPLENDID™ Video Intelligence Technology • Exits the OSD menu or goes back to the previous menu when the OSD menu is active. • Automatically adjusts the image to its optimized position, clock, and phase by pressing this Button for 2-4 seconds (for alignment. • The QuickFit function contains...
Button: • Use this hotkey to switch from six video preset modes (Scenery, Standard, Theater, Game, Night View, and sRGB Mode) with SPLENDID™ Video Intelligence Technology • Exits the OSD menu or goes back to the previous menu when the OSD menu is active. • Automatically adjusts the image to its optimized position, clock, and phase by pressing this Button for 2-4 seconds (for alignment. • The QuickFit function contains...
VN279QLB Series User Guide for English Edition
Page 11
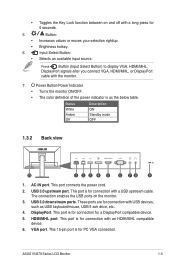
.... Status Description White Amber Off ON Standby mode OFF 1.3.2 Back view 10 6 78 9 1. DisplayPort. This port is for connection with the monitor. 7. This 15-pin port is for connection for 5 seconds. USB 3.0 upstream port. ASUS VN279 Series LCD Monitor 1-3 Press Button (Input Select Button) to display VGA, HDMI/MHL, DisplayPort signals after you connect VGA, HDMI/MHL, or DisplayPort cable with an HDMI/MHL compatible device. 6. HDMI/MHL port. VGA port. • 5. • • 6. • Toggles the Key Lock function between on...
.... Status Description White Amber Off ON Standby mode OFF 1.3.2 Back view 10 6 78 9 1. DisplayPort. This port is for connection with the monitor. 7. This 15-pin port is for connection for 5 seconds. USB 3.0 upstream port. ASUS VN279 Series LCD Monitor 1-3 Press Button (Input Select Button) to display VGA, HDMI/MHL, DisplayPort signals after you connect VGA, HDMI/MHL, or DisplayPort cable with an HDMI/MHL compatible device. 6. HDMI/MHL port. VGA port. • 5. • • 6. • Toggles the Key Lock function between on...
VN279QLB Series User Guide for English Edition
Page 12
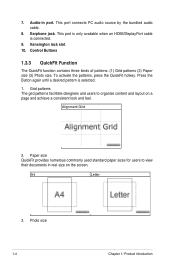
... and feel. Press the Button again until a desired pattern is connected. 9. Paper size QuickFit provides numerous commonly used standard paper sizes for users to organize content and layout on the screen. Alignment Grid 2. This port is only available when an HDMI/DisplayPort cable is selected. 1. 7. Kensington lock slot. 10. Grid patterns The grid patterns facilitate designers and users to view their documents in...
... and feel. Press the Button again until a desired pattern is connected. 9. Paper size QuickFit provides numerous commonly used standard paper sizes for users to organize content and layout on the screen. Alignment Grid 2. This port is only available when an HDMI/DisplayPort cable is selected. 1. 7. Kensington lock slot. 10. Grid patterns The grid patterns facilitate designers and users to view their documents in...
VN279QLB Series User Guide for English Edition
Page 13
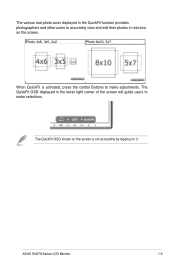
The QuickFit OSD shown on the screen is activated, press the control Buttons to make adjustments. Photo 4x6, 3x5, 2x2 Photo 8x10, 5x7 When QuickFit is not accessible by tapping on the screen. ASUS VN279 Series LCD Monitor 1-5 The various real photo sizes displayed in the QuickFit function provides photographers and other users to accurately view and edit their photos in the lower right corner of the screen will guide users to make selections. The QuickFit OSD displayed in real size on it.
The QuickFit OSD shown on the screen is activated, press the control Buttons to make adjustments. Photo 4x6, 3x5, 2x2 Photo 8x10, 5x7 When QuickFit is not accessible by tapping on the screen. ASUS VN279 Series LCD Monitor 1-5 The various real photo sizes displayed in the QuickFit function provides photographers and other users to accurately view and edit their photos in the lower right corner of the screen will guide users to make selections. The QuickFit OSD displayed in real size on it.
VN279QLB Series User Guide for English Edition
Page 17
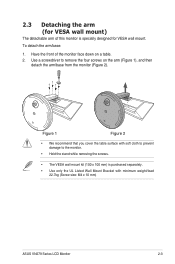
... damage to remove the four screws on a table. 2. Figure 1 Figure 2 • We recommend that you cover the table surface with minimum weight/load 22.7kg (Screw size: M4 x 10 mm) ASUS VN279 Series LCD Monitor 2-3 2.3 Detaching the arm (for VESA wall mount) The detachable arm of the monitor face down on the arm (Figure 1), and then detach the arm/base from the monitor (Figure 2). To...
... damage to remove the four screws on a table. 2. Figure 1 Figure 2 • We recommend that you cover the table surface with minimum weight/load 22.7kg (Screw size: M4 x 10 mm) ASUS VN279 Series LCD Monitor 2-3 2.3 Detaching the arm (for VESA wall mount) The detachable arm of the monitor face down on the arm (Figure 1), and then detach the arm/base from the monitor (Figure 2). To...
VN279QLB Series User Guide for English Edition
Page 18
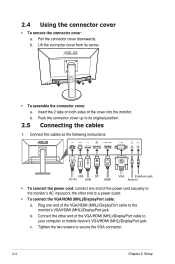
2.4 Using the connector cover • To remove the connector cover: a. Pull the connector cover downwards. Lift the connector cover form its original position. 2.5 Connecting the cables 1. b. b. Tighten the two screws to its center. 1 1 2 • To assemble the connector cover: a. Push the connector cover up to secure the VGA connector. 2-4 Chapter 2: Setup Insert the 2 tabs on both sides of the power cord securely to the monitor's AC input port, the other end of the VGA/HDMI (MHL)/DisplayPort cable to the monitor's VGA/HDMI (MHL...
2.4 Using the connector cover • To remove the connector cover: a. Pull the connector cover downwards. Lift the connector cover form its original position. 2.5 Connecting the cables 1. b. b. Tighten the two screws to its center. 1 1 2 • To assemble the connector cover: a. Push the connector cover up to secure the VGA connector. 2-4 Chapter 2: Setup Insert the 2 tabs on both sides of the power cord securely to the monitor's AC input port, the other end of the VGA/HDMI (MHL)/DisplayPort cable to the monitor's VGA/HDMI (MHL...
VN279QLB Series User Guide for English Edition
Page 19
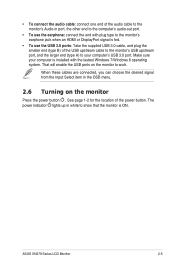
.... ASUS VN279 Series LCD Monitor 2-5 When these cables are connected, you can choose the desired signal from the Input Select item in the OSD menu. 2.6 Turning on the monitor to show that the monitor is installed with the lastest Windows 7/Windows 8 operating system. That will enable the USB ports on the monitor Press the power button . The power indicator lights up in white to work. Make sure your computer's USB 3.0 port. • To connect the audio cable: connect one end of the audio cable...
.... ASUS VN279 Series LCD Monitor 2-5 When these cables are connected, you can choose the desired signal from the Input Select item in the OSD menu. 2.6 Turning on the monitor to show that the monitor is installed with the lastest Windows 7/Windows 8 operating system. That will enable the USB ports on the monitor Press the power button . The power indicator lights up in white to work. Make sure your computer's USB 3.0 port. • To connect the audio cable: connect one end of the audio cable...
VN279QLB Series User Guide for English Edition
Page 21
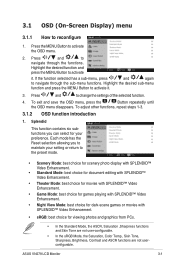
... user-configurable. • In the sRGB Mode, the Saturation, Color Temp., Skin Tone, Sharpness, Brightness, Contrast and ASCR functions are not userconfigurable. Highlight the desired sub-menu function and press the MENU Button to reconfigure 1. 3.1 OSD (On-Screen Display) menu 3.1.1 How to activate it . ASUS VN279 LCD Monitor 3-1 Press and to the preset mode. • Scenery Mode: best choice for scenery photo display with SPLENDID™ Video Enhancement. • Standard Mode: best...
... user-configurable. • In the sRGB Mode, the Saturation, Color Temp., Skin Tone, Sharpness, Brightness, Contrast and ASCR functions are not userconfigurable. Highlight the desired sub-menu function and press the MENU Button to reconfigure 1. 3.1 OSD (On-Screen Display) menu 3.1.1 How to activate it . ASUS VN279 LCD Monitor 3-1 Press and to the preset mode. • Scenery Mode: best choice for scenery photo display with SPLENDID™ Video Enhancement. • Standard Mode: best...
VN279QLB Series User Guide for English Edition
Page 22
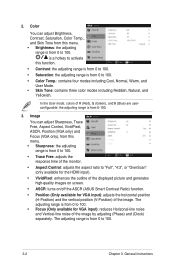
... three color modes including Reddish, Natural, and Yellowish. 2. Color You can adjust Sharpness, Trace Free, Aspect Control, VividPixel, ASCR, Position (VGA only) and Focus (VGA only), from this menu. • Brightness: the adjusting range is from 0 to "Full", "4:3", or "OverScan" (only available for the HDMI input). • VividPixel: enhances the outline of the displayed picture and generates high-quality images on screen. • ASCR: turns on/off the ASCR (ASUS Smart Contrast...
... three color modes including Reddish, Natural, and Yellowish. 2. Color You can adjust Sharpness, Trace Free, Aspect Control, VividPixel, ASCR, Position (VGA only) and Focus (VGA only), from this menu. • Brightness: the adjusting range is from 0 to "Full", "4:3", or "OverScan" (only available for the HDMI input). • VividPixel: enhances the outline of the displayed picture and generates high-quality images on screen. • ASCR: turns on/off the ASCR (ASUS Smart Contrast...
VN279QLB Series User Guide for English Edition
Page 23
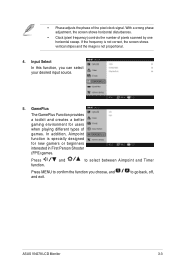
...a wrong phase adjustment, the screen shows horizontal disturbances. • Clock (pixel frequency) controls the number of games. Press and function. to confirm the function you can select your desired input source. 5. In ...MENU to go back, off, ASUS VN279 LCD Monitor 3-3 Input Select In this function, you choose, and and exit. If the frequency is not correct, the screen shows vertical stripes and the image is specially designed for users when playing different types of pixels scanned by one horizontal sweep. • Phase adjusts the phase of the pixel clock signal...
...a wrong phase adjustment, the screen shows horizontal disturbances. • Clock (pixel frequency) controls the number of games. Press and function. to confirm the function you can select your desired input source. 5. In ...MENU to go back, off, ASUS VN279 LCD Monitor 3-3 Input Select In this function, you choose, and and exit. If the frequency is not correct, the screen shows vertical stripes and the image is specially designed for users when playing different types of pixels scanned by one horizontal sweep. • Phase adjusts the phase of the pixel clock signal...
VN279QLB Series User Guide for English Edition
Page 24
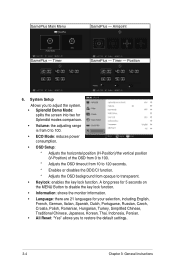
... the MENU Button to disable the key lock function. • Information: shows the monitor information. • Language: there are 21 languages for Splendid modes comparison. • Volume: the adjusting range is from 0 to 100. • ECO Mode: reduces power consumption. • OSD Setup: * Adjusts the horizontal position (H-Position)/the vertical position (V-Position) of the OSD from 0 to 100. * Adjusts the OSD timeout from 10 to 120 seconds. * Enables or disables the DDC/CI function. * Adjusts the OSD background...
... the MENU Button to disable the key lock function. • Information: shows the monitor information. • Language: there are 21 languages for Splendid modes comparison. • Volume: the adjusting range is from 0 to 100. • ECO Mode: reduces power consumption. • OSD Setup: * Adjusts the horizontal position (H-Position)/the vertical position (V-Position) of the OSD from 0 to 100. * Adjusts the OSD timeout from 10 to 120 seconds. * Enables or disables the DDC/CI function. * Adjusts the OSD background...
VN279QLB Series User Guide for English Edition
Page 25
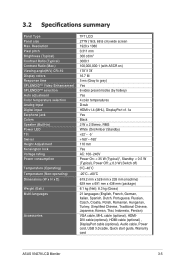
Resolution Pixel pitch Brightness (Typical) Contrast Ratio (Typical) Contrast Ratio (Max.) Viewing angle(H/V) CR>10 Display colors Response time SPLENDID™ Video Enhancement SPLENDID™ selection Auto adjustment Color temperature selection Analog input Digital input Earphone jack Colors Speaker (Built-in) Power LED Tilt Swivel Height Adjustment Kensington lock Voltage rating Power consumption Temperature (Operating) Temperature (Non-operating) Dimensions (W x H x D) Weight (Esti.) Multi-languages Accessories TFT LCD 27"W (16:9, 68.6 cm) wide screen 1920 x 1080 0.311 mm 300 cd/m2 ...
Resolution Pixel pitch Brightness (Typical) Contrast Ratio (Typical) Contrast Ratio (Max.) Viewing angle(H/V) CR>10 Display colors Response time SPLENDID™ Video Enhancement SPLENDID™ selection Auto adjustment Color temperature selection Analog input Digital input Earphone jack Colors Speaker (Built-in) Power LED Tilt Swivel Height Adjustment Kensington lock Voltage rating Power consumption Temperature (Operating) Temperature (Non-operating) Dimensions (W x H x D) Weight (Esti.) Multi-languages Accessories TFT LCD 27"W (16:9, 68.6 cm) wide screen 1920 x 1080 0.311 mm 300 cd/m2 ...
VN279QLB Series User Guide for English Edition
Page 27
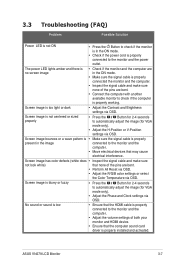
... properly working. ASUS VN279 LCD Monitor 3-7 Screen image has color defects (white does • Inspect the signal cable and make sure none of both your monitor and HDMI device. • Ensure that the computer sound card driver is properly installed and activated. No sound or sound is low • Ensure that the HDMI cable is properly connected to automatically adjust the image (for VGA mode only). • Adjust the Phase and Clock settings via OSD. 3.3 Troubleshooting (FAQ) Problem Possible Solution Power LED is...
... properly working. ASUS VN279 LCD Monitor 3-7 Screen image has color defects (white does • Inspect the signal cable and make sure none of both your monitor and HDMI device. • Ensure that the computer sound card driver is properly installed and activated. No sound or sound is low • Ensure that the HDMI cable is properly connected to automatically adjust the image (for VGA mode only). • Adjust the Phase and Clock settings via OSD. 3.3 Troubleshooting (FAQ) Problem Possible Solution Power LED is...
VN279QLB Series User Guide for English Edition
Page 28
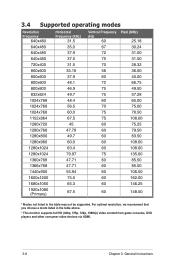
3.4 Supported operating modes Resolution Frequency 640x480 Horizontal Frequency (KHz) 31.5 Vertical Frequency Pixel (MHz) (Hz) 60 25.18 640x480 35.0 67 30.24 640x480 37.9 72 31.50 640x480 37.5 720x400 31.5 75 31....146.25 1920x1080 (Primary) 67.5 60 148.50 * Modes not listed in the table above. * This monitor supports full HD (480p, 576p, 720p, 1080i/p) video content from game consoles, DVD players and other consumer video devices via HDMI. 3-8 Chapter 3: General Instructions For optimal resolution, we recommend that you choose a mode listed in the table may not be...
3.4 Supported operating modes Resolution Frequency 640x480 Horizontal Frequency (KHz) 31.5 Vertical Frequency Pixel (MHz) (Hz) 60 25.18 640x480 35.0 67 30.24 640x480 37.9 72 31.50 640x480 37.5 720x400 31.5 75 31....146.25 1920x1080 (Primary) 67.5 60 148.50 * Modes not listed in the table above. * This monitor supports full HD (480p, 576p, 720p, 1080i/p) video content from game consoles, DVD players and other consumer video devices via HDMI. 3-8 Chapter 3: General Instructions For optimal resolution, we recommend that you choose a mode listed in the table may not be...


