VN279 Series User Guide for English Edition
Page 3
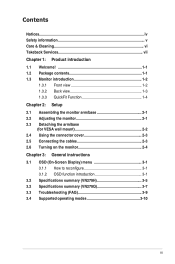
... Front view 1-2 1.3.2 Back view 1-3 1.3.3 QuickFit Function 1-4 Chapter 2: Setup 2.1 Assembling the monitor arm/base 2-1 2.2 Adjusting the monitor 2-1 2.3 Detaching the arm/base for VESA wall mount 2-2 2.4 Using the connector cover 2-3 2.5 Connecting the cables 2-3 2.6 Turning on the monitor 2-4 Chapter 3: General instructions 3.1 OSD (On-Screen Display) menu 3-1 3.1.1 How to reconfigure 3-1 3.1.2 OSD function introduction 3-1 3.2 Specifications summary (VN279H 3-5 3.2 Specifications summary (VN279Q 3-7 3.3 Troubleshooting (FAQ 3-9 3.4 Supported operating modes 3-10...
... Front view 1-2 1.3.2 Back view 1-3 1.3.3 QuickFit Function 1-4 Chapter 2: Setup 2.1 Assembling the monitor arm/base 2-1 2.2 Adjusting the monitor 2-1 2.3 Detaching the arm/base for VESA wall mount 2-2 2.4 Using the connector cover 2-3 2.5 Connecting the cables 2-3 2.6 Turning on the monitor 2-4 Chapter 3: General instructions 3.1 OSD (On-Screen Display) menu 3-1 3.1.1 How to reconfigure 3-1 3.1.2 OSD function introduction 3-1 3.2 Specifications summary (VN279H 3-5 3.2 Specifications summary (VN279Q 3-7 3.3 Troubleshooting (FAQ 3-9 3.4 Supported operating modes 3-10...
VN279 Series User Guide for English Edition
Page 4
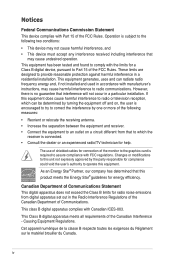
... and receiver. • Connect the equipment to assure compliance with Part 15 of the monitor to the graphics card is required to an outlet on , the user is no guarantee that may cause harmful interference to which can radiate radio frequency energy and, if not installed and used in a particular installation. The use of shielded cables for a Class B digital device, pursuant to...
... and receiver. • Connect the equipment to assure compliance with Part 15 of the monitor to the graphics card is required to an outlet on , the user is no guarantee that may cause harmful interference to which can radiate radio frequency energy and, if not installed and used in a particular installation. The use of shielded cables for a Class B digital device, pursuant to...

VN279 Series User Guide for English Edition
Page 5
... of power supply to your home, consult your dealer or local power company. • Use the appropriate power plug which complies with your dealer immediately. • Slots and openings on a stable surface. • Unplug the unit during a lightning storm or if it by yourself. The dangerous high voltages inside the monitor may become wet. This symbol of power source indicated...
... of power supply to your home, consult your dealer or local power company. • Use the appropriate power plug which complies with your dealer immediately. • Slots and openings on a stable surface. • Unplug the unit during a lightning storm or if it by yourself. The dangerous high voltages inside the monitor may become wet. This symbol of power source indicated...
VN279 Series User Guide for English Edition
Page 6
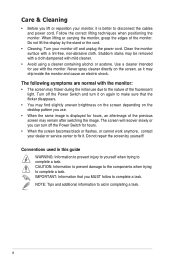
... or acetone. Turn off the Power Switch and turn off and unplug the power cord. Conventions used in this guide WARNING: Information to prevent injury to yourself when trying to aid in completing a task. Turn your monitor off the Power Switch for hours. • When the screen becomes black or flashes, or cannot work anymore, contact your dealer or service center to disconnect the cables and power cord. NOTE: Tips...
... or acetone. Turn off the Power Switch and turn off and unplug the power cord. Conventions used in this guide WARNING: Information to prevent injury to yourself when trying to aid in completing a task. Turn your monitor off the Power Switch for hours. • When the screen becomes black or flashes, or cannot work anymore, contact your dealer or service center to disconnect the cables and power cord. NOTE: Tips...
VN279 Series User Guide for English Edition
Page 9
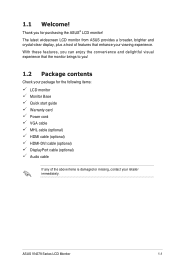
..., contact your retailer immediately. 1.1 Welcome! Thank you ! 1.2 Package contents Check your viewing experience. ASUS VN279 Series LCD Monitor 1-1 With these features, you can enjoy the convenience and delightful visual experience that the monitor brings to you for the following items: LCD monitor Monitor Base Quick start guide Warranty card Power cord VGA cable MHL cable (optional) HDMI cable (optional) HDMI-DVI cable (optional) DisplayPort cable (optional) Audio cable If any of features that enhance your package for purchasing...
..., contact your retailer immediately. 1.1 Welcome! Thank you ! 1.2 Package contents Check your viewing experience. ASUS VN279 Series LCD Monitor 1-1 With these features, you can enjoy the convenience and delightful visual experience that the monitor brings to you for the following items: LCD monitor Monitor Base Quick start guide Warranty card Power cord VGA cable MHL cable (optional) HDMI cable (optional) HDMI-DVI cable (optional) DisplayPort cable (optional) Audio cable If any of features that enhance your package for purchasing...
VN279 Series User Guide for English Edition
Page 10
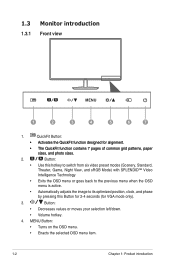
1.3 Monitor introduction 1.3.1 Front view 1 2 3 4 5 6 7 1. Button: • Use this hotkey to switch from six video preset modes (Scenery, Standard, Theater, Game, Night View, and sRGB Mode) with SPLENDID™ Video Intelligence Technology • Exits the OSD menu or goes back to the previous menu when the OSD menu is active. • Automatically adjusts the image to its optimized position, clock, and phase by pressing this Button for 2-4 seconds (for alignment. • The QuickFit...
1.3 Monitor introduction 1.3.1 Front view 1 2 3 4 5 6 7 1. Button: • Use this hotkey to switch from six video preset modes (Scenery, Standard, Theater, Game, Night View, and sRGB Mode) with SPLENDID™ Video Intelligence Technology • Exits the OSD menu or goes back to the previous menu when the OSD menu is active. • Automatically adjusts the image to its optimized position, clock, and phase by pressing this Button for 2-4 seconds (for alignment. • The QuickFit...

VN279 Series User Guide for English Edition
Page 11
...Button) to display VGA, HDMI/MHL-1 (VN279H), HDMI/MHL-2 (VN279H), DisplayPort (VN279Q) signals after you connect VGA, HDMI/MHL, or DisplayPort cable with an HDMI/MHL compatible device. Power Button/Power Indicator • Turns the monitor ON/OFF. • The color definition of the power indicator is for connection for 5 seconds. Button: Increases values or moves your selection right/up. This port connects the power cord. 2. HDMI/MHL port. ASUS VN279 Series LCD Monitor 1-3 AC-IN port. DisplayPort. Brightness hotkey. Input Select Button: Selects an available input source...
...Button) to display VGA, HDMI/MHL-1 (VN279H), HDMI/MHL-2 (VN279H), DisplayPort (VN279Q) signals after you connect VGA, HDMI/MHL, or DisplayPort cable with an HDMI/MHL compatible device. Power Button/Power Indicator • Turns the monitor ON/OFF. • The color definition of the power indicator is for connection for 5 seconds. Button: Increases values or moves your selection right/up. This port connects the power cord. 2. HDMI/MHL port. ASUS VN279 Series LCD Monitor 1-3 AC-IN port. DisplayPort. Brightness hotkey. Input Select Button: Selects an available input source...
VN279 Series User Guide for English Edition
Page 12
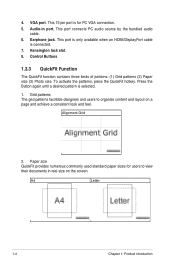
... commonly used standard paper sizes for PC VGA connection. 5. Control Buttons 1.3.3 QuickFit Function The QuickFit function contains three kinds of patterns: (1) Grid patterns (2) Paper size (3) Photo size. To activate the patterns, press the QuickFit hotkey. Press the Button again until a desired pattern is connected. 7. Grid patterns The grid patterns facilitate designers and users to view their documents in port. VGA port. Kensington lock slot. 8. Audio-in real size...
... commonly used standard paper sizes for PC VGA connection. 5. Control Buttons 1.3.3 QuickFit Function The QuickFit function contains three kinds of patterns: (1) Grid patterns (2) Paper size (3) Photo size. To activate the patterns, press the QuickFit hotkey. Press the Button again until a desired pattern is connected. 7. Grid patterns The grid patterns facilitate designers and users to view their documents in port. VGA port. Kensington lock slot. 8. Audio-in real size...
VN279 Series User Guide for English Edition
Page 13
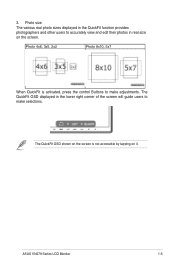
Photo size The various real photo sizes displayed in the QuickFit function provides photographers and other users to make selections. The QuickFit OSD displayed in real size on it. ASUS VN279 Series LCD Monitor 1-5 The QuickFit OSD shown on the screen is activated, press the control Buttons to accurately view and edit their photos in the lower right corner of the screen will guide users to make adjustments. 3. Photo 4x6, 3x5, 2x2 Photo 8x10, 5x7 When QuickFit is not accessible by tapping on the screen.
Photo size The various real photo sizes displayed in the QuickFit function provides photographers and other users to make selections. The QuickFit OSD displayed in real size on it. ASUS VN279 Series LCD Monitor 1-5 The QuickFit OSD shown on the screen is activated, press the control Buttons to accurately view and edit their photos in the lower right corner of the screen will guide users to make adjustments. 3. Photo 4x6, 3x5, 2x2 Photo 8x10, 5x7 When QuickFit is not accessible by tapping on the screen.
VN279 Series User Guide for English Edition
Page 15
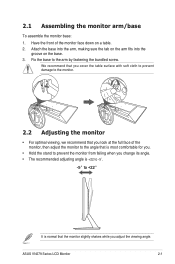
... viewing angle. 2.1 Assembling the monitor arm/base To assemble the monitor base: 1. Have the front of the monitor, then adjust the monitor to the angle that is most comfortable for you. • Hold the stand to prevent the monitor from falling when you change its angle. • The recommended adjusting angle is +22 to -5˚. -5f to the arm by fastening the bundled screw. ASUS VN279 Series LCD Monitor...
... viewing angle. 2.1 Assembling the monitor arm/base To assemble the monitor base: 1. Have the front of the monitor, then adjust the monitor to the angle that is most comfortable for you. • Hold the stand to prevent the monitor from falling when you change its angle. • The recommended adjusting angle is +22 to -5˚. -5f to the arm by fastening the bundled screw. ASUS VN279 Series LCD Monitor...

VN279 Series User Guide for English Edition
Page 16
... (Screw size: M4 x 10 mm) 2-2 Chapter 2: Setup 2.3 Detaching the arm/base (for VESA wall mount) The detachable arm/base of the monitor face down on the hinge (Figure 4), then remove the hinge. 1 2 Figure 1 Figure 2 Figure 3 Figure 4 • We recommend that you cover the table surface with soft cloth to prevent damage to the monitor. • Hold the stand while removing the screws. • The VESA wall mount kit...
... (Screw size: M4 x 10 mm) 2-2 Chapter 2: Setup 2.3 Detaching the arm/base (for VESA wall mount) The detachable arm/base of the monitor face down on the hinge (Figure 4), then remove the hinge. 1 2 Figure 1 Figure 2 Figure 3 Figure 4 • We recommend that you cover the table surface with soft cloth to prevent damage to the monitor. • Hold the stand while removing the screws. • The VESA wall mount kit...

VN279 Series User Guide for English Edition
Page 17
...the power cord securely to the monitor's AC input port, the other end to its center. 1 1 2 • To assemble the connector cover: a. Connect the cables as the following instructions: VN279H VN279Q DisplayPort HDMI VGA Earphone jack Audio-in • To connect the power cord: connect one end of the cover into the monitor. ASUS VN279 Series LCD Monitor 2-3 Push the connector cover up to a power outlet. Lift the connector cover form its original position. 2.5 Connecting the cables 1. Pull the connector cover downwards. 2.4 Using the connector cover • To remove...
...the power cord securely to the monitor's AC input port, the other end to its center. 1 1 2 • To assemble the connector cover: a. Connect the cables as the following instructions: VN279H VN279Q DisplayPort HDMI VGA Earphone jack Audio-in • To connect the power cord: connect one end of the cover into the monitor. ASUS VN279 Series LCD Monitor 2-3 Push the connector cover up to a power outlet. Lift the connector cover form its original position. 2.5 Connecting the cables 1. Pull the connector cover downwards. 2.4 Using the connector cover • To remove...
VN279 Series User Guide for English Edition
Page 18
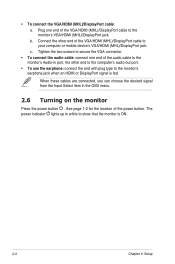
... the VGA/HDMI (MHL)/DisplayPort cable to the monitor's earphone jack when an HDMI or DisplayPort signal is ON. 2-4 Chapter 2: Setup Connect the other end to the computer's audio-out port. • To use the earphone: connect the end with plug type to the monitor's VGA/HDMI (MHL)/DisplayPort jack. c. The power indicator lights up in the OSD menu. 2.6 Turning on the monitor Press the power button . b. Plug one end of the audio cable to the monitor's Audio-in port...
... the VGA/HDMI (MHL)/DisplayPort cable to the monitor's earphone jack when an HDMI or DisplayPort signal is ON. 2-4 Chapter 2: Setup Connect the other end to the computer's audio-out port. • To use the earphone: connect the end with plug type to the monitor's VGA/HDMI (MHL)/DisplayPort jack. c. The power indicator lights up in the OSD menu. 2.6 Turning on the monitor Press the power button . b. Plug one end of the audio cable to the monitor's Audio-in port...

VN279 Series User Guide for English Edition
Page 21
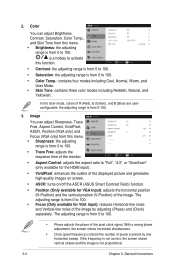
... function. 4. Each mode has the Reset selection allowing you can select for viewing photos and graphics from PCs. • In the Standard Mode, the ASCR, Saturation ,Sharpness functions and Skin Tone are not user-configurable. • In the sRGB Mode, the Saturation, Color Temp., Skin Tone, Sharpness, Brightness, Contrast and ASCR functions are not userconfigurable. ASUS VN279 LCD Monitor 3-1 3.1 OSD (On-Screen Display) menu 3.1.1 How to...
... function. 4. Each mode has the Reset selection allowing you can select for viewing photos and graphics from PCs. • In the Standard Mode, the ASCR, Saturation ,Sharpness functions and Skin Tone are not user-configurable. • In the sRGB Mode, the Saturation, Color Temp., Skin Tone, Sharpness, Brightness, Contrast and ASCR functions are not userconfigurable. ASUS VN279 LCD Monitor 3-1 3.1 OSD (On-Screen Display) menu 3.1.1 How to...
VN279 Series User Guide for English Edition
Page 22
... (pixel frequency) controls the number of R (Red), G (Green), and B (Blue) are userconfigurable; is a hotkey to activate this menu. • Brightness: the adjusting range is from 0 to 100. • Trace Free: adjusts the response time of the monitor. • Aspect Control: adjusts the aspect ratio to 100. • Phase adjusts the phase of the image by one horizontal sweep. the adjusting range is from 0 to 100. • Focus (Only available for VGA input): adjusts the horizontal position (H-Position...
... (pixel frequency) controls the number of R (Red), G (Green), and B (Blue) are userconfigurable; is a hotkey to activate this menu. • Brightness: the adjusting range is from 0 to 100. • Trace Free: adjusts the response time of the monitor. • Aspect Control: adjusts the aspect ratio to 100. • Phase adjusts the phase of the image by one horizontal sweep. the adjusting range is from 0 to 100. • Focus (Only available for VGA input): adjusts the horizontal position (H-Position...
VN279 Series User Guide for English Edition
Page 24
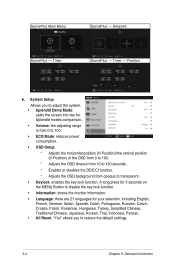
...; Splendid Demo Mode: splits the screen into two for Splendid modes comparison. • Volume: the adjusting range is from 0 to 100. • ECO Mode: reduces power consumption. • OSD Setup: * Adjusts the horizontal position (H-Position)/the vertical position (V-Position) of the OSD from 0 to 100. * Adjusts the OSD timeout from 10 to 120 seconds. * Enables or disables the DDC/CI function. * Adjusts the OSD background from opaque to restore the default settings. 3-4 Chapter 3: General Instructions Timer...
...; Splendid Demo Mode: splits the screen into two for Splendid modes comparison. • Volume: the adjusting range is from 0 to 100. • ECO Mode: reduces power consumption. • OSD Setup: * Adjusts the horizontal position (H-Position)/the vertical position (V-Position) of the OSD from 0 to 100. * Adjusts the OSD timeout from 10 to 120 seconds. * Enables or disables the DDC/CI function. * Adjusts the OSD background from opaque to restore the default settings. 3-4 Chapter 3: General Instructions Timer...
VN279 Series User Guide for English Edition
Page 25
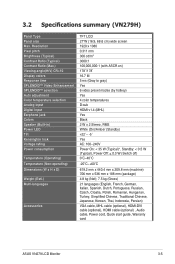
Resolution Pixel pitch Brightness (Typical) Contrast Ratio (Typical) Contrast Ratio (Max.) Viewing angle(H/V) CR>10 Display colors Response time SPLENDID™ Video Enhancement SPLENDID™ selection Auto adjustment Color temperature selection Analog input Digital input Earphone jack Colors Speaker (Built-in) Power LED Tilt Kensington lock Voltage rating Power consumption Temperature (Operating) Temperature (Non-operating) Dimensions (W x H x D) Weight (Esti.) Multi-languages Accessories TFT LCD 27"W (16:9, 68.6 cm) wide screen 1920 x 1080 0.311 mm 300 cd/m2 3000:1 100,000,000...
Resolution Pixel pitch Brightness (Typical) Contrast Ratio (Typical) Contrast Ratio (Max.) Viewing angle(H/V) CR>10 Display colors Response time SPLENDID™ Video Enhancement SPLENDID™ selection Auto adjustment Color temperature selection Analog input Digital input Earphone jack Colors Speaker (Built-in) Power LED Tilt Kensington lock Voltage rating Power consumption Temperature (Operating) Temperature (Non-operating) Dimensions (W x H x D) Weight (Esti.) Multi-languages Accessories TFT LCD 27"W (16:9, 68.6 cm) wide screen 1920 x 1080 0.311 mm 300 cd/m2 3000:1 100,000,000...
VN279 Series User Guide for English Edition
Page 27
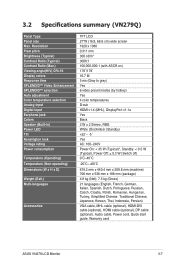
... Specifications summary (VN279Q) Panel Type Panel size Max. Resolution Pixel pitch Brightness (Typical) Contrast Ratio (Typical) Contrast Ratio (Max.) Viewing angle(H/V) CR>10 Display colors Response time SPLENDID™ Video Enhancement SPLENDID™ selection Auto adjustment Color temperature selection Analog input Digital input Earphone jack Colors Speaker (Built-in) Power LED Tilt Kensington lock Voltage rating Power consumption Temperature (Operating) Temperature (Non-operating) Dimensions (W x H x D) Weight (Esti.) Multi-languages Accessories TFT LCD 27"W (16:9, 68.6 cm) wide screen...
... Specifications summary (VN279Q) Panel Type Panel size Max. Resolution Pixel pitch Brightness (Typical) Contrast Ratio (Typical) Contrast Ratio (Max.) Viewing angle(H/V) CR>10 Display colors Response time SPLENDID™ Video Enhancement SPLENDID™ selection Auto adjustment Color temperature selection Analog input Digital input Earphone jack Colors Speaker (Built-in) Power LED Tilt Kensington lock Voltage rating Power consumption Temperature (Operating) Temperature (Non-operating) Dimensions (W x H x D) Weight (Esti.) Multi-languages Accessories TFT LCD 27"W (16:9, 68.6 cm) wide screen...

VN279 Series User Guide for English Edition
Page 29
... connected to the monitor and the computer. • Move electrical devices that the computer sound card driver is not centered or sized properly • Press the Button for 2-4 seconds to the monitor and the power outlet. Screen image is properly installed and activated. Screen image has color defects (white does • Inspect the signal cable and make sure none of the pins are in the ON mode. • Check if the power cord...
... connected to the monitor and the computer. • Move electrical devices that the computer sound card driver is not centered or sized properly • Press the Button for 2-4 seconds to the monitor and the power outlet. Screen image is properly installed and activated. Screen image has color defects (white does • Inspect the signal cable and make sure none of the pins are in the ON mode. • Check if the power cord...
VN279 Series User Guide for English Edition
Page 30
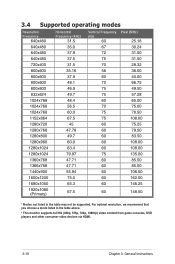
3.4 Supported operating modes Resolution Frequency 640x480 Horizontal Frequency (KHz) 31.5 Vertical Frequency Pixel (MHz) (Hz) 60 25.18 640x480 35.0 67 30.24 640x480 37.9 72 31.50 640x480 37.5 720x400 31.5 75 31.50....25 1920x1080 (Primary) 67.5 60 148.50 * Modes not listed in the table above. * This monitor supports full HD (480p, 576p, 720p, 1080i/p) video content from game consoles, DVD players and other consumer video devices via HDMI. 3-10 Chapter 3: General Instructions For optimal resolution, we recommend that you choose a mode listed in the table may not be...
3.4 Supported operating modes Resolution Frequency 640x480 Horizontal Frequency (KHz) 31.5 Vertical Frequency Pixel (MHz) (Hz) 60 25.18 640x480 35.0 67 30.24 640x480 37.9 72 31.50 640x480 37.5 720x400 31.5 75 31.50....25 1920x1080 (Primary) 67.5 60 148.50 * Modes not listed in the table above. * This monitor supports full HD (480p, 576p, 720p, 1080i/p) video content from game consoles, DVD players and other consumer video devices via HDMI. 3-10 Chapter 3: General Instructions For optimal resolution, we recommend that you choose a mode listed in the table may not be...


