VG278HV Series User Guide for English Edition
Page 2
... view 1-4 2.1 Assembling the monitor base 2-1 2.2 Adjusting the monitor 2-2 2.3 Detaching the arm (for identification or explanation and to the owners' benefit, without the express written permission of ASUSTeK COMPUTER INC. ("ASUS"). or (2) the serial number of their respective companies, and are used only for VESA wall mount 2-3 3.1 OSD (On-Screen Display) menu 3-1 3.1.1 How to infringe. SPECIFICATIONS AND INFORMATION CONTAINED IN THIS MANUAL ARE FURNISHED FOR INFORMATIONAL USE ONLY, AND ARE SUBJECT TO CHANGE...
... view 1-4 2.1 Assembling the monitor base 2-1 2.2 Adjusting the monitor 2-2 2.3 Detaching the arm (for identification or explanation and to the owners' benefit, without the express written permission of ASUSTeK COMPUTER INC. ("ASUS"). or (2) the serial number of their respective companies, and are used only for VESA wall mount 2-3 3.1 OSD (On-Screen Display) menu 3-1 3.1.1 How to infringe. SPECIFICATIONS AND INFORMATION CONTAINED IN THIS MANUAL ARE FURNISHED FOR INFORMATIONAL USE ONLY, AND ARE SUBJECT TO CHANGE...

VG278HV Series User Guide for English Edition
Page 3
... user is connected. • Consult the dealer or an experienced radio/TV technician for radio noise emissions from digital apparatus set out in accordance with the limits for a Class B digital device, pursuant to radio communications. If this equipment does cause harmful interference to radio or television reception, which can radiate radio frequency energy and, if not installed...
... user is connected. • Consult the dealer or an experienced radio/TV technician for radio noise emissions from digital apparatus set out in accordance with the limits for a Class B digital device, pursuant to radio communications. If this equipment does cause harmful interference to radio or television reception, which can radiate radio frequency energy and, if not installed...

VG278HV Series User Guide for English Edition
Page 4
... to open the monitor cabinet. If you are not sure of the type of power supply to fix it will protect the monitor from the type of any damage, contact your local power standard. • Do not overload power strips and extension cords. If you encounter technical problems with the monitor, contact a qualified service technician or your retailer. • Before using the product, make...
... to open the monitor cabinet. If you are not sure of the type of power supply to fix it will protect the monitor from the type of any damage, contact your local power standard. • Do not overload power strips and extension cords. If you encounter technical problems with the monitor, contact a qualified service technician or your retailer. • Before using the product, make...
VG278HV Series User Guide for English Edition
Page 5
Turn your monitor off the Power Switch for hours, an afterimage of the previous screen may remain after switching the image. Never spray cleaner directly on the screen, as it is displayed for hours. • When the screen becomes black or flashes, or cannot work anymore, contact your dealer or service center to fix it on the desktop pattern you use with mild cleaner. • Avoid using a cleaner...
Turn your monitor off the Power Switch for hours, an afterimage of the previous screen may remain after switching the image. Never spray cleaner directly on the screen, as it is displayed for hours. • When the screen becomes black or flashes, or cannot work anymore, contact your dealer or service center to fix it on the desktop pattern you use with mild cleaner. • Avoid using a cleaner...
VG278HV Series User Guide for English Edition
Page 7
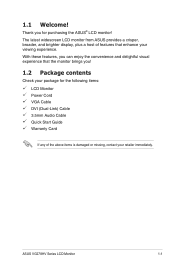
... damaged or missing, contact your viewing experience. ASUS VG278HV Series LCD Monitor 1-1 With these features, you can enjoy the convenience and delightful visual experience that enhance your retailer immediately. 1.1 Welcome! Thank you ! 1.2 Package contents Check your package for the following items: LCD Monitor Power Cord VGA Cable DVI (Dual-Link) Cable 3.5mm Audio Cable Quick Start Guide Warranty Card If any of features that the monitor brings you for purchasing the ASUS® LCD monitor!
... damaged or missing, contact your viewing experience. ASUS VG278HV Series LCD Monitor 1-1 With these features, you can enjoy the convenience and delightful visual experience that enhance your retailer immediately. 1.1 Welcome! Thank you ! 1.2 Package contents Check your package for the following items: LCD Monitor Power Cord VGA Cable DVI (Dual-Link) Cable 3.5mm Audio Cable Quick Start Guide Warranty Card If any of features that the monitor brings you for purchasing the ASUS® LCD monitor!

VG278HV Series User Guide for English Edition
Page 8
Volume hotkey 4. Button: 1-2 Chapter 1: Product Introduction 1.3 Monitor introduction 1.3.1 Front view 1 234 56 7 1. Button: • Press this button to decrease the value of the function selected or move to the previous menu when the OSD menu is active. 2. Button: • Press this button to automatically adjust the image to its optimized position, clock, and phase (for VGA mode only). 3. • • Button: Press this hotkey to switch from six video preset modes (Scenery...
Volume hotkey 4. Button: 1-2 Chapter 1: Product Introduction 1.3 Monitor introduction 1.3.1 Front view 1 234 56 7 1. Button: • Press this button to decrease the value of the function selected or move to the previous menu when the OSD menu is active. 2. Button: • Press this button to automatically adjust the image to its optimized position, clock, and phase (for VGA mode only). 3. • • Button: Press this hotkey to switch from six video preset modes (Scenery...
VG278HV Series User Guide for English Edition
Page 9
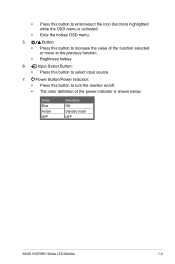
... ON Standby mode OFF ASUS VG278HV Series LCD Monitor 1-3 Power Button/Power Indicator: • Press this button to turn the monitor on/off. • The color definition of the power indicator is activated. • Exits the hotkey OSD menu. 5. • • Button: Press this button to increase the value of the function selected or move to the previous function. Brightness hotkey 6. Input Select Button: • Press this button to select input source. 7. • Press...
... ON Standby mode OFF ASUS VG278HV Series LCD Monitor 1-3 Power Button/Power Indicator: • Press this button to turn the monitor on/off. • The color definition of the power indicator is activated. • Exits the hotkey OSD menu. 5. • • Button: Press this button to increase the value of the function selected or move to the previous function. Brightness hotkey 6. Input Select Button: • Press this button to select input source. 7. • Press...

VG278HV Series User Guide for English Edition
Page 10
HDMI-IN port: This port is for earphone audio connection. 1-4 Chapter 1: Product Introduction Earphone-Out Jack: This 3.5mm stereo jack is for PC VGA connection. 4. 1.3.2 Back view 1 23 4 5 67 Rear connectors 1. DVI port: This 24-pin port is for connection with an HDMI compatible device. 6. AC-IN port: This port connects the power cord. 3. VGA port: This 15-pin port is for PC audio connection. 7. PC Audio-In Jack: This 3.5mm stereo jack is for PC (Personal Computer) DVI-D digital signal connection. 5. Kensington lock slot. 2.
HDMI-IN port: This port is for earphone audio connection. 1-4 Chapter 1: Product Introduction Earphone-Out Jack: This 3.5mm stereo jack is for PC VGA connection. 4. 1.3.2 Back view 1 23 4 5 67 Rear connectors 1. DVI port: This 24-pin port is for connection with an HDMI compatible device. 6. AC-IN port: This port connects the power cord. 3. VGA port: This 15-pin port is for PC audio connection. 7. PC Audio-In Jack: This 3.5mm stereo jack is for PC (Personal Computer) DVI-D digital signal connection. 5. Kensington lock slot. 2.

VG278HV Series User Guide for English Edition
Page 11
Attach the base to joint the base with the screws to the arm. 2. You can easily tighten the screws by fingers. 3. Remove the height adjustment lock from the arm. 1 2 3 The height adjustment lock should NEVER be removed BEFORE you place the monitor VERTICALLY on a flat and clean table. ASUS VG278HV Series LCD Monitor 2-1 Fix with the arm. 2.1 Assembling the monitor base To assemble the monitor base: 1.
Attach the base to joint the base with the screws to the arm. 2. You can easily tighten the screws by fingers. 3. Remove the height adjustment lock from the arm. 1 2 3 The height adjustment lock should NEVER be removed BEFORE you place the monitor VERTICALLY on a flat and clean table. ASUS VG278HV Series LCD Monitor 2-1 Fix with the arm. 2.1 Assembling the monitor base To assemble the monitor base: 1.

VG278HV Series User Guide for English Edition
Page 12
2.2 Adjusting the monitor • For optimal viewing, we recommend that you look at the full face of the monitor, then adjust the monitor to the angle that is most comfortable for you. • Hold the base to prevent the monitor from falling when you change its angle. • You can tilt the monitor's from -5˚ to +15˚, swivel from left-to-right for 150˚, and lift the monitor's height for about 100mm. -5° ~ +15° 150° 150° 0° 100mm It is normal that the monitor slightly shakes while you adjust the viewing angle. 2-2 Chapter 2: Setup
2.2 Adjusting the monitor • For optimal viewing, we recommend that you look at the full face of the monitor, then adjust the monitor to the angle that is most comfortable for you. • Hold the base to prevent the monitor from falling when you change its angle. • You can tilt the monitor's from -5˚ to +15˚, swivel from left-to-right for 150˚, and lift the monitor's height for about 100mm. -5° ~ +15° 150° 150° 0° 100mm It is normal that the monitor slightly shakes while you adjust the viewing angle. 2-2 Chapter 2: Setup

VG278HV Series User Guide for English Edition
Page 13
....4kg (Screw size: M4 x 10 mm). Carefully put the front of this monitor is purchased separately. • Use only the UL Listed Wall Mount Bracket with soft cloth to prevent damage to its lowest height, and then insert the height adjustment lock. 3. 2.3 Detaching the arm (for VESA wall mount. Use a screwdriver to remove the four screwdrivers on a flat and clean table. 4. To detach the arm: 1. ASUS VG278HV Series LCD Monitor 2-3 Disconnect power and signal cables. 2.
....4kg (Screw size: M4 x 10 mm). Carefully put the front of this monitor is purchased separately. • Use only the UL Listed Wall Mount Bracket with soft cloth to prevent damage to its lowest height, and then insert the height adjustment lock. 3. 2.3 Detaching the arm (for VESA wall mount. Use a screwdriver to remove the four screwdrivers on a flat and clean table. 4. To detach the arm: 1. ASUS VG278HV Series LCD Monitor 2-3 Disconnect power and signal cables. 2.
VG278HV Series User Guide for English Edition
Page 14
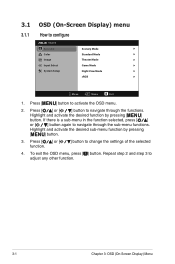
...-menu in the function selected, press [ ] or [ ] button again to navigate through the sub-menu functions. Repeat step 2 and step 3 to activate the OSD menu. 2. 3.1 3.1.1 OSD (On-Screen Display) menu How to change the settings of the selected 4. Press [ ] or [ ] button to navigate through the functions. Press [ ] or [ function. ] button to configure VG278 Splendid Color Image Input Select System Setup Scenery Mode Standard Mode Theater Mode Game Mode Night View Mode sRGB Move Menu...
...-menu in the function selected, press [ ] or [ ] button again to navigate through the sub-menu functions. Repeat step 2 and step 3 to activate the OSD menu. 2. 3.1 3.1.1 OSD (On-Screen Display) menu How to change the settings of the selected 4. Press [ ] or [ ] button to navigate through the functions. Press [ ] or [ function. ] button to configure VG278 Splendid Color Image Input Select System Setup Scenery Mode Standard Mode Theater Mode Game Mode Night View Mode sRGB Move Menu...
VG278HV Series User Guide for English Edition
Page 15
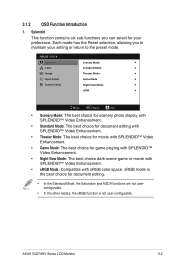
... SPLENDID™ Video Enhancement. • sRGB Mode: Compatible with sRGB color space. 3.1.2 OSD Function Introduction 1. Splendid This function contains six sub-functions you to maintain your preference. VG278 Splendid Color Image Input Select System Setup Scenery Mode Standard Mode Theater Mode Game Mode Night View Mode sRGB Move Menu Exit • Scenery Mode: The best choice for scenery photo display with SPLENDID™ Video Enhancement. • Standard Mode: The best choice for...
... SPLENDID™ Video Enhancement. • sRGB Mode: Compatible with sRGB color space. 3.1.2 OSD Function Introduction 1. Splendid This function contains six sub-functions you to maintain your preference. VG278 Splendid Color Image Input Select System Setup Scenery Mode Standard Mode Theater Mode Game Mode Night View Mode sRGB Move Menu Exit • Scenery Mode: The best choice for scenery photo display with SPLENDID™ Video Enhancement. • Standard Mode: The best choice for...
VG278HV Series User Guide for English Edition
Page 16
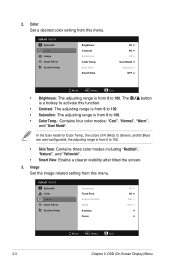
... color modes including "Reddish", "Natural", and "Yellowish". • Smart View: Enable a clearer visibility after tilted the screen. 3. The is from this menu. VG278 Splendid Sharpness 50 Color Trace Free 60 Image Aspect Control Full Input Select ASCR OFF System Setup Position Focus Move Menu Exit 3-3 Chapter 3: OSD (On-Screen Display) Menu Image Set the image related setting from this function. Color Set a desired color setting from 0 to activate this menu. In the User mode for Color Temp., the colors of R (Red), G (Green), and B (Blue...
... color modes including "Reddish", "Natural", and "Yellowish". • Smart View: Enable a clearer visibility after tilted the screen. 3. The is from this menu. VG278 Splendid Sharpness 50 Color Trace Free 60 Image Aspect Control Full Input Select ASCR OFF System Setup Position Focus Move Menu Exit 3-3 Chapter 3: OSD (On-Screen Display) Menu Image Set the image related setting from this function. Color Set a desired color setting from 0 to activate this menu. In the User mode for Color Temp., the colors of R (Red), G (Green), and B (Blue...
VG278HV Series User Guide for English Edition
Page 17
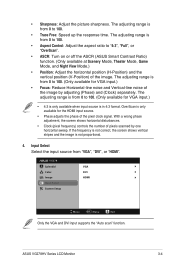
...View Mode.) • Position: Adjust the horizontal position (H-Position) and the vertical position (V-Position) of pixels scanned by adjusting (Phase) and (Clock) separately. With a wrong phase adjustment, the screen shows horizontal disturbances. • Clock (pixel frequency) controls the number of the image. OverScan is from "VGA", "DVI", or "HDMI". The adjusting range is only available for VGA input.) • Focus: Reduce Horizontal-line noise and Vertical-line noise of the pixel clock signal. ASUS VG278HV Series LCD Monitor 3-4 • Sharpness: Adjust the picture...
...View Mode.) • Position: Adjust the horizontal position (H-Position) and the vertical position (V-Position) of pixels scanned by adjusting (Phase) and (Clock) separately. With a wrong phase adjustment, the screen shows horizontal disturbances. • Clock (pixel frequency) controls the number of the image. OverScan is from "VGA", "DVI", or "HDMI". The adjusting range is only available for VGA input.) • Focus: Reduce Horizontal-line noise and Vertical-line noise of the pixel clock signal. ASUS VG278HV Series LCD Monitor 3-4 • Sharpness: Adjust the picture...

VG278HV Series User Guide for English Edition
Page 18
Its brightness is ON. VG278 Splendid Color Image Input Select System Setup Splendid Demo Mode Volume ECO Mode OSD Setup Language Information All Reset OFF 50 OFF English Move Menu Exit • Splendid Demo Mode: Splits the screen into two for power saving. (Some gray levels may not be distinguished if ECO is lower than that when setting the Contrast Ratio to 100.) • OSD Setup: • H-Position / V-Position: Adjusts the horizontal position (H-Position) or the vertical position (V-Position) of the OSD from...
Its brightness is ON. VG278 Splendid Color Image Input Select System Setup Splendid Demo Mode Volume ECO Mode OSD Setup Language Information All Reset OFF 50 OFF English Move Menu Exit • Splendid Demo Mode: Splits the screen into two for power saving. (Some gray levels may not be distinguished if ECO is lower than that when setting the Contrast Ratio to 100.) • OSD Setup: • H-Position / V-Position: Adjusts the horizontal position (H-Position) or the vertical position (V-Position) of the OSD from...
VG278HV Series User Guide for English Edition
Page 19
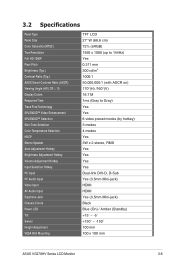
... Panel Size Color Saturation(NTSC) True Resolution Full HD 1080P Pixel Pitch Brightness (Typ.) Contrast Ratio (Typ.) ASUS Smart Contrast Ratio (ASCR) Viewing Angle (H/V) CR≧10 Display Colors Response Time Trace Free Technology SPLENDID™ Video Enhancement SPLENDID™ Selection Skin-Tone Selection Color Temperature Selection HDCP Stereo Speaker Auto Adjustment Hotkey Brightness Adjustment Hotkey Volume Adjustment Hotkey Input Selection Hotkey PC Input PC Audio Input Video Input AV Audio Input Earphone Jack Chassis Colors Power LED Tilt Swivel Height Adjustment VESA Wall Mounting...
... Panel Size Color Saturation(NTSC) True Resolution Full HD 1080P Pixel Pitch Brightness (Typ.) Contrast Ratio (Typ.) ASUS Smart Contrast Ratio (ASCR) Viewing Angle (H/V) CR≧10 Display Colors Response Time Trace Free Technology SPLENDID™ Video Enhancement SPLENDID™ Selection Skin-Tone Selection Color Temperature Selection HDCP Stereo Speaker Auto Adjustment Hotkey Brightness Adjustment Hotkey Volume Adjustment Hotkey Input Selection Hotkey PC Input PC Audio Input Video Input AV Audio Input Earphone Jack Chassis Colors Power LED Tilt Swivel Height Adjustment VESA Wall Mounting...

VG278HV Series User Guide for English Edition
Page 20
Kensington Lock AC Input Voltage Power Consumption Note Temperature (Operating) Temperature (Non-operating) Dimension (W x H x D) Weight (Esti.) Regulation approvals Yes AC: 100 ~ 240V Power On: < 29.5 W* Standby: < 1 W (Typ.) Power Off: < 1 W * Based on Energy Star 6.0 standard 0˚C ~ +35˚C -20˚C ~ +60˚C 643 x 438 x 250 mm (machine) 711 x 227 x 540 mm (package) 8.1kg (Net); 11.6kg (Gross) ErP, UL/cUL, CB, CE, FCC, CCC, Gost-R, C-Tick, VCCI, J-MOSS, PSB, RoHS, WEEE, Windows 7 WHQL 3-7 Chapter 3: OSD (On-Screen Display) Menu
Kensington Lock AC Input Voltage Power Consumption Note Temperature (Operating) Temperature (Non-operating) Dimension (W x H x D) Weight (Esti.) Regulation approvals Yes AC: 100 ~ 240V Power On: < 29.5 W* Standby: < 1 W (Typ.) Power Off: < 1 W * Based on Energy Star 6.0 standard 0˚C ~ +35˚C -20˚C ~ +60˚C 643 x 438 x 250 mm (machine) 711 x 227 x 540 mm (package) 8.1kg (Net); 11.6kg (Gross) ErP, UL/cUL, CB, CE, FCC, CCC, Gost-R, C-Tick, VCCI, J-MOSS, PSB, RoHS, WEEE, Windows 7 WHQL 3-7 Chapter 3: OSD (On-Screen Display) Menu
VG278HV Series User Guide for English Edition
Page 21
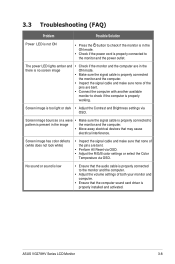
... computer sound card driver is present in the image the monitor and the computer. • Move away electrical devices that none of the pins are bent. • Perform All Reset via OSD. • Adjust the R/G/B color settings or select the Color Temperature via OSD. ASUS VG278HV Series LCD Monitor 3-8 No sound or sound is low • Ensure that the audio cable is properly connected to pattern is properly installed and activated. Screen image is too light...
... computer sound card driver is present in the image the monitor and the computer. • Move away electrical devices that none of the pins are bent. • Perform All Reset via OSD. • Adjust the R/G/B color settings or select the Color Temperature via OSD. ASUS VG278HV Series LCD Monitor 3-8 No sound or sound is low • Ensure that the audio cable is properly connected to pattern is properly installed and activated. Screen image is too light...
VG278HV Series User Guide for English Edition
Page 23
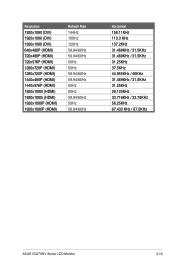
... 50Hz 50Hz 59.94/60Hz 50Hz 59.94/60Hz Horizontal 158.11KHz 113.3 KHz 137.2KHz 31.469KHz / 31.5KHz 31.469KHz / 31.5KHz 31.25KHz 37.5KHz 44.955KHz / 45KHz 31.469KHz / 31.5KHz 31.25KHz 28.125KHz 33.716KHz / 33.75KHz 56.25KHz 67.433 KHz / 67.5KHz ASUS VG278HV Series LCD Monitor 3-10
... 50Hz 50Hz 59.94/60Hz 50Hz 59.94/60Hz Horizontal 158.11KHz 113.3 KHz 137.2KHz 31.469KHz / 31.5KHz 31.469KHz / 31.5KHz 31.25KHz 37.5KHz 44.955KHz / 45KHz 31.469KHz / 31.5KHz 31.25KHz 28.125KHz 33.716KHz / 33.75KHz 56.25KHz 67.433 KHz / 67.5KHz ASUS VG278HV Series LCD Monitor 3-10


