User Manual
Page 9
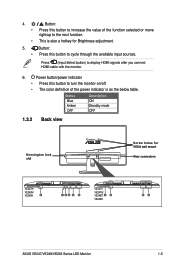
... next function. 4. • • Button: Press this button to increase the value of the power indicator is also a hotkey for VESA wall mount Rear connectors VE247H/ VE248H/ VE249H 2 134 5 6 VE247T/ VE247S/ VE248T/ 1 2 VE248S 56 ASUS VE247/VE248/VE249 Series LED Monitor 1-3
... next function. 4. • • Button: Press this button to increase the value of the power indicator is also a hotkey for VESA wall mount Rear connectors VE247H/ VE248H/ VE249H 2 134 5 6 VE247T/ VE247S/ VE248T/ 1 2 VE248S 56 ASUS VE247/VE248/VE249 Series LED Monitor 1-3
User Manual
Page 13
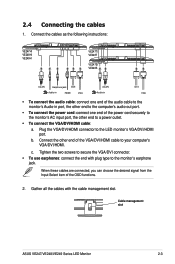
.../DVI/HDMI cable: a. Gather all the cables with plug type to your computer's VGA/DVI/HDMI. Connect the cables as the following instructions: VE247H/ VE248H/ VE249H VE247T/ VE248T VE247S/ VE248S Earphone jack Audio-in HDMI VGA Audio-in VGA • To connect the audio cable: connect one...connect one end of the power cord securely to the monitor's AC input port, the other end of the OSD functions. 2. Cable management slot ASUS VE247/VE248/VE249 Series LED Monitor 2-3 c. b. Tighten the two screws to the LED monitor's VGA/DVI/HDMI port. When these cables are connected...
.../DVI/HDMI cable: a. Gather all the cables with plug type to your computer's VGA/DVI/HDMI. Connect the cables as the following instructions: VE247H/ VE248H/ VE249H VE247T/ VE248T VE247S/ VE248S Earphone jack Audio-in HDMI VGA Audio-in VGA • To connect the audio cable: connect one...connect one end of the power cord securely to the monitor's AC input port, the other end of the OSD functions. 2. Cable management slot ASUS VE247/VE248/VE249 Series LED Monitor 2-3 c. b. Tighten the two screws to the LED monitor's VGA/DVI/HDMI port. When these cables are connected...


