
User Guide
Page 8
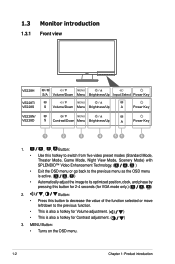
.... ( ) This is active. ( , ) Automatically adjust the image to its optimized position, clock, and phase by pressing this button for 2-4 seconds (for Contrast adjustment. ( ) 3. 1.3 Monitor introduction 1.3.1 Front view VE228H VE228T/ VE228S S/A Volume/Down Menu Brightness/Up Input Select Power Key S Volume/Down Menu Brightness/Up A Power Key VE228N/ VE228D S Contrast/Down Menu Brightness/Up...
.... ( ) This is active. ( , ) Automatically adjust the image to its optimized position, clock, and phase by pressing this button for 2-4 seconds (for Contrast adjustment. ( ) 3. 1.3 Monitor introduction 1.3.1 Front view VE228H VE228T/ VE228S S/A Volume/Down Menu Brightness/Up Input Select Power Key S Volume/Down Menu Brightness/Up A Power Key VE228N/ VE228D S Contrast/Down Menu Brightness/Up...
User Guide
Page 9
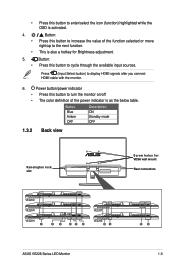
... to enter/select the icon (function) highlighted while the OSD is also a hotkey for VESA wall mount Rear connectors VE228D VE228N VE228H 1 23 45 6 VE228T VE228S 31 56 ASUS VE228 Series LED Monitor 1-3 This is activated. 4. • • Button: Press this button to the next function. Status Blue Amber OFF Description ON Standby mode...
... to enter/select the icon (function) highlighted while the OSD is also a hotkey for VESA wall mount Rear connectors VE228D VE228N VE228H 1 23 45 6 VE228T VE228S 31 56 ASUS VE228 Series LED Monitor 1-3 This is activated. 4. • • Button: Press this button to the next function. Status Blue Amber OFF Description ON Standby mode...
User Guide
Page 13
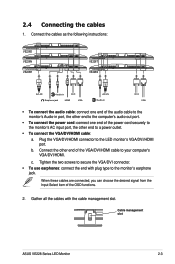
... connect the VGA/DVI/HDMI cable: a. Gather all the cables with plug type to the monitor's AC input port, the other end of the OSD functions. 2. Connect the cables as the following instructions: VE228D VE228N VE228H VE228T VE228S Audio-in Earphone jack HDMI VGA Audio-in VGA • To connect the audio cable... to secure the VGA/DVI connector. • To use earphones: connect the end with the cable management slot. Connect the other end to the LED monitor's VGA/DVI/HDMI port. Cable management slot ASUS VE228 Series LED Monitor 2-3 2.4 Connecting the cables 1.
... connect the VGA/DVI/HDMI cable: a. Gather all the cables with plug type to the monitor's AC input port, the other end of the OSD functions. 2. Connect the cables as the following instructions: VE228D VE228N VE228H VE228T VE228S Audio-in Earphone jack HDMI VGA Audio-in VGA • To connect the audio cable... to secure the VGA/DVI connector. • To use earphones: connect the end with the cable management slot. Connect the other end to the LED monitor's VGA/DVI/HDMI port. Cable management slot ASUS VE228 Series LED Monitor 2-3 2.4 Connecting the cables 1.


